Universal Material
In older versions of OctaneRender®, there were some restrictions on combining certain surface effect types when creating materials. For example, it was not possible to use the "emission" feature when using glossy or specular material, or not to use "specular" and "glossy" at the same time. Instead, these materials were created separately in conjunction with a mix (deprecated) or blend material to pull it all together. The Universal Material eliminates all of these restrictions and provides a highly flexible and creative solution for material creation.
The Universal Material does render a bit slower than the original Octane materials, but most will find the versatility worth it. Still, if one of the more limited materials will get the job done, it would be best to use that one instead.
|
|
Universal Material
|

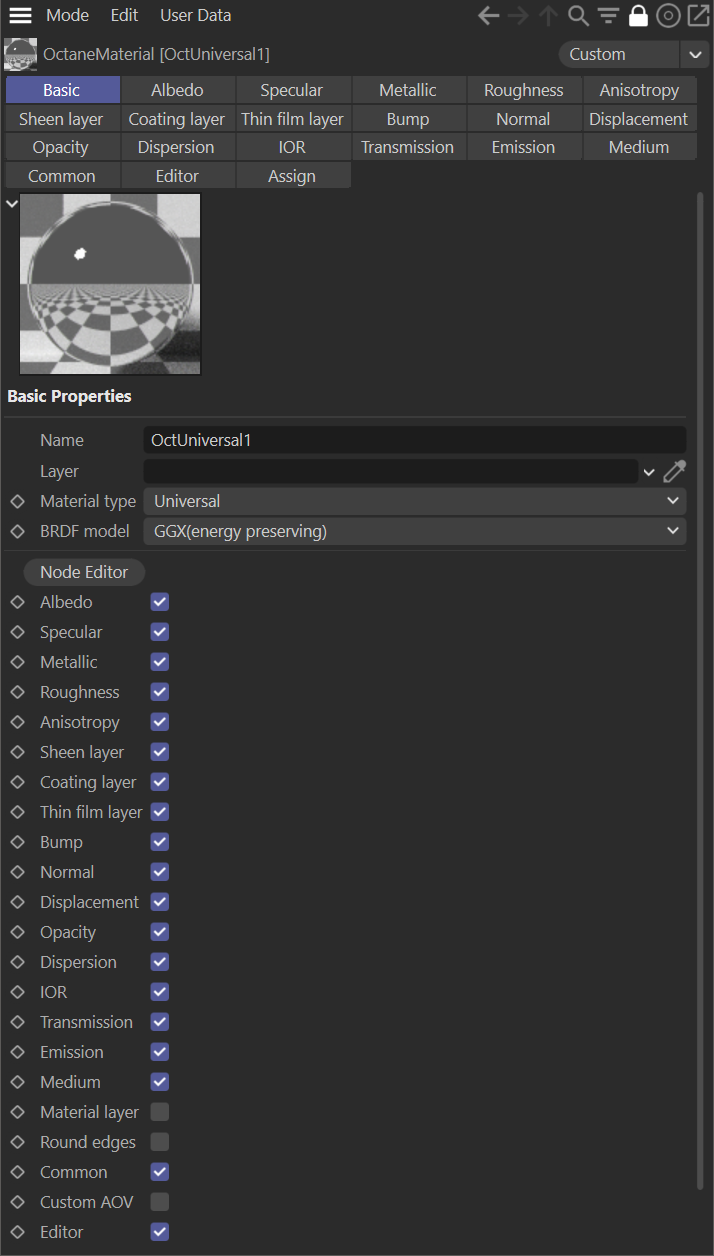
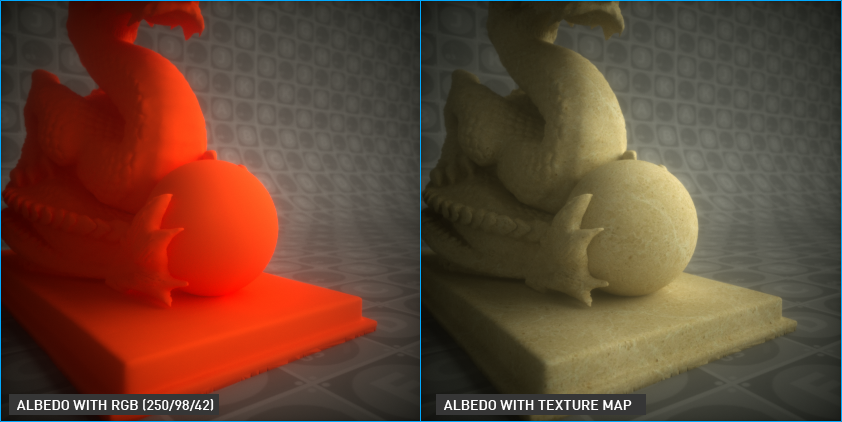
Albedo
Albedo is equivalent to Diffuse, with no shading, light direction, or ambient occlusion. RGB Spectrum, Gaussian Spectrum, float, or image textures can all be used as input for albedo.
|
|
albedo
|
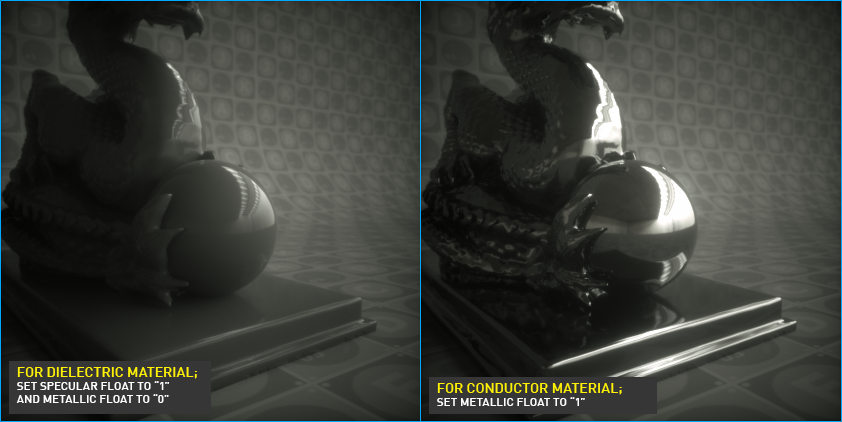
Specular
Equivalent to the "Specular Material" (discussed here). The Universal Material defaults to a specular setting of 0.0 and instead the Universal defaults to Metallic 1.0, making the material a conductor (as opposed to dielectric, like the Specular material.) If the Specular is preferred, then set the Metallic value to 0.0.
|
|
universal material
|
Conductor and Dielectric materials include:
Conductors: Aluminum, Copper, Gold, Iron, Lithium, Mercury, Silver, Sodium, Lithium, Titanium, etc.
Dielectrics: Water, Plastics, Glass, Asphalt, Diamond, Emerald, Grass, Ruby, Milk, etc.
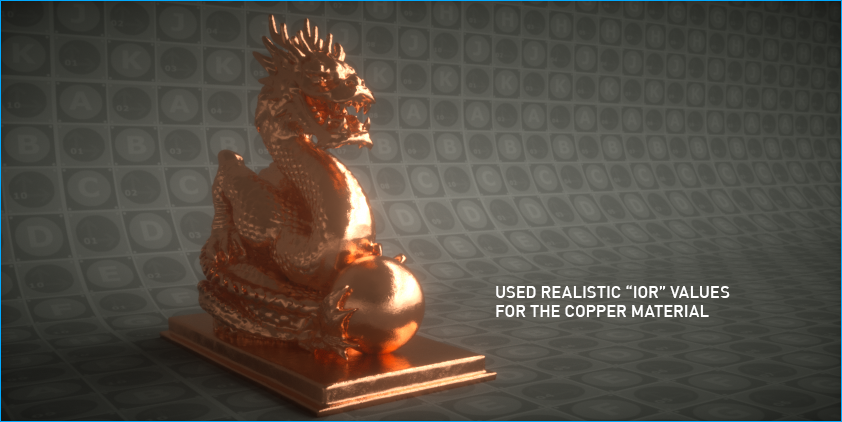
MetallIc
As with the Specular parameter, the Universal Metallic parameter is equivalent to the Metallic material, discussed here. By default, the Universal Metallic parameter is a Conductor, with the Specular Map value set to a default Float value of 1. In this case, the "Specular" parameter will be disabled automatically. When using the Metallic parameter, the IOR is very important for best results. Realistic IOR data of the real-world surfaces or materials can be found at refractiveindex.info.
|
|
universal material
|
Roughness
This parameter works as in other material types. A detailed description of the Roughness parameter can be found in the Glossy material section.
Anisotropy
This parameter is explained in detail in the "Glossy Material" section, here.
Sheen Layer
This parameter is explained in detail in the "Glossy Material" section, here.
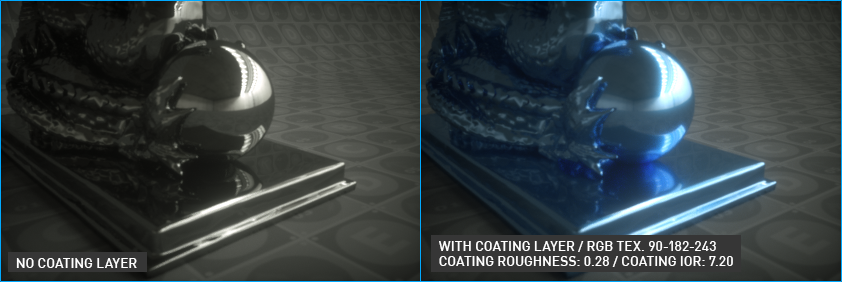
Coating Layer
The Coating Layer parameter is only available in the Universal Material. and refers to the coating that rides above the other parameters in the material. This coating gives additional shading controls over the top layer shading characteristics, and has several options:
- Coating (float, texture)
- Roughness (float, texture)
- Coating IOR (float)
- Bump (texture)
- Normal (texture)
Each attribute can be driven by the various generators and image texture nodes available in Octane. These attributes can be modulated via these inputs for a variety of interesting effects. In order to see color in the coating layer, the Coating IOR value will need to be higher than the default setting.
To get the effect seen in the picture below, go to the "tex" menu and select "RGB" from the available options. Now set any color. The color is assigned to the outermost level of the material, depending on the use of Specular, Albedo or Metallic parameters. The options Coating Roughness and Coating IOR work together. Coating Roughness determines the coat distribution level of the coat layer. Coating IOR is used to determine the strength of the same layer by increasing or decreasing the refractive index. Both options have nothing to do with Universal Material's roughness and IOR settings.
|
|
universal material
|
Thin Film Layer
This parameter simulates the look of a film material on a surface and is explained in detail in the "Glossy Material" section, here.
Bump
Bump creates fine details on a material's surface using a procedural or image texture and is explained in detail in the "Diffuse Material" section, here.
Normal
Normal maps create fine details on a material's surface, similar to a bump. However, normal maps are made of vectors and use the full 24-bit color range, as opposed to the grayscale range of bump maps. This allows for more precision and quality. This parameter explained in detail in the "Diffuse Material" section, here.
Displacement
Displacements are described in detail in the "Displacement" section, here.
Opacity
Opacity is explained in detail in the "Diffuse Material" section, here.
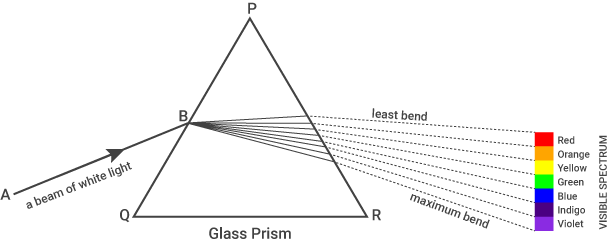
Dispersion
In optics, dispersion (aka "chromatic dispersion") of light occurs when white light is separated into its different constituent color components per the law of refraction or Snell's law. Each visible wavelength has a slightly different index of refraction. For most materials, the smaller the wavelength of light, the larger the index of refraction, which results in the smaller wavelength light bending more than larger wavelength. The prism illustration below shows this effect.
There are two different Dispersion methods: Abbe number and Cauchy formula. The Mode menu determines which method is used, as governed by the Dispersion Coefficient B value. If this value is 0.0, then the dispersion methods are unused, and the basic Snell's law refraction will be used instead.
Abbe Number — This is the chromaticity (hue/saturation) of the transparent material. Small numbers will break down the dispersion into a very strong effect, but will produce noise, requiring more samples to clean up. Larger numbers will render more quickly, but the dispersion effect will be less noticeable.
Cauchy Formula — describes the empirical relationship between the Index of Refraction (IOR) value and the light wavelength passing through the material. It is typically a very small value, such as "0.00420" for Borosilicate glass, which has an IOR of 1.5046.
IOR
The Index of Refraction (IOR) parameter is discussed in detail in the "Metallic Material" topic, here. Note that there are some minor user interface differences in use with the Universal Material, as explained below:
Dielectric IOR
This parameter evaluates when the specular (dielectric) parameter is activated. The results from this parameter are equivalent to the Glossy material.
Dielectric 1/IOR Map
This parameter allows you to control the IOR value with an RGB / grayscale or Procedural texture. If a texture is present in this slot the "Dielectric IOR" parameter is disabled and controlled by the texture parameter.
Metallic Reflection Mode & Metallic IOR
These two parameters are the equivalents of the same IOR options described in the Metallic Material section. See this link.
IOR Presets
When the Metallic Reflection Mode is set to RGB IOR, the IOR Presets menu will appear. This menu offers several preset RGB IOR values for various metals. Select the desired option, and the click on the Apply button to use.
Allow Caustics
This flag enables the caustics effect when using the Photon Tracing kernel only (discussed here).
Transmission
Transmission controls how light passes through a transparent surface and is explained in detail in the "Specular Material" section. See the link here. One difference from the Specular material is the Transmission Type drop down menu, which contains the following options:
- Diffuse — Uses the Diffuse value for transmission. This setting will spread out the transmission of light through the surface in a broad manner. Good for simulating textured glass, plastic drop cloth, etc. This is the default value in version 2021 of the OctaneRender for Cinema 4D plugin.
- Specular — Uses the Specular value for transmission. Use this setting for clear materials. This was the previous behavior in earlier versions of the OctaneRender for Cinema 4D plugin.
- Thin Wall — Uses the Thin wall value for transmission.
- Thin Wall (Diffuse) — Meant for thin surfaces such as leaves and treats layers of the Universal material to be independent of the side of the surface. Incoming rays will always enter the topmost layer first.
Emission
The Emission parameter uses Black Body emission, which uses Temperature (in Kelvin) and Power to control the color and intensity of the light, respectively. This is explained in detail in the "Blackbody Emission" section. See this link.
Medium
This parameter explained in detail in the "Mediums" topic. To review, go here and here.
Material Layer
The Material Layer will allow for the creation of a custom material, by adding up to eight of the following material layers to an existing material (defaults to OFF). These layers are based on components used in previous Octane materials. Complex materials can be recreated in a physically based manner, as opposed to manually mixing materials together. When enabled on the Basic tab, a Material Layer tab will be added to the tab row. In the Material Layer tab, the Add button will display the available material nodes:
- Diffuse Layer — Used for dull, non-reflective materials.
- Layer Group — Adds multiple material layers to existing materials.
- Metallic Layer — Used for highly reflective materials.
- Sheen Layer — Simulates the grazing coloration in fabrics.
- Specular Layer — Used for shiny materials like plastic, or clear materials like glass.
The Layer Group is used to "stack" layers together. The other material types, if chosen, will replace the earlier layer choice.
The Remove button will remove one layer at a time.
Round Edges
The Round Edges option will round off the edges by using a shading effect instead of creating additional geometry (defaults to OFF). This option is best used for rounded edges that will appear small in the final render, as larger sizes will reveal the trick. When enabled on the Basic tab, a Rounded Edges tab will be added to the tab row. In the Rounded Edges tab, there are five animatable parameters:
- Mode — Choose from Fast, Accurate, Convex and Concave. Each choice offers a different look and render time. The Accurate mode will produce better-looking results but may be slower. Accurate mode can select the affected edges by using the Concave Only or Convex Only options.
- Radius — The radius of the rounded edge.
- Roundness — The rounded appearance of the edge (beveled to smooth). A value of 1.0 is completely round, while a value of 0.0 is a chamfer.
- Samples — The number of rays to use when sampling neighboring geometry.
- Consider Others — This option controls how rounded edges are applied to different objects. When enabled, intersections between different objects are rounded. When disabled, only the current object is considered.
Common
This section is explained in detail in the "Diffuse Material" topic, here.
Editor
This section offers the following options:
- Animate Preview — This option will enable the display animated textures or material attributes in the user interface.
- Texture Preview Size — This option determines the OpenGL texture preview size for the 3D viewport windows.
- Editor Display — This option will determine what aspect of the material is used in viewport display. The default is combined, which shows all channels. Use this option for Octane materials, as the individual channels in the list refer to Cinema 4D materials only.