Octane Render Settings
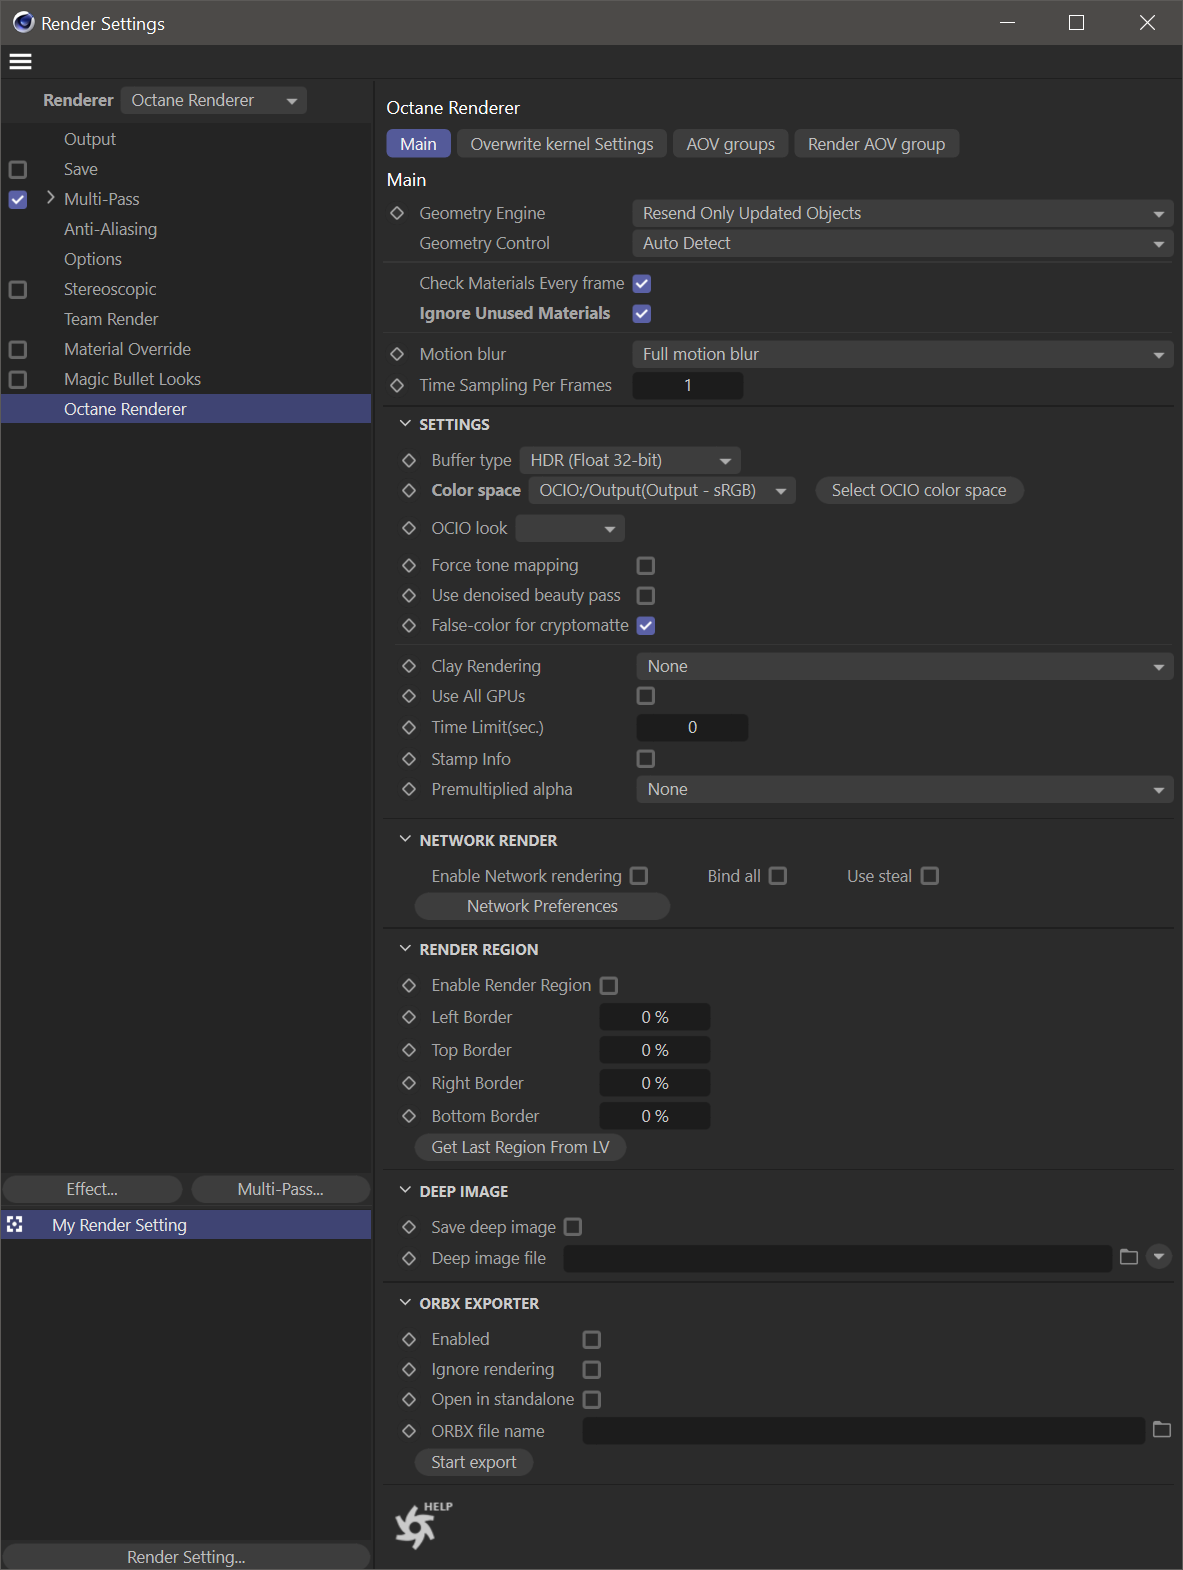
Final render output is controlled with the Render Settings window. Choose Octane Renderer from the Renderer drop down menu and the Octane Renderer settings window will appear. First, open the render settings window of Cinema 4D by selecting Render > Edit Render Settings… from the main menu or by pressing CTRL + B. Select "Octane Renderer" from the Renderer menu in the upper left corner. Here you will see four main tabs: Main,
|
|
Octane REnder SEttings — Main tab
|

Main Tab
Main Tab Settings
The Main tab settings panel contains the global controls for managing renders sent to Octane.
Geometry Engine
Each time a render is initiated, Octane compiles and sends information to the GPU card(s) in the system or network render nodes. As scenes can get very complex, this process can end up taking some time. The two options for the Geometry Engine (discussed below) are here to help manage the way that Octane handles data. To better understand these options, read the this section about geometry checking in Octane.
Resend Only Updated Objects: This is the fastest method for single frame/animation rendering. On the first frame, all scene data will be sent to Octane Render. For subsequent frames, only the updated portions of the scene will be updated.
Resend All Scene Data (Deprecated): This is the slowest render data method. This method will reset all data and completely send the entire scene on every frame. In some cases, this method may help to resolve situations that do not update as they should. As this is an expensive method, do not choose this unless absolutely necessary.
Geometry Control
Geometry Control determines how scene object data is transferred to Octane:
Manual Assignment: Requires that animated, emissive, etc. objects are flagged by hand via the Octane Object Tag > Main tab > Force Update setting.
Auto Detect: Makes some pre-calculations before animation rendering begins. This method will try to find/assign the movable, emissive, etc. objects automatically. With this option, there is no need to use the Octane Object tag Force Updates setting. If Octane can't finish the evaluating the scene within the time frame, all objects will be assumed to be movable.
All Objects Movable: This option will force all objects to be sent to the GPU for every frame. Heavy scenes may cause a crash after 10-15,000 object. Auto-Detect is recommended for heavy scenes instead.
Check Materials Every Frame
This option controls whether or not materials in the scene are checked for each frame. The default is ON.
Ignore Unused Materials
Unused materials are not checked. Defaults to OFF
Motion Blur
This option determines how motion blur is applied to objects in the scene. Motion blur must be properly enabled on every Octane Camera tag in the scene, described here.
Disabled: No motion blur will be rendered in the scene.
Camera Motion Blur: This option renders the motion blur effect of the camera object only.
Full Motion Blur: This option will render both camera and object motion blur for the scene.
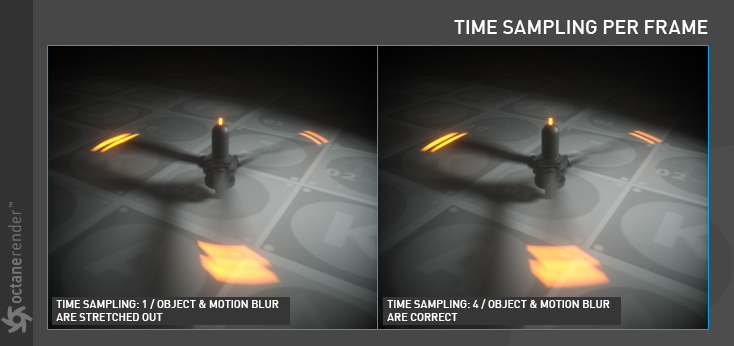
Time Sampling per Frames
This option will create sub-keyframes for motion blurred objects. This option is only necessary with spinning or rotating objects, such as wheels, rotor blades, and streak effects.
This value is used to divide the time and export more PSR matrices/vertex values, which gives the motion blur engine a more accurate motion to calculate the result, and thus render a more accurate blur. A clear indicator that you need to increase this value is when you see a linear motion blur instead of a curved motion path.
Take an example of two frames, one with a value of 0 degrees and the other with a value of 30 degrees: with a value of 3, the motion will be sampled at 10, 20 and 30 degrees, with 0 degrees as the starting point. For a value of 10, Octane will export the values at every three degrees between 0 degrees and 30 degrees, for a smoother motion blur result.
Larger values will take longer to process. The default value is 1.
Settings Turndown
Buffer Type
There are three different buffer types to choose from: HDR (Float 32-bit), HDR (Float 16-bit) and LDR(8-bit).
Color Space
The color space chosen for the output rendering, from the list supplied in the drop down menu, as follows:
- sRGB — a color space developed by Microsoft and HP in 1996, standardized in 1999. Variations of this color space by many vendors, including Adobe, form the basis of the way the color is typically presented on computer screens. This color space is not capable of accurately representing the spectral color in with Octane renders; it is a better choice to use the OCIO <sRGB> output option if you need sRGB color imagery. sRGB color space is non-linear, and has a gamma curve of 2.2 applied.
- Linear sRGB — essentially the same as sRGB, but with no gamma curve (gamma 1.0). This setting will make images look darker. As all renderers operate in linear space, colors are more accurate. Prior to the introduction of the new ACES-based color management system in Octane, this was the best output option for color grading and compositing pipelines.
- ACES 2065-1 — ACES stands for the Academy Color Encoding System, developed by the Academy of Motion Picture Arts and Sciences. The 2065-1 designation refers to the specific flavor of ACES; 2065-1 is the ACES archival format, effectively the broadest color space supported by ACES. Most ACES/OCIO applications can import this format; typically, the format is transformed into the application's working format (often user-specified as opposed to hard-wired into the application). Use this format if you want to retain as much of the original Octane spectral space as possible.
- ACES CG — ACEScg is a specific version of ACES developed for RGB rendering engines. As Octane is not an RGB rendering engine, this format is not necessary, and will result in less color fidelity than ACES 2065-1. However, some production pipelines require ACEScg, therefore the format is presented as an option here.
- OCIO<> — This menu presents many different output options determined by the OCIO config that is currently set in the Octane Settings > Color Management tab Config file slot(s). For more information on OCIO, see here. For typical sRGB uses, choose the OCIO:Output/Output-sRGB option.
Select OCIO Color Space
This button will present a menu of available OCIO color spaces from the assigned config.ocio file, discussed here. The options here can change dramatically (as they are different for every config.ocio package), therefore, it is best to refer to the documentation for the config file included in the OCIO package for definitions.
OCIO Look
The items in this menu are generated from the information in the assigned config.ocio file, discussed here. Depending upon the config file, this list may not have any entries (which is normal). Looks are also called "Look Modification Transforms" (LMTs) in ACES/OCIO, and will apply a special look up table (LUT) to the image as it is displayed. When chosen from this location, the underlying image data will have this transform permanently applied, baking the LUT into the resulting final frames. Looks should NOT be applied when output is intended for a color grading pipeline.
Force Tone Mapping
Tone mapping will approximate a high dynamic range by adjusting luminance and saturation values in an image, adding more detail and contrast. Tone mapping uses gamma correction as part of the process but is different than color correction or color grading, where color LUTs (look up tables) are used to create a certain look. Tone mapping is irreversible once applied if saved. The algorithms in this option are inferior to those used with ACES/OCIO. This option should only be used when matching older OctaneRender scenes. Force Tone Mapping should NOT be used when using the ACES/OCIO color system introduced in the 2020 series.
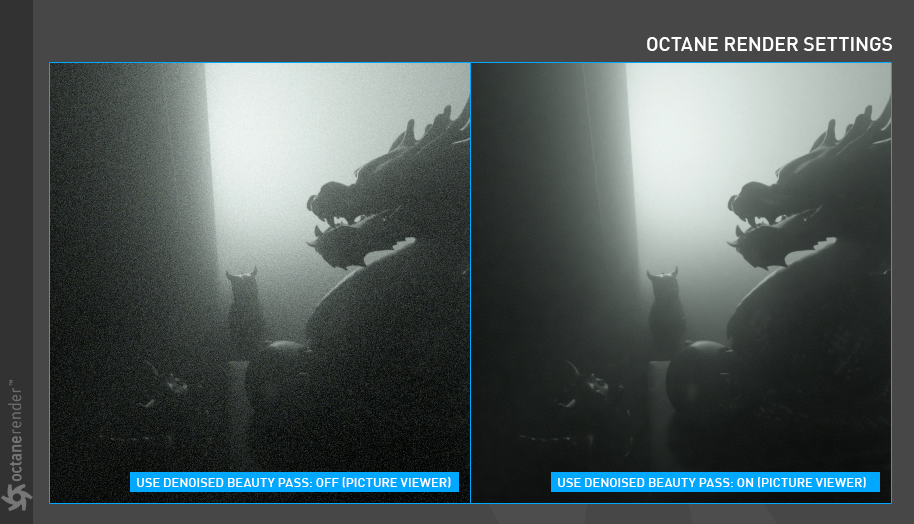
Use Denoised Beauty Pass
This option will output a denoised beauty pass for the image, without the need to enable Denoiser Render Passes.
False Color for Cryptomatte
This option will enable false color rendering for cryptomattes. It defaults to ON.
Clay Rendering
Clay rendering will render the image in one of three different aspects:
- None — This option will render the scene normally (the default).
- Gray — This option will render the scene in gray values only.
- Color — This option will render the scene by object color only; no speculars or other additional parameters will appear in the render.
Be sure to set the value to "None" for final renders.
Use all GPUs
Should more than one GPU have been switched in Octane Live Viewer or Render Settings, this option will force them all to be used for rendering. It is also used for batch rendering on separate machines - to be sure that the scene will be rendered with full power on any network machine even if there is a different GPU set on each of them. Default is OFF.
Time Limit (sec.)
This option sets the maximum time (in seconds) to rendering for each frame. The default value of zero (0) seconds allows the frame to take as long as it needs to complete, as determined by the Max Samples setting.
Stamp Info
The Stamp Info option will overlay rendering statistics on the render output (sample count; VRAM; duration; etc.). Do not forget to disable this option when executing the final render.
Premultiplied Alpha
This option determines the method in which the Alpha channel is treated, defaults to NONE. Leave this control at the default.
Network Render Turndown
Network Render
Network Render is explained in more detail here.
Render Region turndown
Render Region
This option will render a defined portion of the frame. If the render region is defined in Live Viewer, press the "Get Last Region From Live Viewer" button to use that region, or set one numerically. The Render Region option in Live Viewer is discussed here.
Deep Image Turndown
Save Deep Image
This option will save a Deep Image in the location specified in the Deep Image File slot.
Deep Image File
Specifies the file name and location. Click on the Folder icon to access the system save file dialog.
|
IMPORTANT The goal of deep image rendering is to improve the compositing workflow by storing Z-depth with samples. It works best in scenarios where traditional compositing fails, like masking out overlapping objects, working with images that have depth-of-field or motion blur, or compositing footage in rendered volumes. Most major compositing applications now support deep image compositing. The disadvantage of deep image rendering is the large amounts of memory required to render and store deep images, and this function is effectively obsolete considering AOV compositing in general. |
ORBX Exporter Turndown
Animated ORBX files suitable for The Render Network are exported with this command.
Enabled
Enables the Export Process.
|
IMPORTANT If enabled, the normal Render command will be disabled, and will instead result in the ORBX Export to occur — for normal rendering, this flag should be disabled. |
Ignore Rendering
This option disables actual rendering to the Picture Viewer, enabling the fastest possible output of the ORBX file. If disabled, both rendering AND ORBX export will result.
Open in Standalone
This option will open the Octane Standalone application (from the location specified in Octane Settings) and the ORBX file will be automatically loaded into that instance of Standalone.
ORBX file name
Specify the file name and desired location of the ORBX file.
Start Export
This button will initiate the ORBX export process.
Overwrite Kernel Settings Tab
The Overwrite Kernel Settings tab will allow the settings in Live Viewer to be ignored in favor of the settings in this tab, assuming the Overwrite Kernel Settings toggle is enabled (Default is OFF). Kernel Settings are discussed here.
Render AOV Group Tab
Render AOV groups are discussed in this section here.