The Render Viewport
|
|
Render Viewport
|
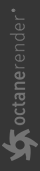
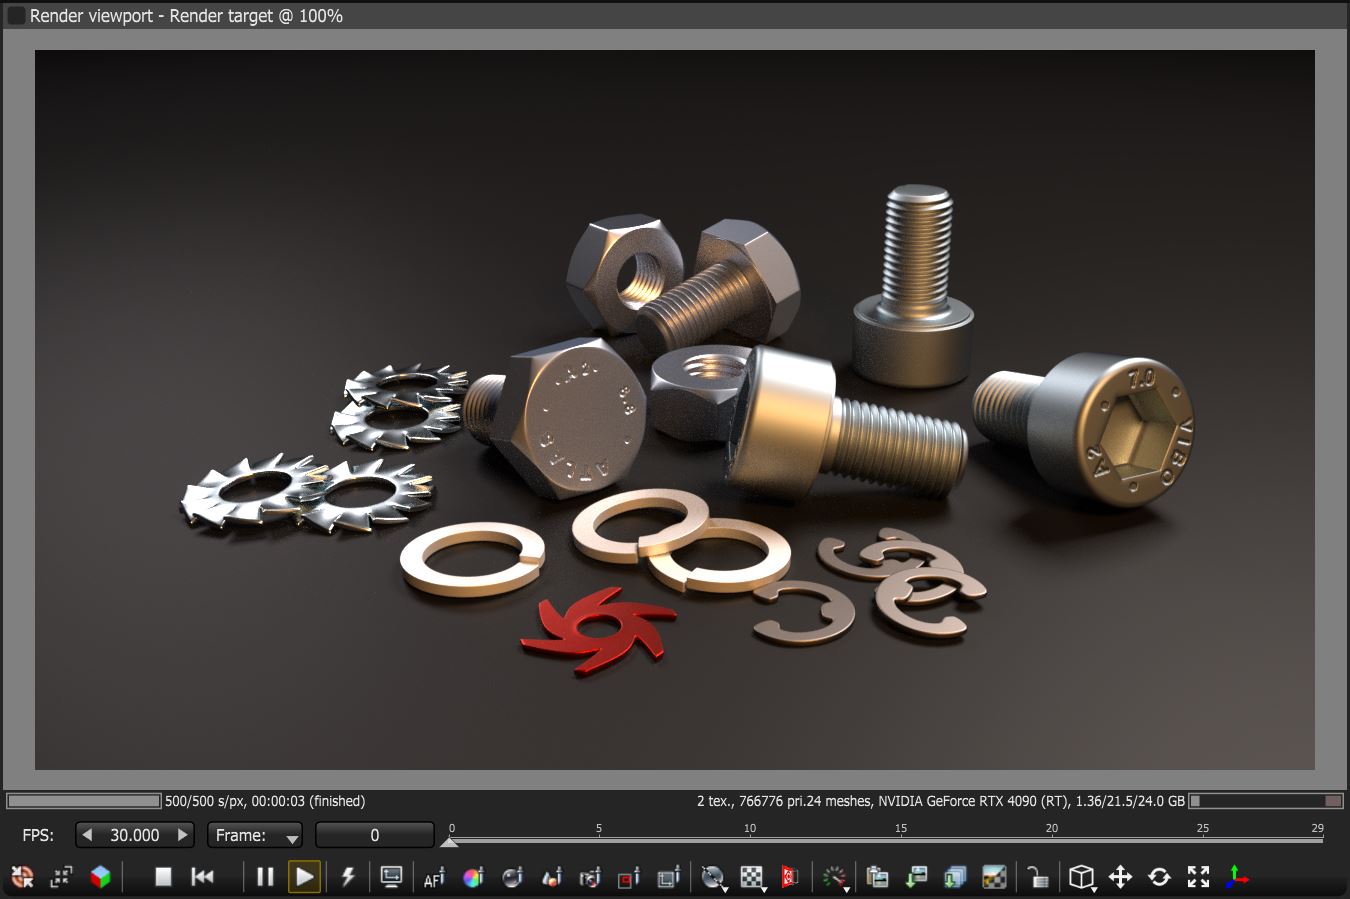
Figure 1: The Render Viewport
Information in the render progress indicator includes the following:

Figure 2: Render progress indicator
Information included in the GPU quick information bar:
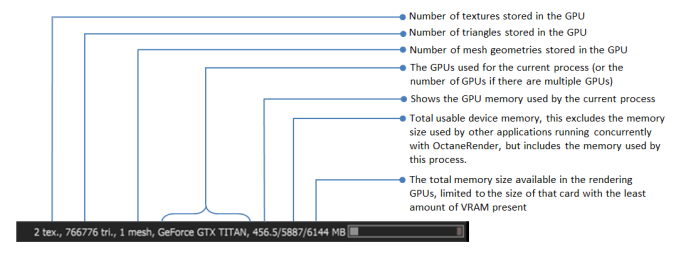
Figure 3: GPU quick information bar
Right-clicking on the render progress indicator and the GPU quick information bar invokes general statistics affecting GPU resources.
Figure 4: Render progress indicator
The Render Viewport adjusts many aspects of the scene while maintaining a complete rendering environment. Horizontal and vertical scrollbars on the render view allows viewing parts of the image that fall out of the display area.
The Render Viewport contains buttons located at the bottom of the window (Figure 2) that control several aspects of the render process.
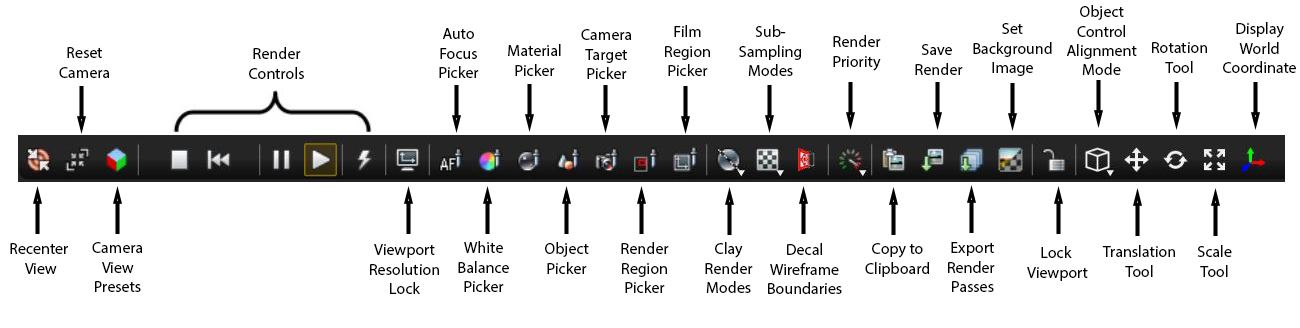
Figure 5: Render Viewport icons
Recenter View - Centers the render view display area in the Render Viewport. This is useful if you move the render view display area and part of it is no longer visible or centered. This re-centers the render view display area without affecting the current zoom level.
Reset Camera - Resets the camera back to the original position. If you create a scene from an imported object, then the Camera Reset button resets the camera position to the default coordinates, similar to when the object was just imported. If you save the scene as an Octane Scene File, then the camera resets to the position of the Octane Scene File.
Camera View Presets - Provides preset camera views of the scene in the Render Viewport.
Stop Render - Aborts the rendering process and frees all resources used by the current scene.
Restart Render - Halts the current rendering process while keeping the loaded contents in memory, and then restarting the rendering process at zero samples.
Pause Render - Pauses the rendering process without losing the rendered data, and also keeps the contents of the GPU’s memory intact. Pausing the render is useful when you need to free the GPU cores in order to run other GPU-intensive applications, and intend to continue the render process later.
Start Render - Starts the rendering process, or resumes the render from the point where it was paused.
Real Time Rendering - Uses more GPU memory to provide a more interactive experience. Note that the following features do not work when this button is active:
Viewport Resolution Lock - The Viewport can scroll up and down to accommodate the rendered image's current visible size. Enabling this facility adjusts the resolution of the rendered image to the current Viewport size. If this is enabled, OctaneRender® restarts the rendering every time you adjust the Viewport window's size, since the image resolution also changes. This is disabled by default and when disabled, holding down the Control key and using the mouse wheel will zoom in and out on the rendered display. Control key and left mouse button will pan the rendered display.
Auto Focus Picking Mode - Helps with navigating complex or difficult scenes. To enter Focus Picking mode, click on the Focus Picking icon under the Render Viewport, then click on any part of the scene to focus the camera on that point. When enabled, right-clicking on the mouse brings up a context menu for picking objects along the path of a ray, affecting that point in the scene.
White Balance Picking Mode - Selects any part of the scene to see white point colors applicable to the whole scene on the basis of a diffuse within the scene. This does not cause the render to restart, as the current white point color is used throughout the render. To restore the scene's original balance, click on an empty part of the scene while in this mode.
Material Picker - Select any part of the rendered scene to inspect the material applied to it. Right-clicking on the mouse when this is enabled invokes a context menu to pick materials applied to the objects along the path of a ray, affecting that point in the scene. OctaneRender® invokes the Material node and it appears on the Node Inspector.
Object Picker - Select particular objects in the rendered scene to inspect its attributes on the Node Inspector pane. Right-clicking the mouse when this is enabled brings up a context menu to pick of the objects along the path of a ray, affecting that point in the scene. The object’s node graph representation is also selected on the Graph Editor.
Camera Target Picker - Helps with navigating a scene that is very complex or is difficult to navigate. To enter Camera Target Zoom Picking mode, click on the Camera Target Zoom Picking icon under the Render Viewport, then click on any part of the scene to make the point under the mouse pointer become the center of rotation and zooming. A quick roll of the mouse wheel causes the render to zoom in to the selected point. When enabled, right-clicking on the mouse brings up a context menu to pick objects along the path of a ray, affecting that point in the scene.
Render Region Picker - Specifies a region in the Viewport to view changes and reduce noise in specific areas. To use Render Region Picking mode, click on the Render Region Picking icon under the Render Viewport, then select a rectangular area in the Viewport to restrict rendering to that area. A feathered border represents the selected area. To disable this feature and return to rendering the whole image, click once anywhere in the Viewport. The samples rendered in this region are taken into account in the Viewport's samples-per-pixel statistics. This represents the average samples-per-pixel over the full image.
Film Region Picker - Specifies a region in the scene to set new values for Region Start and Region Size for Film Settings parameters, which configures the render film. Although the resolution remains the same, just the film region gets rendered. You can reset the film region back to its full size by double-clicking on the Render Viewport while the toggle is enabled.
Clay Mode Rendering Settings - Shows the model details while rendering is still in progress. This lets you see details without the complex texturing applied, or colors and/or textures to be applied.
Sub-Sampling Settings - Provides smoother scene navigation by reducing the render resolution. In order to improve navigation at the cost of visual quality, you can adjust 2×2 or 4×4 sub-sampling settings by using the checkerboard buttons under the Render Viewport. The reduced settings apply when navigating the scene, and then it returns to the render settings after stopping navigation. The following figures show the difference between navigating with no sub-sampling versus navigating with 4×4 sub-sampling.
Decal Wireframe Boundaries - Toggles wireframe along the boundaries of the decals.
Render Priority Settings - This sets the priority for the active GPUs when the Use Priority option is enabled on the Devices preferences tab. The render priority is necessary when a GPU is not dedicated to rendering, but is also shared among different processes in one machine. For example, a machine that has one GPU shares the GPU for processes across the whole system, including the operating system. In this case, setting the Render Priority to Low and enabling Use Priority from Preferences > Devices for that single GPU is best for interactivity.
Copy to Clipboard - Copies the current rendered image to the clipboard in low dynamic range format, which you can paste in to different applications.
Save Render - Saves the current render to disk in a specific file format.
Export Render Passes - Brings up the Render Passes Export window.
Set Background Image - Places a background image in the Render Viewport. To see the background image, enable the Alpha Channel for the Kernel.
Lock Viewport - Locks and unlocks the Viewport controls. Locking the Viewport controls prevents accidental changes or render restarts.
Object Control Alignment Mode - Specifies the coordinate system used while modifying Placement and Scatter nodes using handles for rotation, scaling, and translation in the Viewport. You can choose to align with the world axis, or with the local axis while working with the gizmos for object controls.
Placement Translation Tool (Toggle Move Gizmo) - Modifies the translation of Placement and Scatter nodes using handles in the Viewport. The Move tool allows movement along each axis, or constrained to the plane defined by two axes using different parts of the control.
Placement Rotation Tool (Toggle Rotate Gizmo) - Modifies the rotation of Placement and Scatter nodes using handles in the Viewport. The Rotation tool allows rotation around each axis via the axis rotation bands, a free rotation via the inner orange circle, and rotation around the camera-object axis via the outer yellow circle. You can also rotate objects multiple times around the picked axis.
Placement Scale Tool (Toggle Scale Gizmo) - Adjusts the scale of Placement and Scatter nodes using handles in the Viewport. The Scale tool works along each axis by selecting one of the axis lines, constrained to two axes by selecting one of the corners near the origin, and uniform scaling works by selecting one of the axis end handles.
Display World Coordinate - This displays a small representation of the World Coordinate axis at the top-left corner of the Viewport.
The time slider appears along the Render Viewport buttons when you:
- Load an Alembic file containing a scene with animated geometry
- Load an FBX file with animation
- Specify a sequence in the OBJ or VDB importing settings
- Load a series of images
![]()
Figure 6: Time slider