Spot Lights in Octane
There are two ways to achieve spotlight illumination in Octane: the Octane SpotLight and the Area Light with Spotlight distrubution. This section discusses both methods.
Octane SpotLight
The OctaneRender® Spotlight is a variation of the Cinema 4D spotlight, with additional controls in the OctaneLight tag consisting of an RGB spectrum texture for the light color, a scattering medium to simulate a visible cone, and barn doors to help shape the light, such as those of an actual spotlight on a working movie stage. The implementation involves a cheat of sorts (for the visible cone), but is versatile and can be very useful in most cases, as long as the following recommendations are considered:
|


Editing Light Characteristics
In the Octane Spotlight, the texture slot is pre-loaded with an RGBSpectrum node and a Scattering Medium is assigned. The light cone is adjusted with the standard Cinema 4D controls, and further shaped with the barn doors. The barn doors can be scaled as needed, or disabled altogether.
The RGB Spectrum node provides the overall color for the light. The Light Medium allows for control of the medium within the spotlight cone.
|
|
spotlight
|


Spotlight Medium
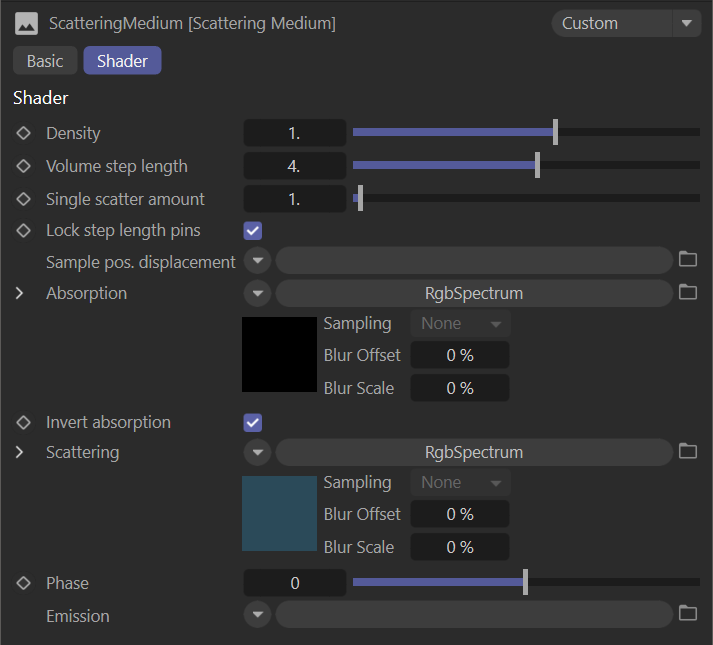
The spotlight medium is a standard Octane scattering medium, which is discussed in detail here. The default settings for the spotlight medium are too strong and unrealistic for most situations. Typically, in real world examples of spotlights, a density of less than 1.0 (in some cases, far less) will yield a more accurate and aesthetically pleasing result (as illustrated below). It is helpful to have the color of the RGBSpectrum node in the Scattering slot be in the range as the color found in the in the Texture slot of the Light Settings panel for realism. There is plenty of leeway to be had here, but straying too far will not look natural.
|
|
spotlight medium
|
There are no restrictions to the number of spotlights in a scene (VRAM-permitting) but artifacts may sometimes occur on the intersection boundaries of spotlight cones to other objects in the scene (even other spotlights). Adjusting the Ray Epsilon value (discussed here) will remove these artifacts.
Area Light with Spot Light Distribution
The other method for spotlight illumination in Octane pairs an Octane Area Light with a Spotlight Distribution Node in the Distribution slot found in the Octane Light tag. The node does not produce a visible cone; for that you will need a volume fog to illuminate. This method looks better than the Octane Spotlight, but can take longer to render. That said, it typically looks more realistic than the Octane Spotlight.
|
|
area light & spotlight distribution with volume fog
|

Create an Octane Area Light, and select the Octane Light tag. In the Light Settings tab, you will see the following panel. Locate the Distribution slot, and add the Spotlight Distribution node to that slot, as shown in the following illustration.
|
|
spotlight distribution
|

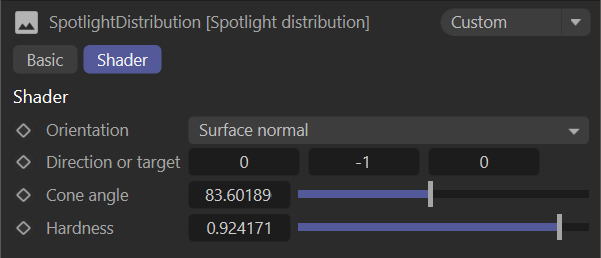
The Spotlight Distribution node is used to add spotlight behavior to Octane lights. This node can be added to any Octane light with a Distribution slot. The node contains the following attributes:
- Orientation — Surface Normal Direction - World Space Direction - Object Space Target point - World Space Target Point - Object Space
- Direction or Target — These edit fields are used to define the orientation of the spotlight, and either direction or target is determined by the orientation setting.
- Cone Angle — The angle of the spotlight cone in degrees, and determines the illumination area of the cone.
- Hardness — Determines how the light within the cone falls off; smaller values will have the light drop off quickly, whereas larger values will illuminate more of the cone volume.
|
|
spotlight distribution node
|