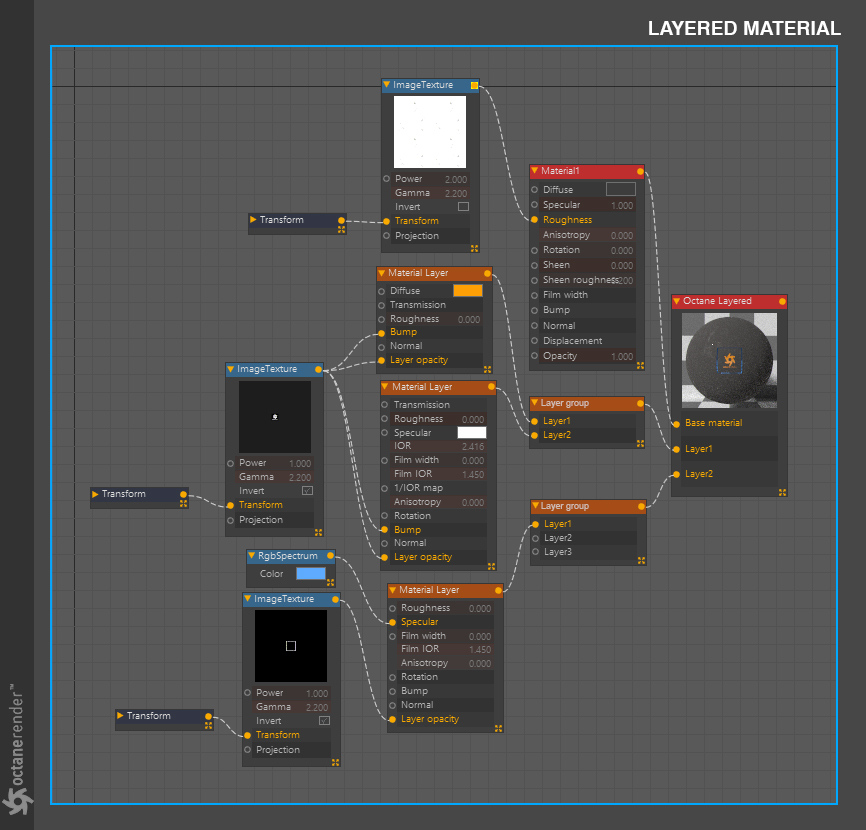
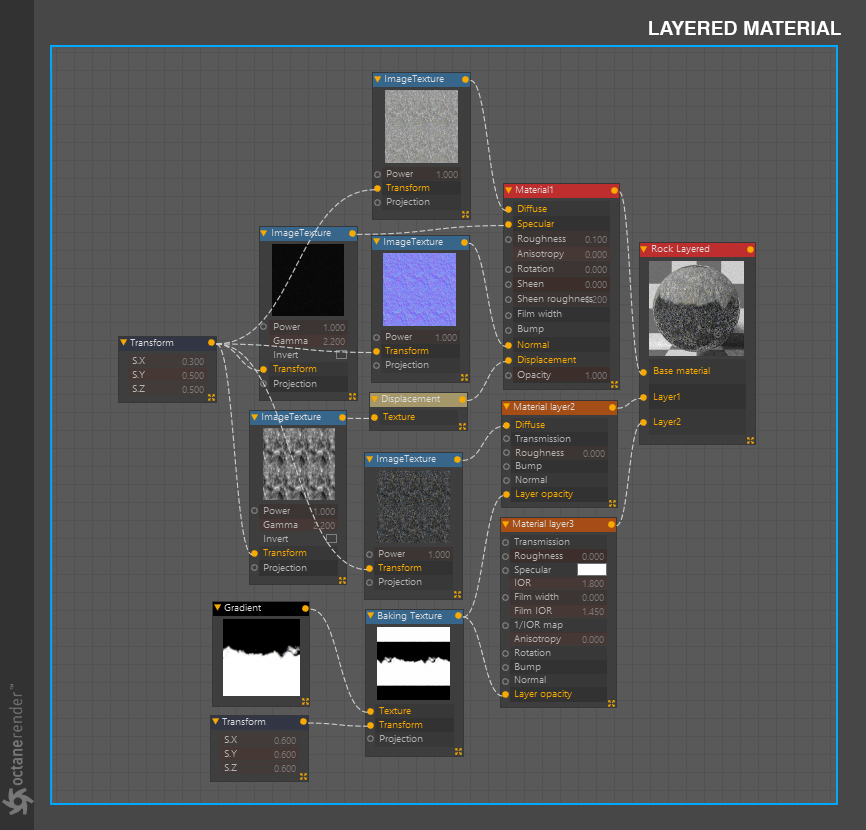
Layered Material
The OctaneRender® Layered Material system allows you to construct complex materials that consists of a Base Material, along with a maximum of 8 layers that can be inserted below of the base layer (the Layered Material is evaluated from the top down. The Base Material layer can be any of the existing Octane materials (Diffuse, Glossy, Specular, Metallic, Toon, Universal and Standard Surface, chosen from the Material Type menu shown in the illustration). Subsequent layers can be any combination of Diffuse layers, Specular layers, Metallic layers, Sheen layers, and Layer Groups.
|
|
Base material
|

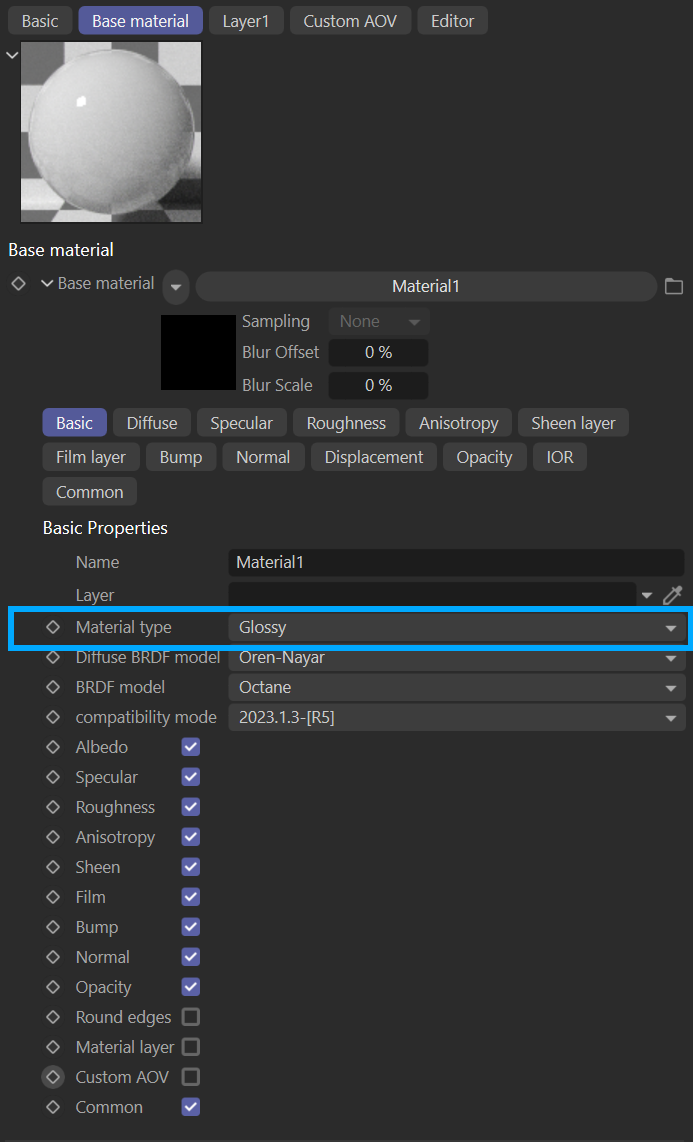
Layered Material — Base Material Attributes
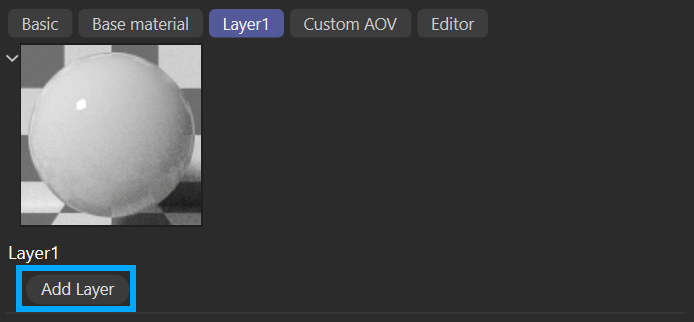
Add a Material Layer
To add a Layer to the Base Material, select the desired Layer tab and click on the Add Layer button. Choose the desired Layer from the pop-out menu.
|
|
Add layer
|
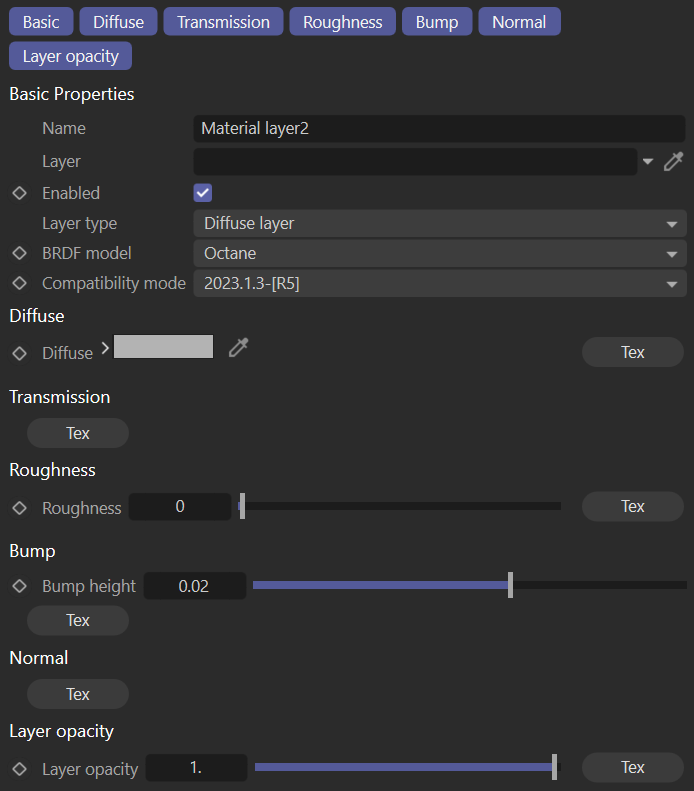
Select the Material Layer node in the Node Editor to show the Attribute panel for the node.
|
|
diffuse layer attributes
|
|
NOTE Do not use C4D shaders inside the Layered Material. Use OSL textures and/or combinations of Octane nodes to achieve similar effects. |
Layered Material Example
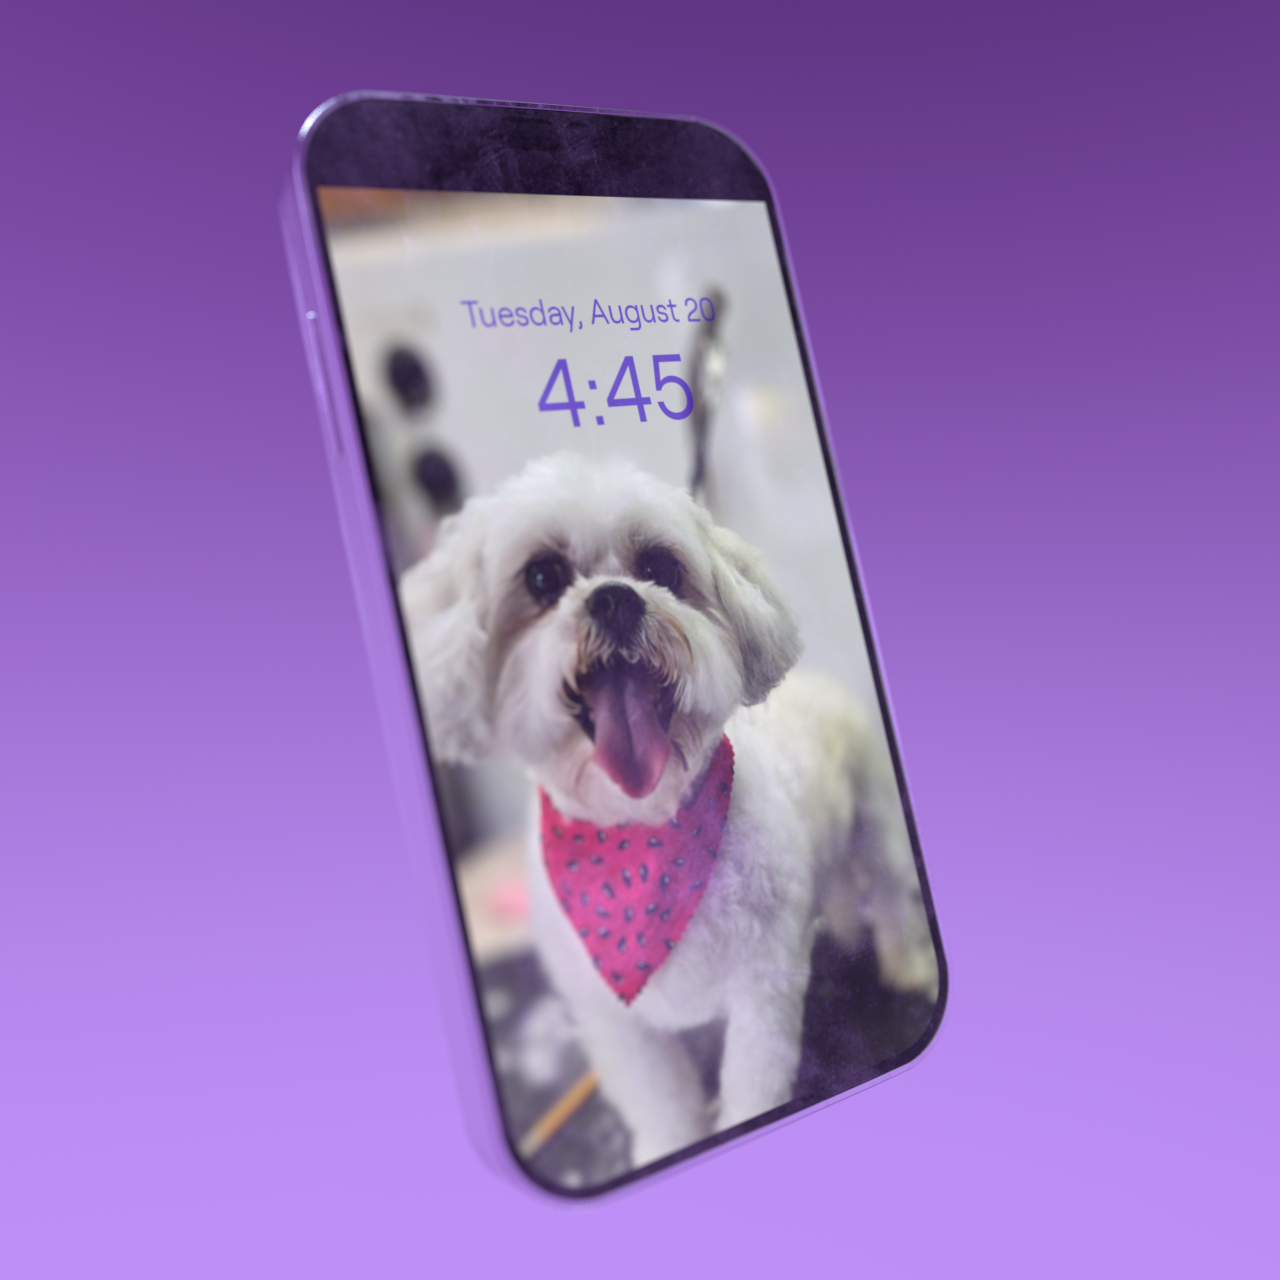
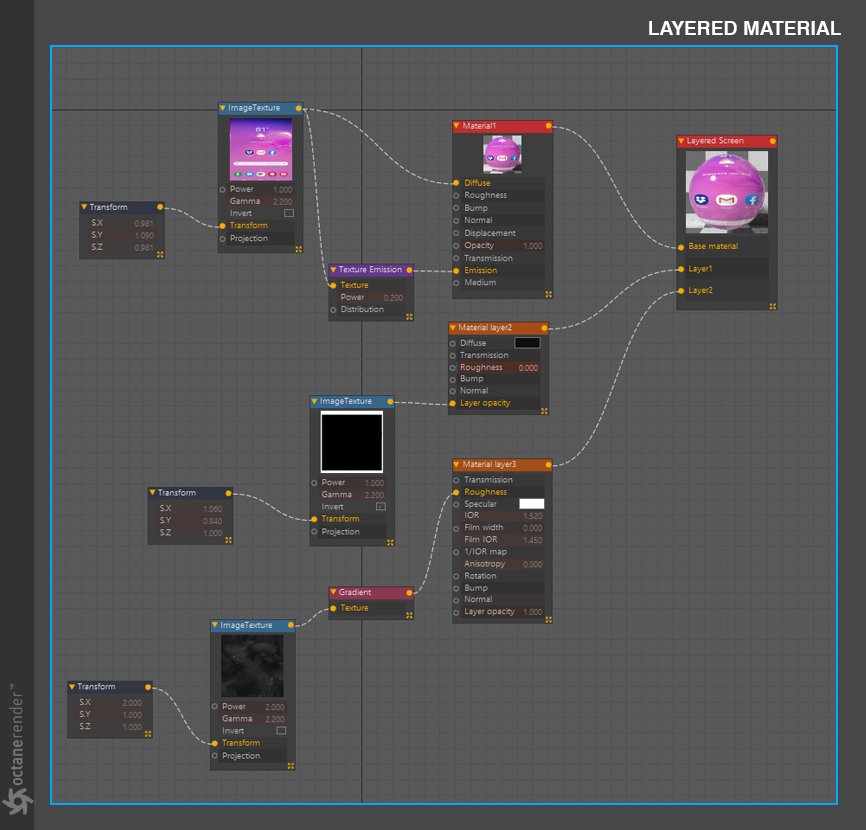
Layered materials are great for simulating real world wear and tear.This example of a modern cel phone screen starts with a Universal material in the Base Material for the illuminated screen and related masks for the glass (the emission is a little complex to control specific masking features of the glass and underlying screen border). A diffuse layer with the same screen image was combined with mask art connect to Layer Opacity for Layer1, clipping any illuminated pixels from the boundary area. Layer2 was set to a specular layer to provide the phone glass, with a GSG Smudge map in the roughness: The same Smudge map was then applied via Layer3 set to a Diffuse layer, and masked by the same Smudge map. That map was also run through a gradient to control the roughness of the smudge effect on the glass. This was necessary to have the camera area of the phone underneath the glass be readable, while showing smudges on the glass.
|
|
layered material example 1
|
|
|
layered material example 1 nodegraph
|
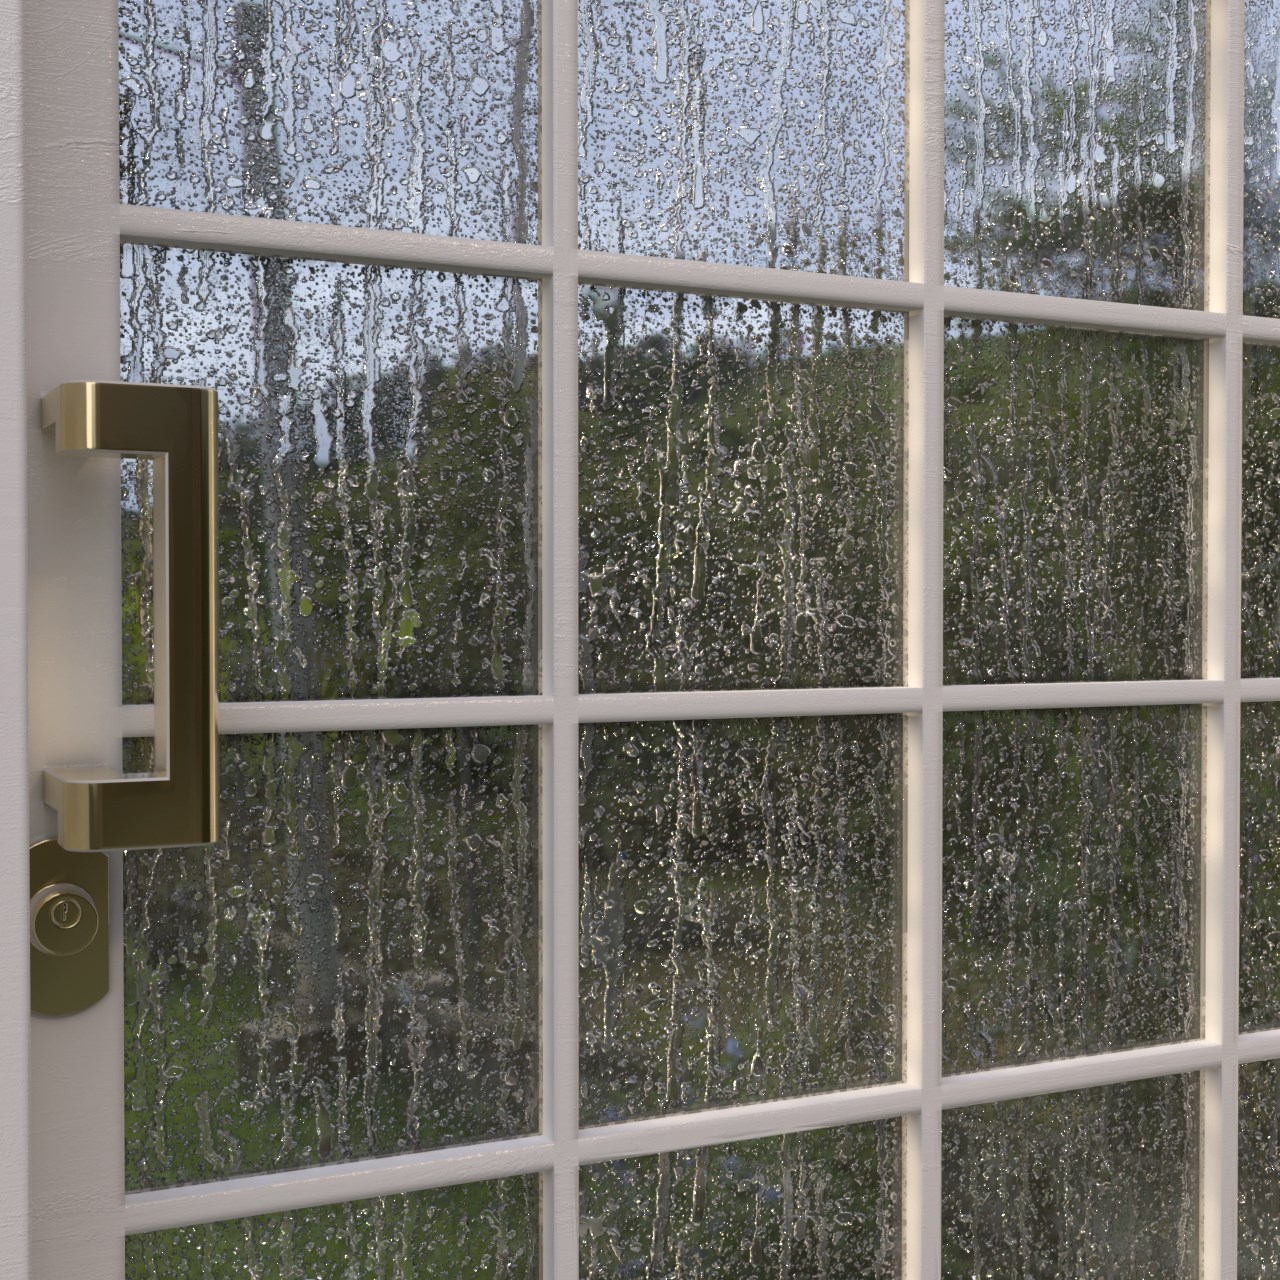
Raindrop Effect using Per Layer Bump Map and Normal Map Perturbation
This example consists of two specular layers, with the top specular layer using a custom raindrop normal map (with the Power value increased to 2.0 to enhance the refractions) while the bottom Base Material specular layer uses the geometric normal. In order to use a different IOR for the water (without affecting the glass), a GSG SI Stains grayscale map was connected to the raindrop layer's Layer Opacity:
|
|
layered material example 2
|
|
|
layered material example 2 nodegraph
|

Be Banksy with Layers
With the Layered Material, decals can be layered on top of the Base Material (or build in reverse). Consider this spray painted rocky wall as an example. Here a glossy material is used for the spray paint in the Base Material. Masks masks in Layer1 (the rock layer) allow the spray paint to show through, giving it the appearance of being on top. The Base layer uses a displacement that will make the layers on top appear as though they are displaced.
|
|
layered material example 3
|
|
|
layered material example 3 nodegraph
|
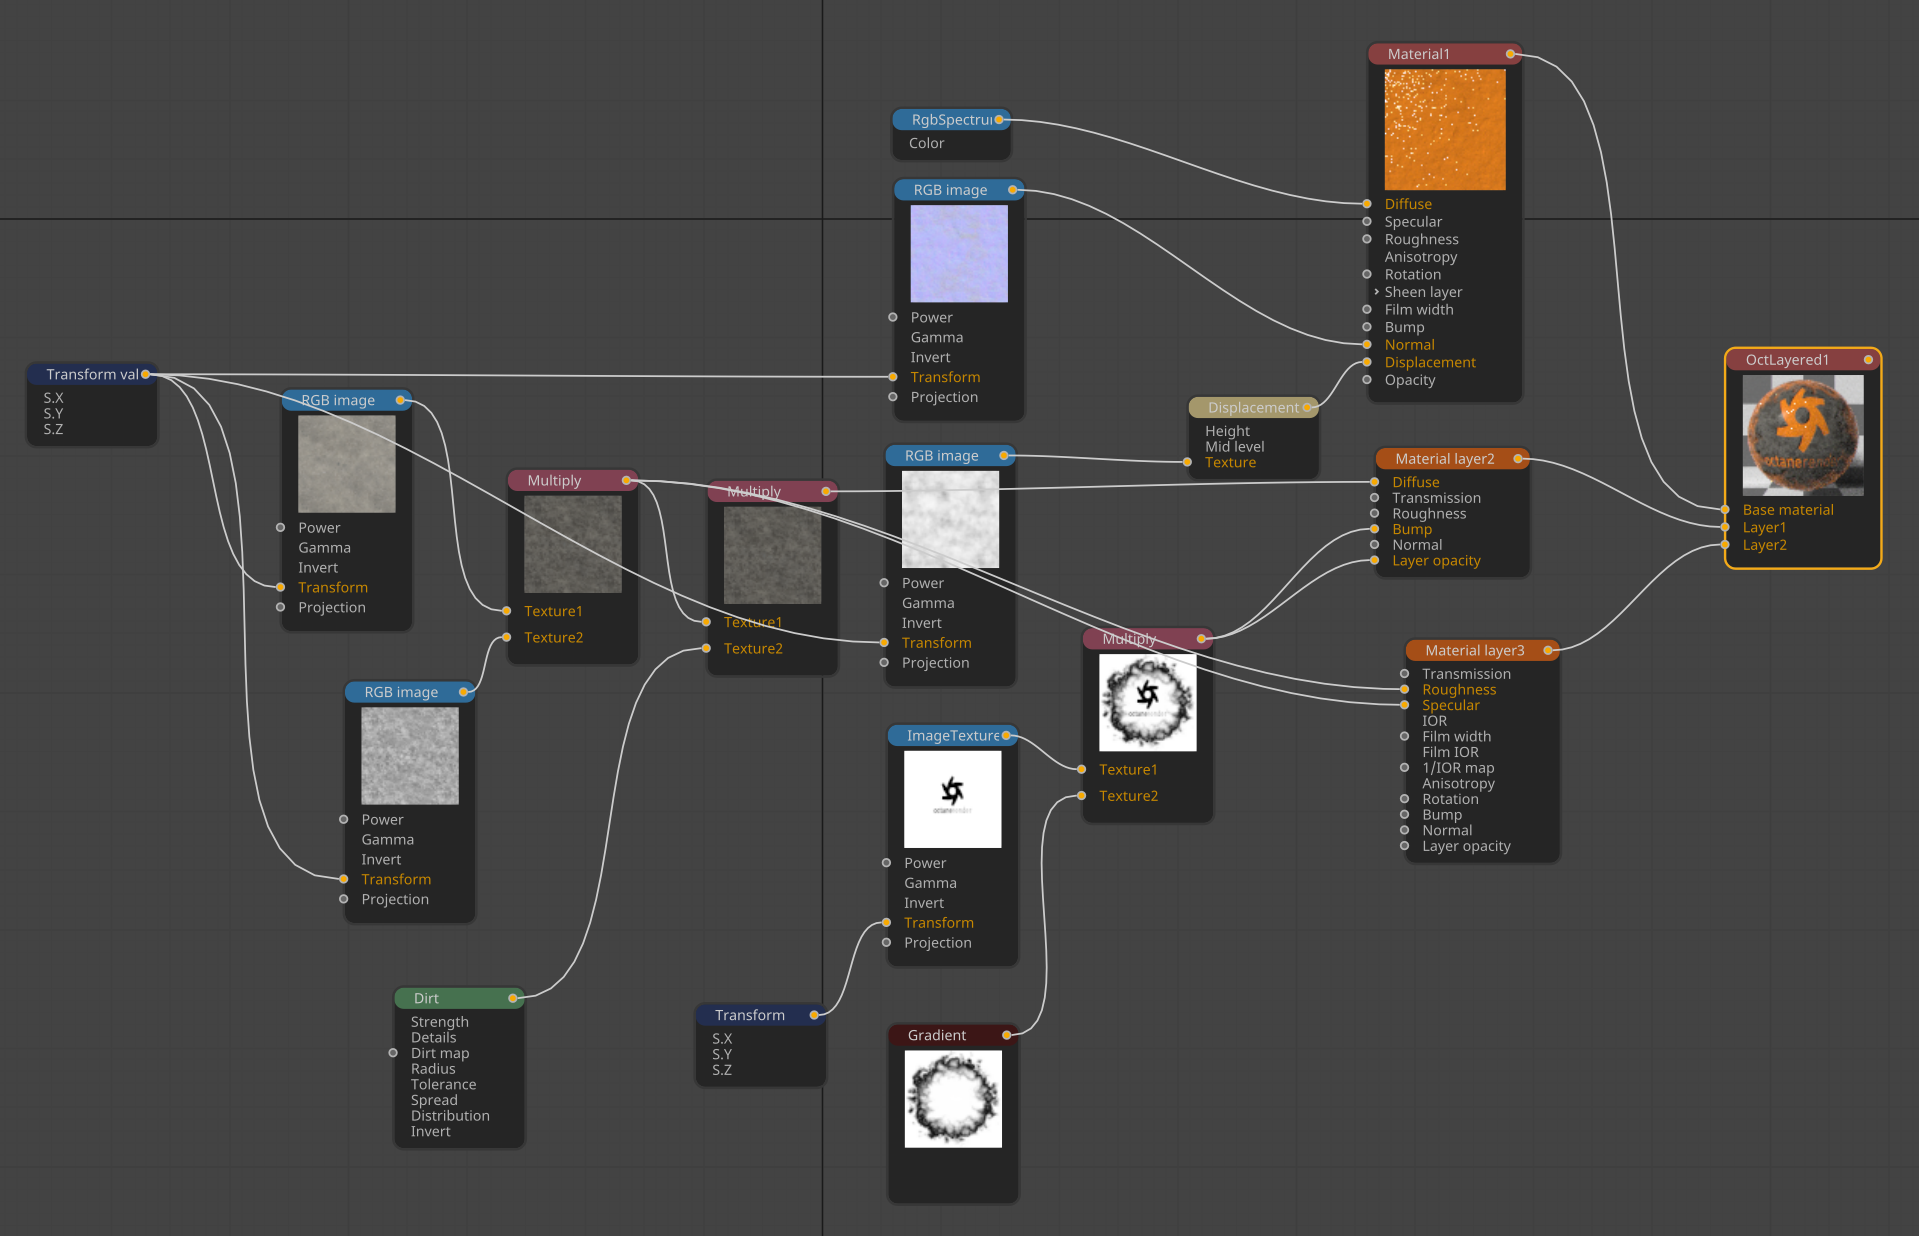
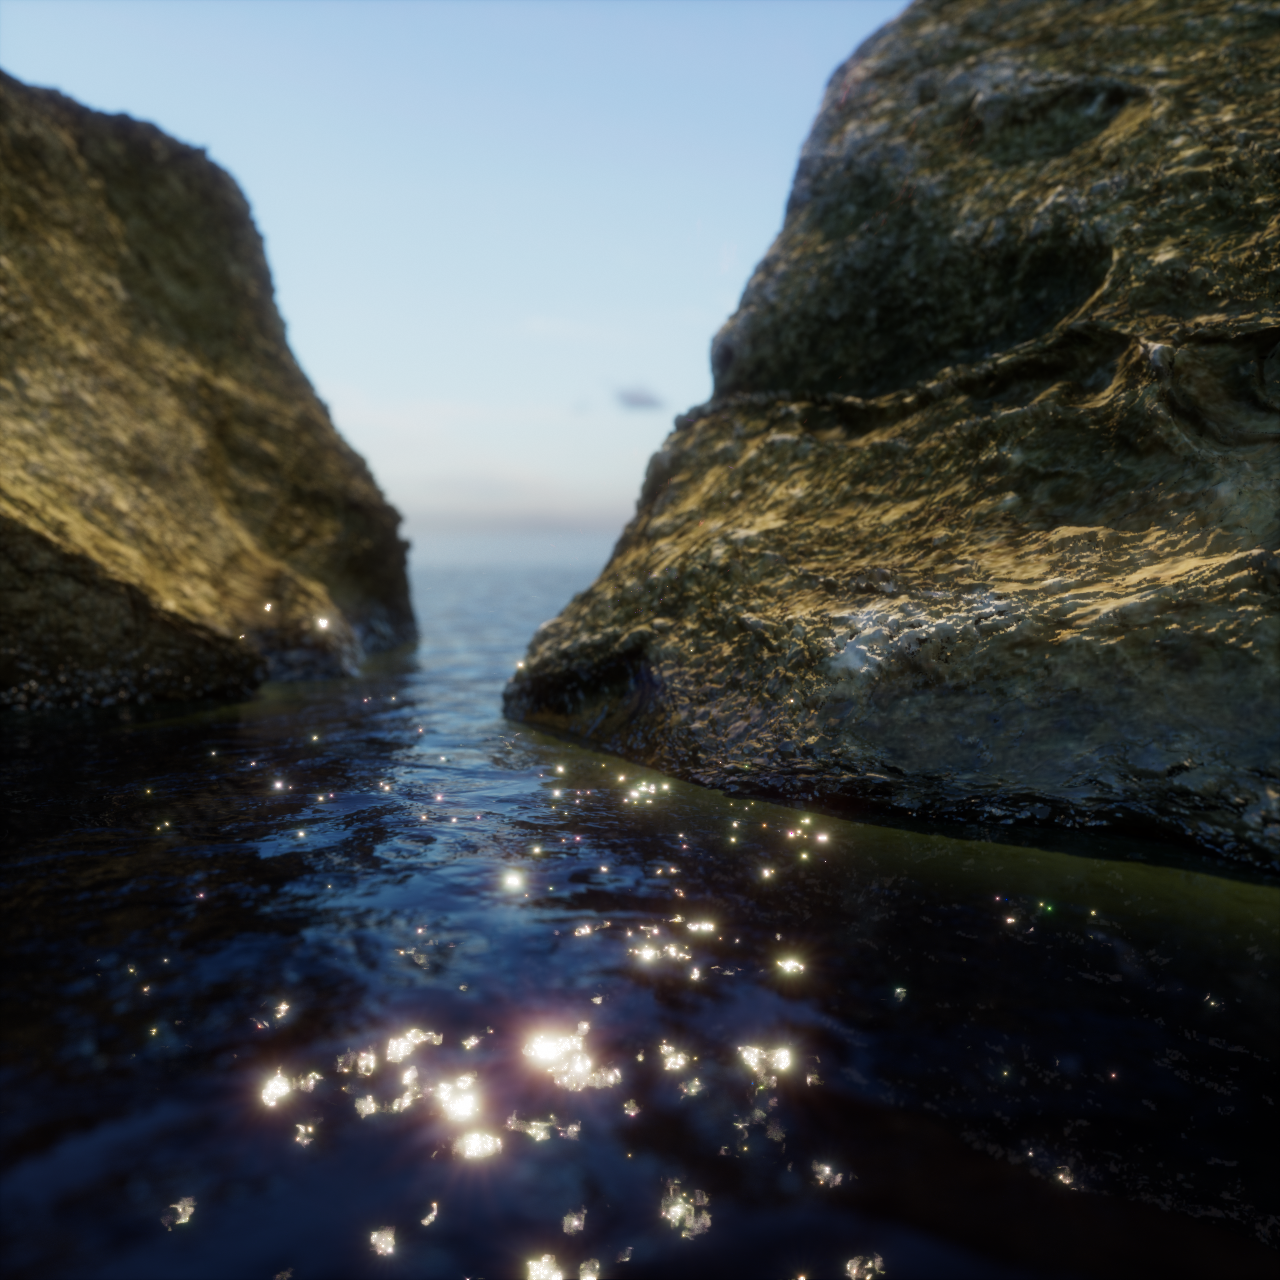
Creating Rock with Layers
In the following example, the Base Material is used to create the underlying dry portion of the rock, with a darker version diffuse material (adjusted using a Color Correction node) connected to Layer1. Layer2 is a specular to add a shiny wetness. Both Layer1 and Layer2 are masked with a Field Texture (set to Angular — see settings below) in the Layer Opacity inputs so that the darker material is confined to the lower portion of the mesh, and reusing that same gradient, limiting the wetness to just above the waterline. The displacement and normals only need to be used in the Base Material.
|
NOTE Gradients are often used for masking in situations like this. However, in this case, the UVs for the rock are irregular, thus causing the darker diffuse material to appear in unwanted areas of the rock, making the gradient useless. The Field Texture operates explicitly in three-dimensional space, producing the desired mask. The Angular option was chosen as it best fit the intent of the illustration. |
|
|
layered material example 4
|
|
|
layered material example 4 nodegraph
|
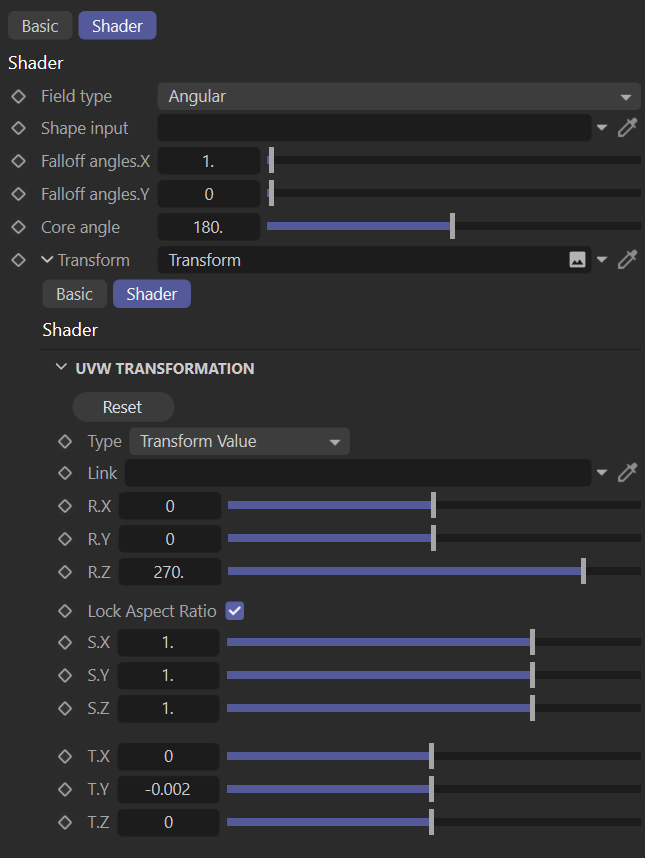
Angular Field Settings
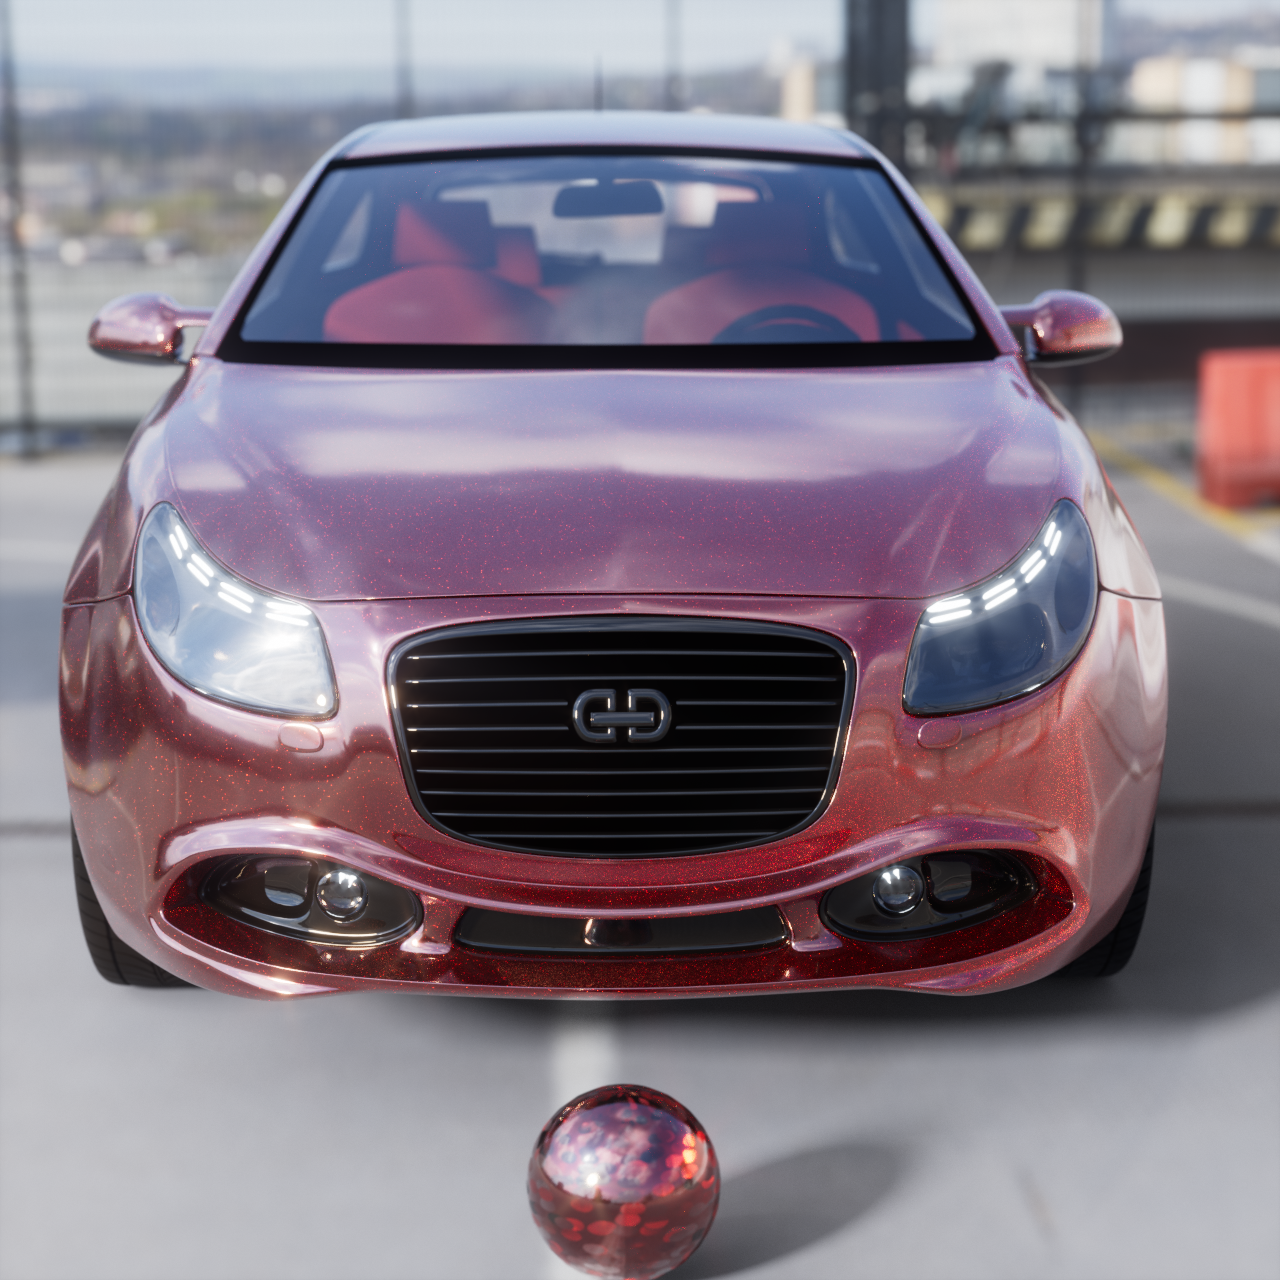
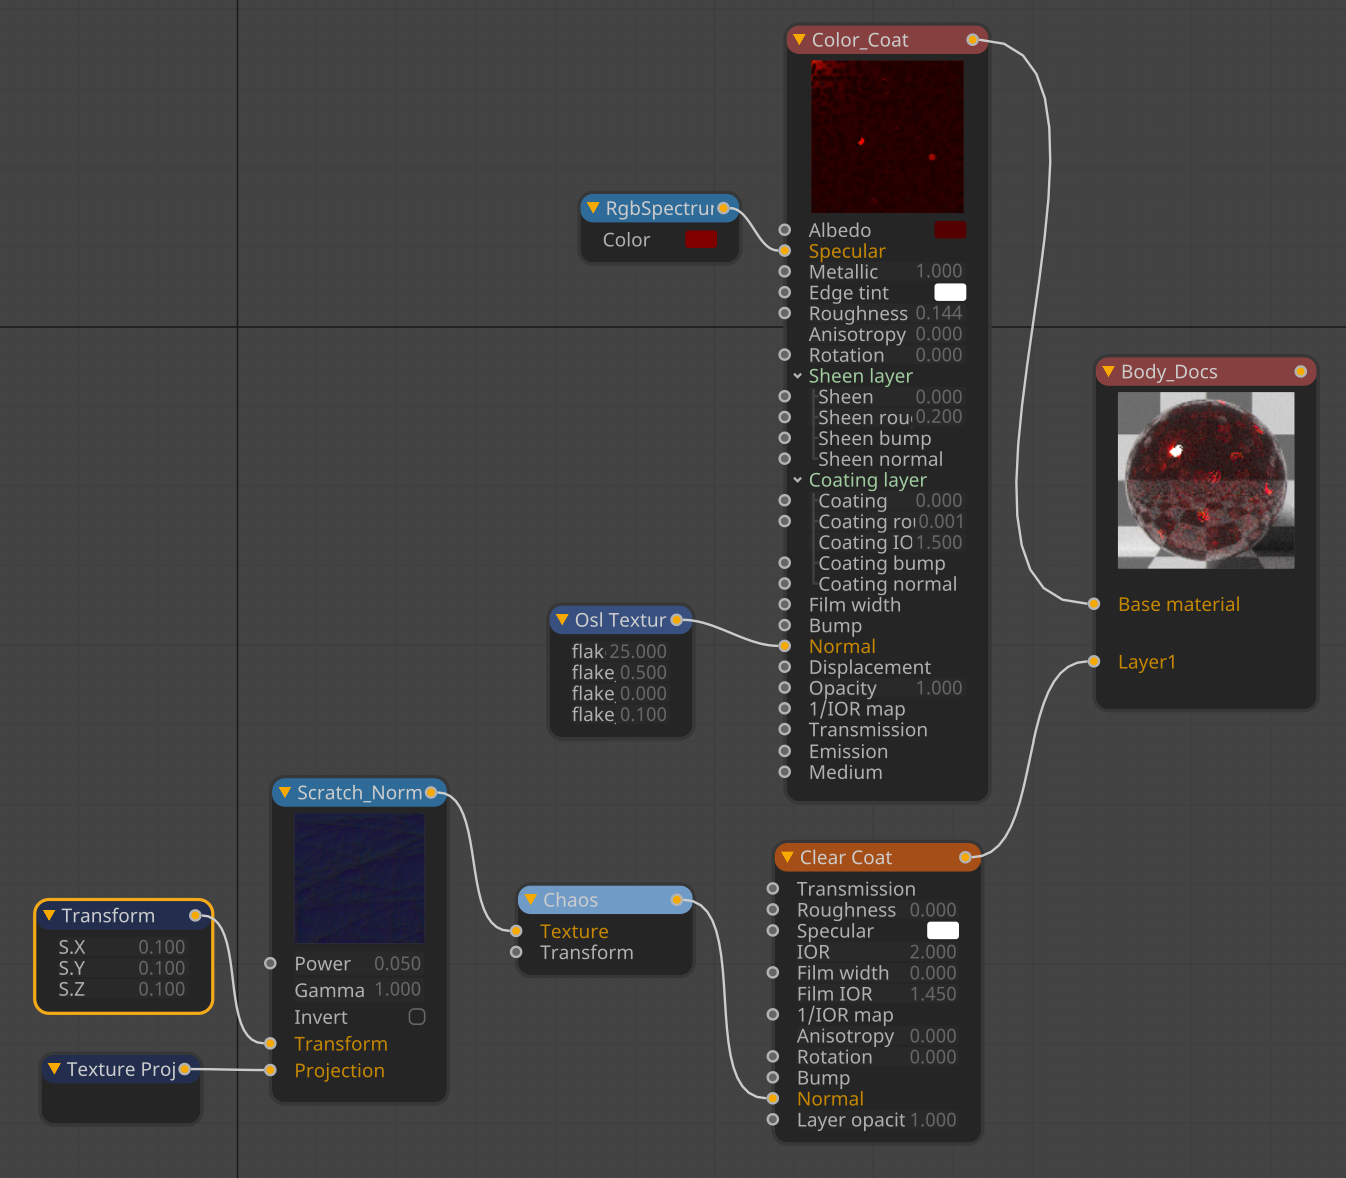
Creating Car Paint
The Layered Material enables the ability to craft materials in the same way they are constructed in the real world. In real life, car paint is typically applied as a color coat base with a clear coat on top, for protection and shine. This example shows a car paint material created with a Universal Base Material with color from the specular channel, and a bit of roughness. An OSL Flake node was connected to the normal map input of the Base Material to produce the metal flake speckles. The clear coat was created with a separate specular material which also had a Scratch Normal map connected via a Chaos node in Layer1:
|
|
layered material example 5
|
|
|
layered material example 5 nodegraph
|
Layer Groups
Layer groups can be used to organize and re-use of relevant parts of a node graph. There are two ways to create Layer group nodes:
- Drag from the input pin of a Layered Material and use the node search window, explained here. Double-click "Material layer" from the node list. Select the node, and in the attribute panel, choose, Layer tab > Layers > Add, and choose Layer group from the list. Select that new Material Layer node and then choose Add again, this time picking the desired material type. This will create a new Layer input in the Layer group node, as well as a new material layer of the type selected, already connected.
- Drag a Material layer node from the Texture Group in the node editor. Select the node, and choose Add, Layer group from the attribute panel. As with the previous method, this will convert the Material layer node into a Layer group. Select that node and choose Add again, adding a desired material type, which will automatically make the connection.
The following example uses a glossy Base Material with a smudge texture in the roughness channel. In the Layer1 input a Layer Group node combines a diffuse orange layer with a specular layer (for gloss) into one node, masked with the OctaneRender logo — this is accomplished using one input on the Layered Material, leaving another input open for extra details. For the Layer2 input, a metallic layer is masked with a simple square frame. The metallic reflection is only revealed where the white areas of the mask are applied to the mesh.
|
|
layered material example 6
|
|
|
Layered material example 6 nodegraph
|