Diffuse Layer
The Diffuse layer is used for dull, non-reflective materials.
|
|
Diffuse Layer
|
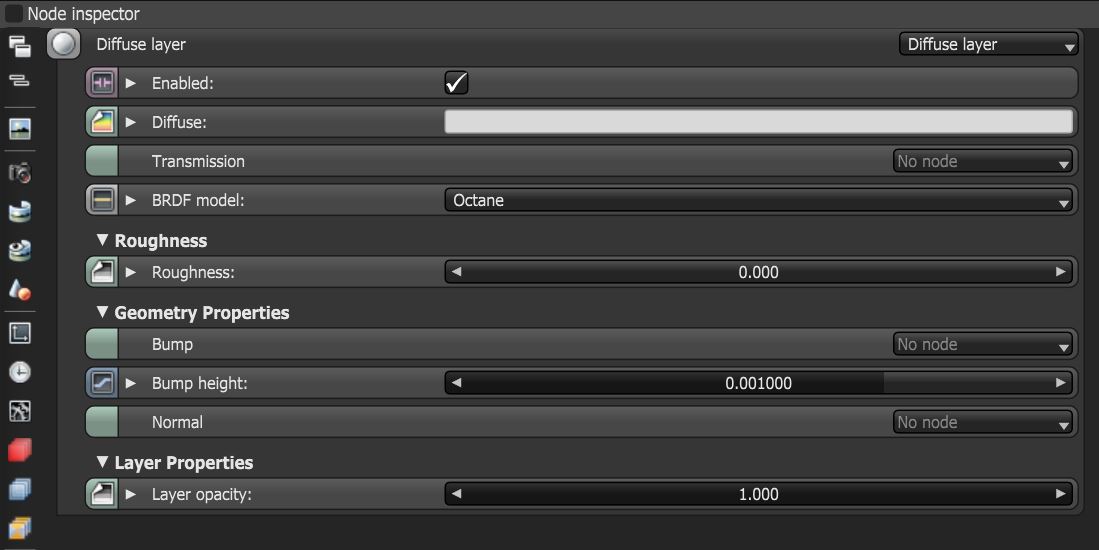
Figure 1: Diffuse layer parameters
Diffuse Layer Parameters
Enabled - Determines whether the material layer contributes to the overall layered material system.
Diffuse - Provides color to the material. This is also known as base color or albedo. You can set Diffuse color by using a value, or connecting a Procedural or Image texture.
Transmission - Uses a color or texture that is mixed with the material’s Diffuse color, and is most noticeable in areas affected by indirect lighting.
BRDF Model - Provides three models for diffuse light reflectance. Lambertian reflects light equally in all directions and does not support roughness. The Octane option creates a sheen effect much like velvet. And, the Oren-Nayar option behaves more like clay
Roughness - Determines the spread of highlights on the surface. A high Roughness value or light color can simulate very rough surfaces such as sand paper or clay. You can set Roughness using a value, or by connecting a Procedural or Image texture. A roughness value of 1 (white color) creates a diffuse sheen along the edges of the surface, simulating the look of crushed velvet.
Bump - Creates fine details on the material’s surface using a Procedural or Image texture. Often a Greyscale image texture connects to this parameter - light areas of the texture indicate protruding bumps, and dark areas indicate indentation. You can adjust the Bump map's strength by adjusting the Power or Gamma values on the Image texture node. These attributes are covered in more detail in the Texture topic in this manual.
Bump Height - Determines the height represented by a normalized value of 1.0 in the bump texture. A vaule of 0 disables the bump map and a negative value will invert the bump map.
Normal - Creates the look of fine detail on the surface. A Normal map is a special type of Image texture that uses red, green, and blue color values to perturb the surface normals at render time, giving the appearance of added detail. They can be more accurate than Bump maps, but require specific software such as ZBrush®, Mudbox®, Substance Designer, xNormal, or others to generate. To load a full-color Normal map, set the Normal channel to the RGB Image data type. Note that Normal maps take precedence over Bump maps, so you cannot use a Normal map and a Bump map at the same time.
Layer Opacity - Controls the material layer opacity with a Greyscale texture.

