Octane Gradient Map
The Gradient Map node (Standalone: Gradient Map) creates a gradient blend between color knot values.
|
IMPORTANT! The Gradient Map node requires an input connected to the Texture pin to work properly (typically a Falloff Map or Sinewave Generator node, but almost any Map node will suffice). If no input is connected to the Gradient Map node, standard Cinema 4D Color controls are displayed in the Gradient turndown. These controls are ignored by Octane. |
The texture input determines how the gradient is mapped to the surface — it may be necessary to add a Projection node to the texture used for the Texture Input pin. The Octane Gradient node is typically used for color and value remapping. For more traditional Cinema 4D uses of the gradient, it is better to use the C4D Gradient node.
|
ADDITIONAL OPTIONS The Octane Gradient Generator can be used to create specific gradient patterns, and also has built in Transform and Projection nodes for easy scaling and placement. |
Octane Gradient Map
The Octane Gradient map node controls are found in the Shader tab of the node. Depending upon which mode is selected, the contents in the Shader tab will change.
|
|
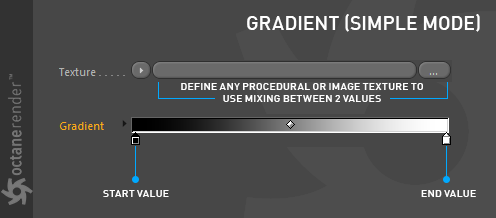
OCTANE GRADIENT map — simple mode
|

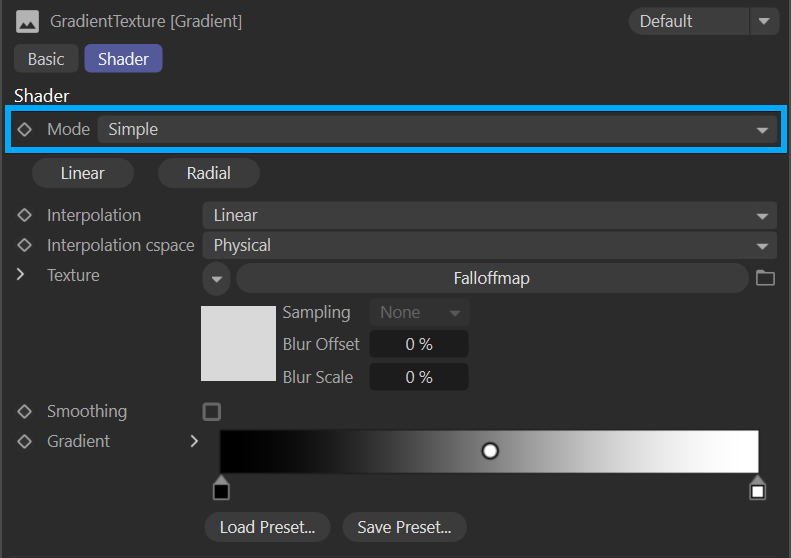
Octane Gradient Map — Simple Mode
Simple Mode
The Gradient texture node has two modes, Simple and Complex, set via the Mode menu in the Shader tab of the Octane Gradient node.
Common Gradient Settings
Mode
Select the gradient mode from this drop down menu. There are two modes: Simple and Complex, both of which are explained above.
Linear and Radial OptIons
You can select the gradient style from here.
Interpolation
Select from Constant, Linear or Cubic to determine the rate at which colors blend from one gradient knot to the next. Note that each color knot can have a separate interpolation value, so this setting will override those settings.
Texture (Input)
Input to determine the way the color is mapped to the surface. The importance of this option is explained in the examples above. For an accurate mix, you can define RGB / Alpha / grayscale procedural or image texture here.
Smoothing
This toggle smooths the mix if enabled.
Gradient Field
From here you can add "value" or knots to create the gradient.
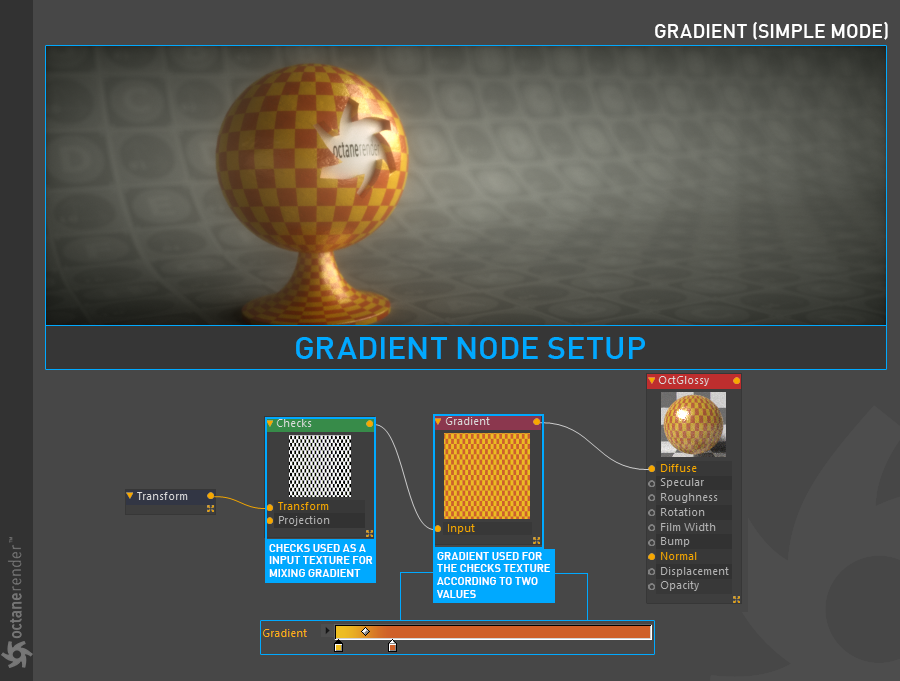
Color any Generator using a Gradient
A "value" is each color you assign to the gradient. This value can be any color or image texture. In simple mode you can define a maximum of 2 values, and any color or image texture will be mixed according to the data you define in the input node.
As you can see in the node setup below, the grayscale checker is used as texture input and the colors are changed by entering two separate values (i.e., color) in the gradient.
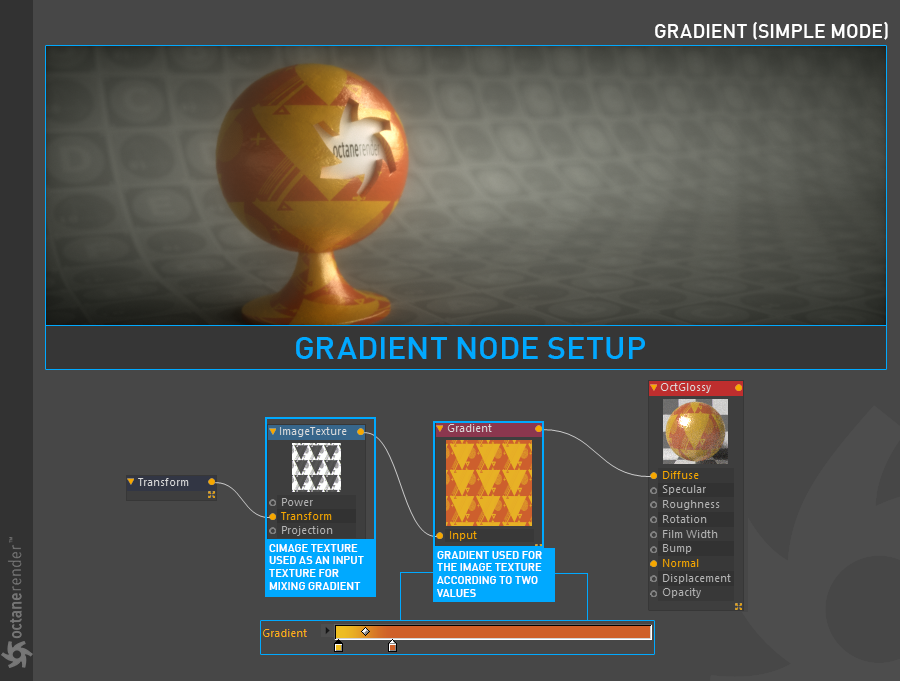
Re-Color any Image Texture using a Gradient
If you want to change the colors of the image texture you uploaded, you can also use a Gradient. The following setup shows this process.
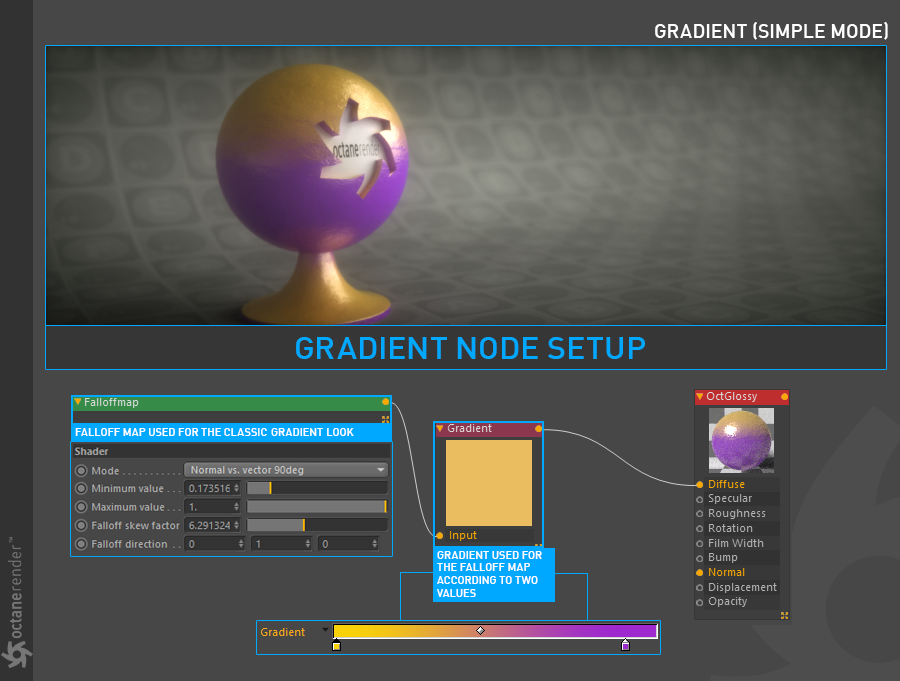
How to get a Classic Gradient Look
The default behavior of the Octane gradient does not create the expected "blend" between the two different color values. To get this blend, attach a Falloffmap node to the input of the Octane Gradient node. You can also use native Cinema 4D's "Gradient" for the classic gradient look.
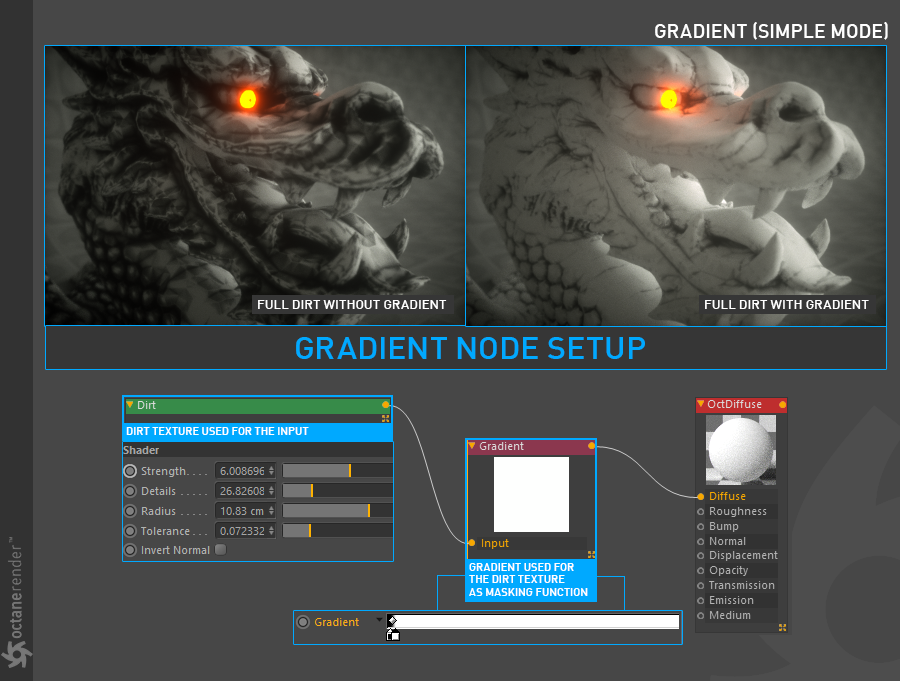
Gradient as a Mask Function for Dirt/other Generators
You can also use the Gradient Node as a mask. The default values, black and white (or float values which is 0 and 1), can use as a masking function. In the following setup the "Dirt Texture" is assigned to the Dragon Object and then using the gradient to make this dirt appear only in the crevices.
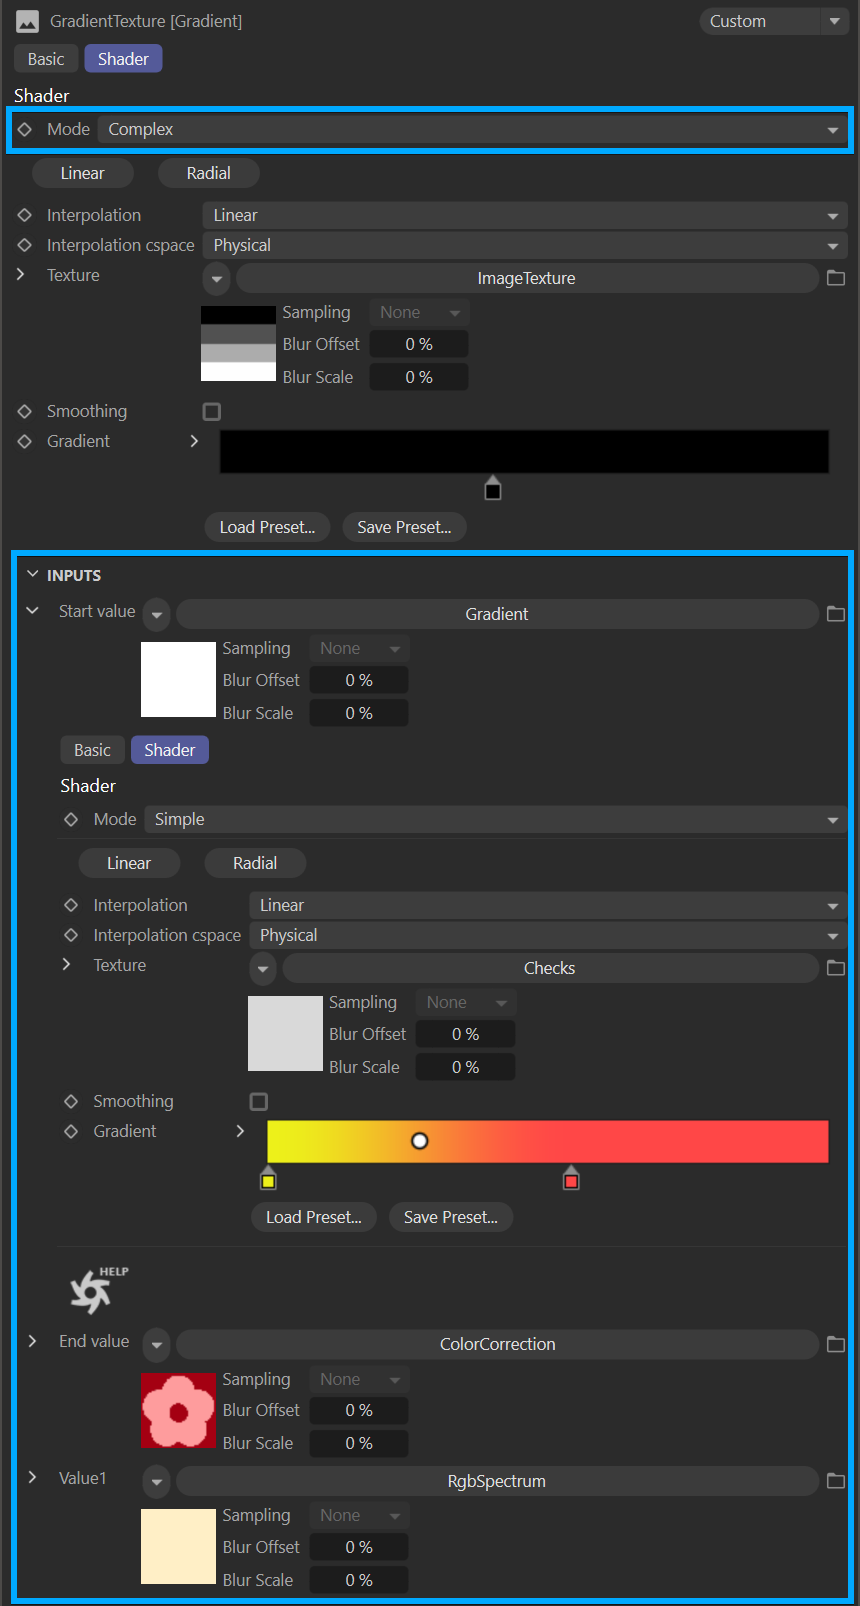
Complex Mode
To switch to Complex Mode, select Mode > Complex from the menu; this will reveal the additional gradient inputs available via the Complex Mode (shown in the following image), and accessible via the Inputs turndown. These inputs consist of a Start Value and End Value, as well as two additional Value inputs (more inputs are added by clicking on the Gradient ramp). It's possible to use any Image Texture or Procedural texture for the values. The image below shows an example setup. Only one "value" is used except the "Start and End" values to get the texture in the image. Also, one image texture is used as a input texture and mix factor. Download the scene from this link
|
|
Octane gradient map — complex mode
|
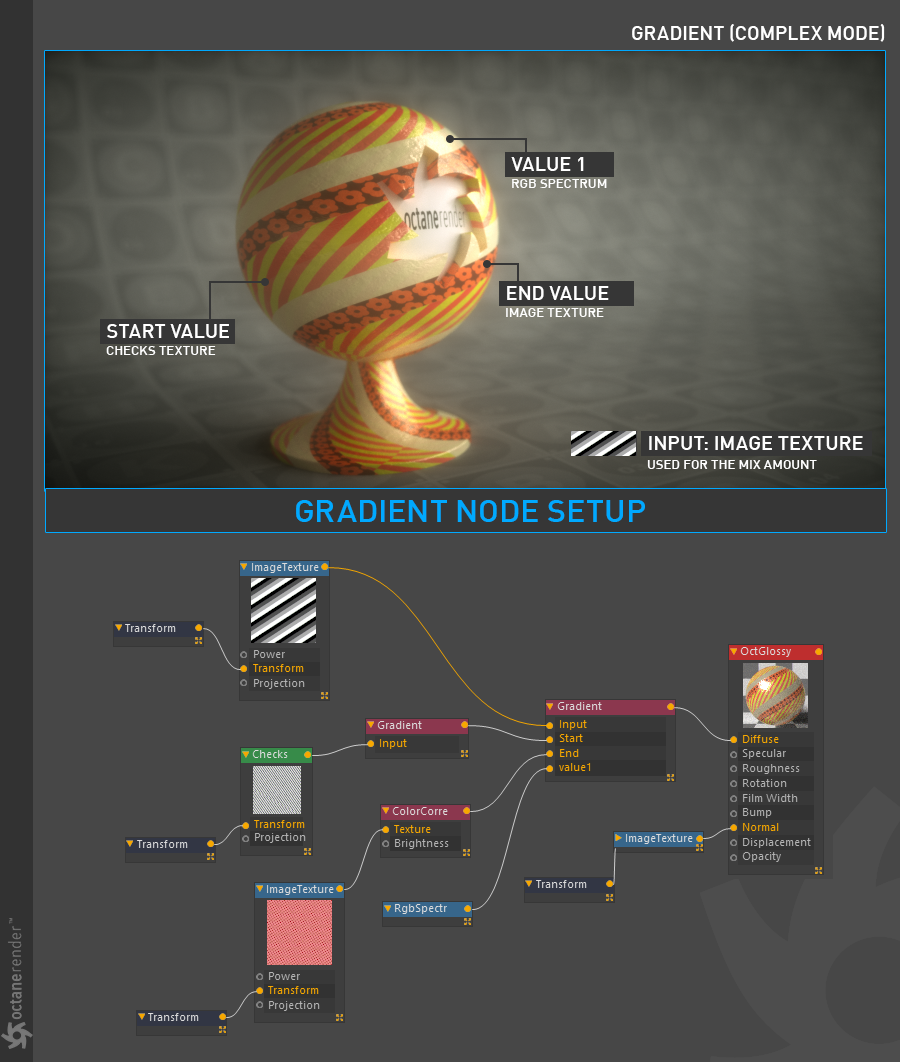
Octane Gradient Map — Complex Mode
In the illustration, a Gradient Map node is set to Complext Mode. There are now inputs for Start, End, and (in this case) one value (more values can be added by clicking on the Gradient ramp itself). Here, there are three different input textures being modulated by the Image Texture connected to the Input pin. The values in the Image Texture determine where the other textures will be applied on the object, creating the pattern seen in the rendered image. Additionally, the Checker generator is being colorized by a Gradient Map to red and yellow squares. The Checker generator is rotated on the Y axis in the attached Transform node to create the spiral effect, as is the Image Texture of the flower graphic.