How to Render on a Network
Network rendering requires OctaneRender® Enterprise and a properly configured network, consisting of a Primary Node and Render Node machines (with installed GPU devices). This section will discuss a simple approach for network rendering using the tools directly within Octane. This section does not cover the use of third-party network rendering controllers such as Team Render or Deadline.
|
IMPORTANT: |
|
Network rendering requires the Enterprise license of Octane (Octane Standalone + C4D Plugin) and only the Octane Standalone License on node machines. |
|
Ensure that the controller and the node are not blocked by the Operating System firewall or any firewalls in the network. This can be done by turning off the firewall for home/work networks on the controller. If that does not help, try switching off the firewall on the node computer for home/work networks. |
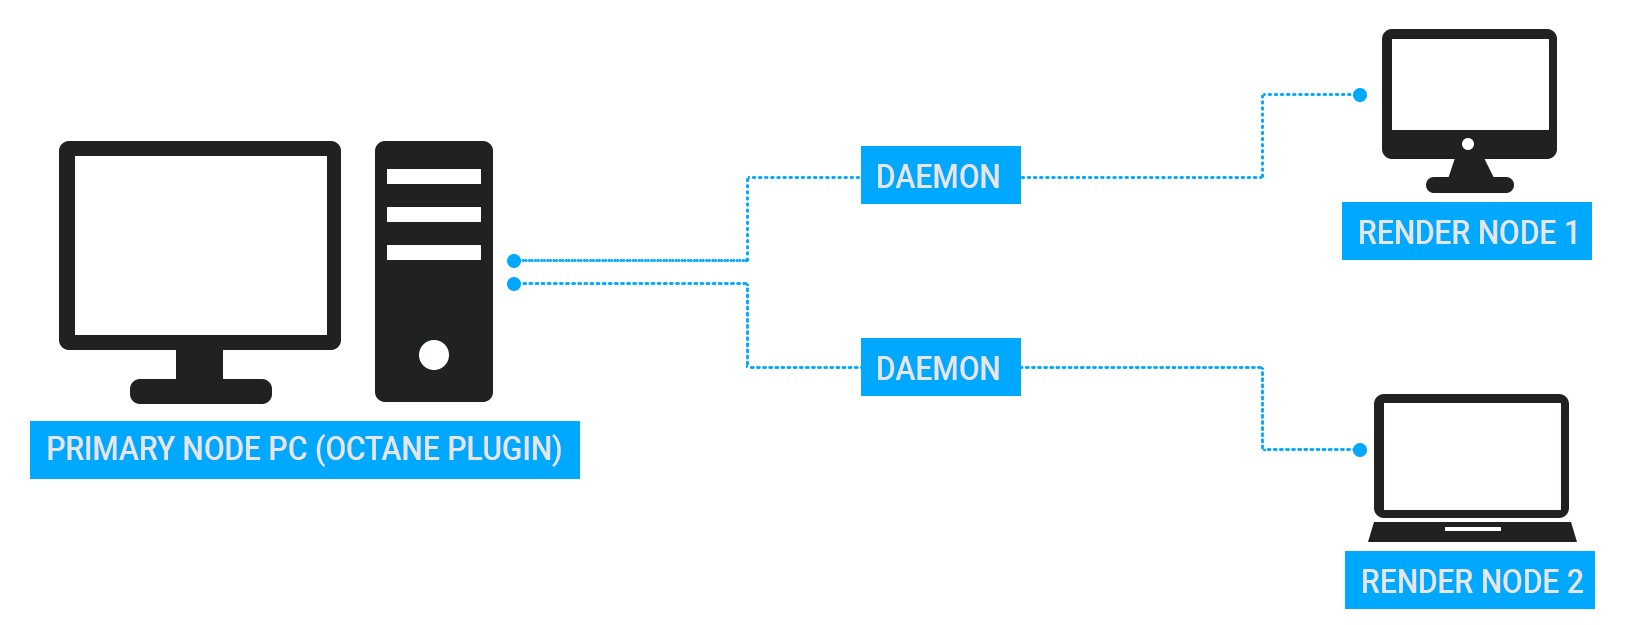
The illustration above shows one Primary Node PC and two Render Node computers. We want to use these two render nodes with their installed GPU(s) for the renders.
Getting Everything Set Up
1. Install Daemons
Begin by installing the daemon utility on the render node machines. The daemon is a program that starts a render node process on the machine (on request by a controller), monitors it and stops it (on request by a controller). Monitoring means making sure that a running render node sends a regular “heartbeat” to the daemon and if that doesn’t happen it will try to stop the render node gracefully and if that does not work, it kills the process. The daemon runs all the time and starts/stops a render node process if a controller requests it. The daemon also listens for the “heartbeat” of the render node to check if the render node process is still running at all. This render node daemon eliminates the need to launch the render node process manually on each computer each time rendering is required on the render node.
|
INFO: You must perform the Daemon Install process described below for each render node machine separately. |
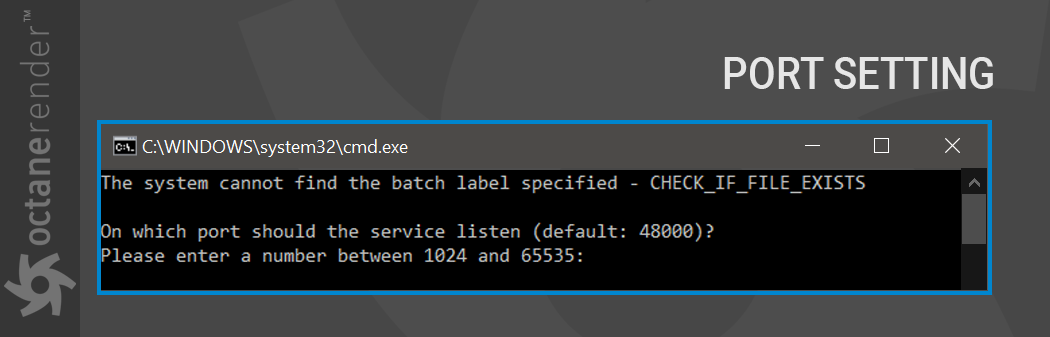
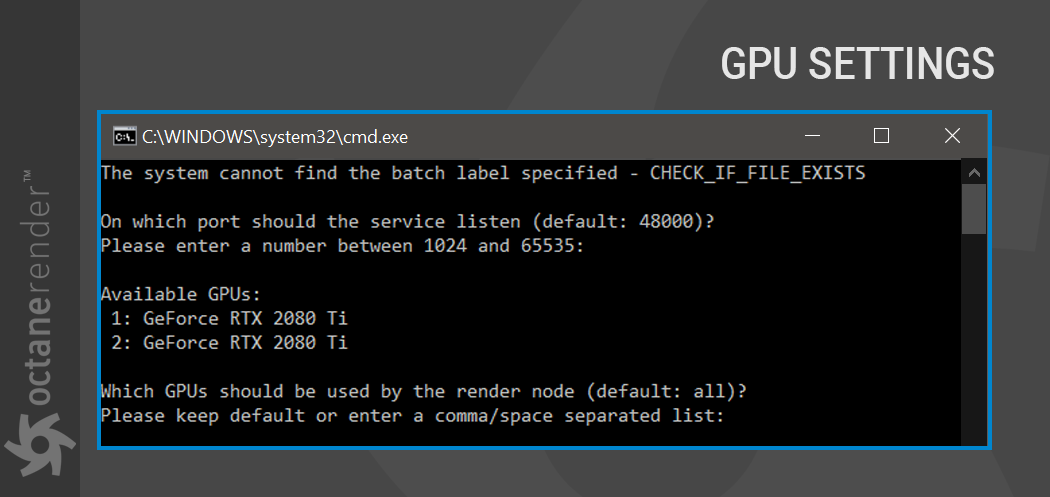
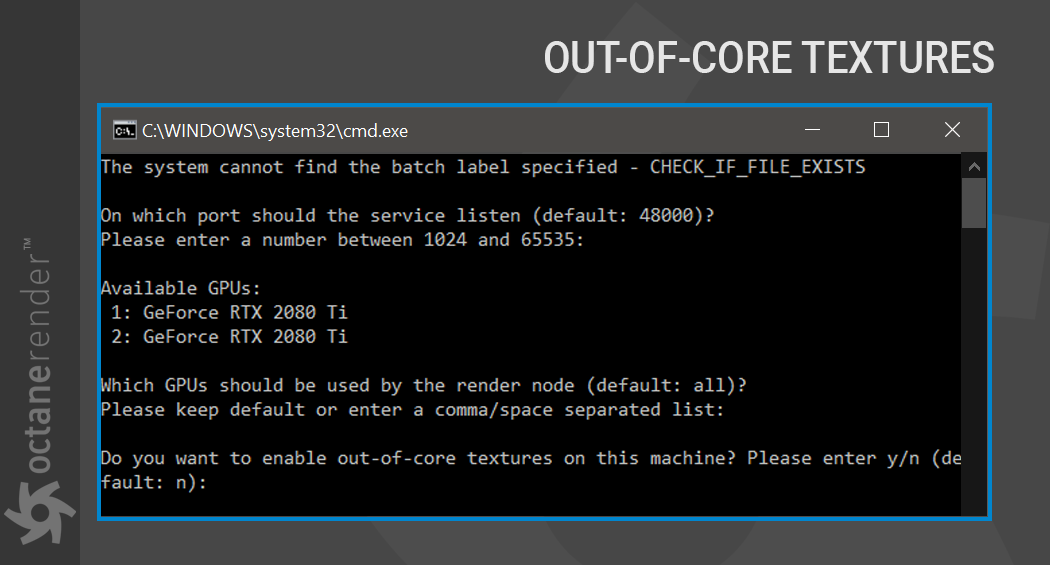
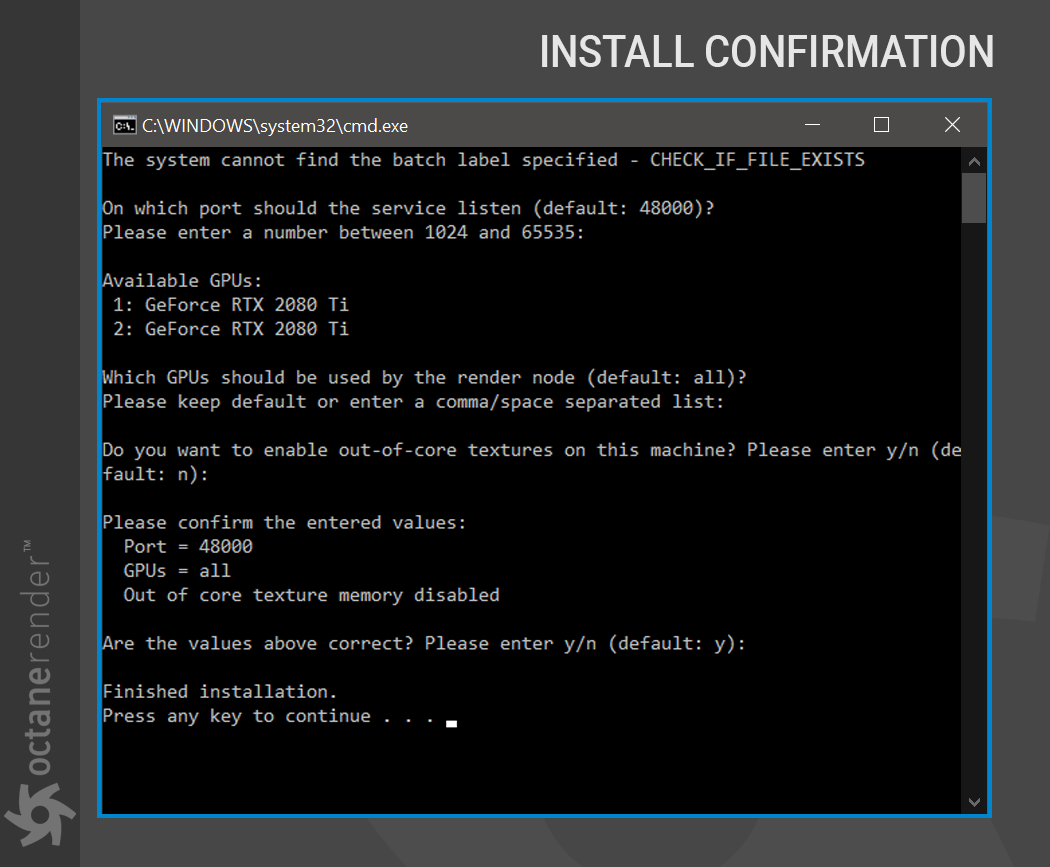
To install the render node Daemon: first go to the standalone install folder. In this folder, run the command line utility named "_install_daemon.bat". The Command line window will appear and there will be some options:
Port Setting
Specifies port the Daemon will listen to. The default port is 48000. Use this default value by pressing Enter.
GPU(s) Setting
Presents a list of GPU(s) on the render node machine and choose which one to use. For example, if only 2 out of 3 GPUs are needed, just enter the following line: "1, 2" (without quotations), or press Enter to default to use all GPUs.
Out of Core Textures Setup
Specify the use of the Out of Core textures on the render node machine. If VRAM amount is sufficient, skip this feature by entering "0". More about the Out of Core feature from this link.
Confirm & Finish Installation
A confirmation text will appear afterward. If all the settings are correct, type "y" to complete the installation. Exit the command line utility by pressing any key.
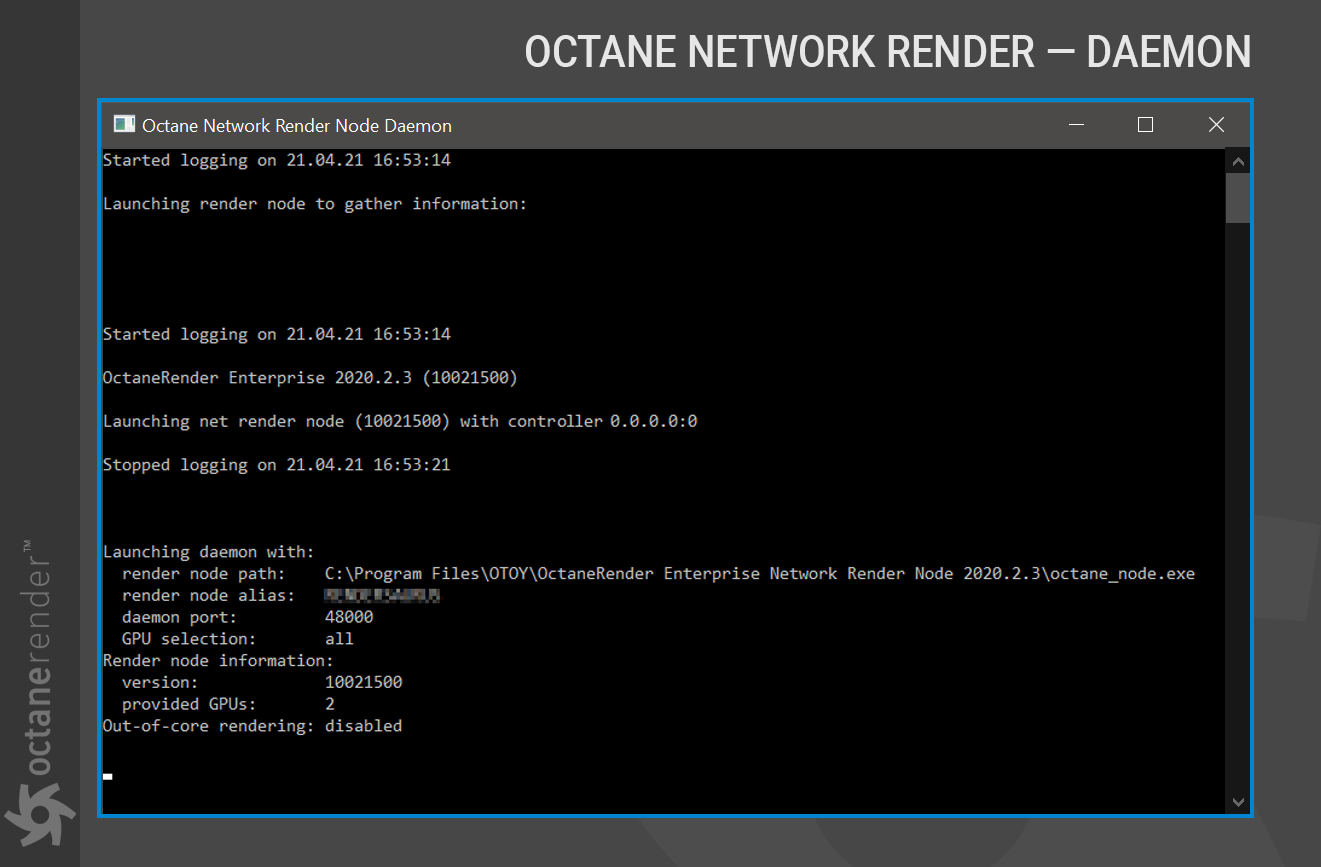
2. Starting Daemon(s)
The Daemon must now be run on the render node machines. The Daemon will be ready to use the render node machines every time rendering requests come from the controller machine. For this, go to the folder where Standalone is installed and run "_run_installed_daemon.bat". Daemon will run the command "octane_render node.exe" automatically. The properties of the render node machine will be presented in the command line window that appears on the screen. Now the render node machine is ready for network rendering.
|
INFO: This window must be opened at all times. Daemon will run automatically when you restart the computer. |
Using Network Render in Live Viewer
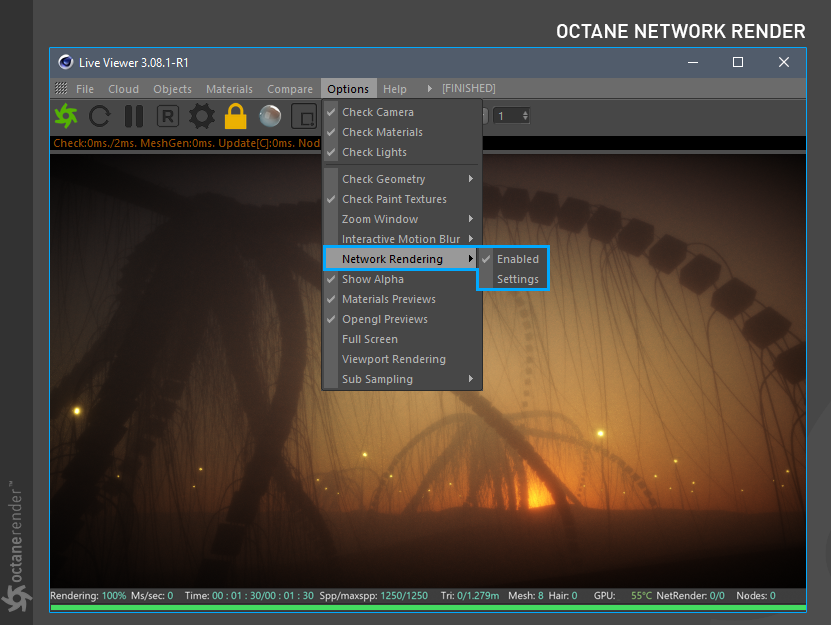
This completes the setup of render node machines. Now it is time to use the GPUs in these machines to render. Open Cinema 4D, upload any project, and launch Live Viewer. From the Live Viewer menu go to Options > Network Rendering and choose Enabled. Then go to the Settings.
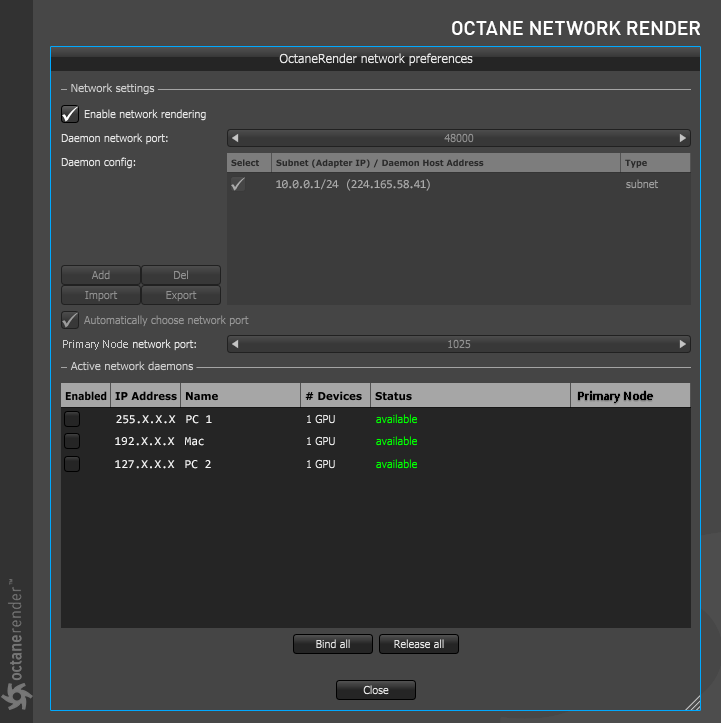
The Settings window contains the network settings, and the render node machines in general. The Daemon utility running on other machines plays a key role in communication with both controller and render node machines. The Subnet (Adapter IP) and Daemon Host Address seen in the Daemon Config window are the physical addresses of the modem or Network Hub. If more than one address appears in this section, the physical address of the network hub or modem is the one that is required. The required IP is the Daemon Host address.
|
Find IP on Windows |
Find IP on Macintosh |
|
|
After the Subnet IP has been identified, a list of render node machines will appear in "Active Network Daemons". Machines listed in the Status list as "available" are ready for network rendering. Enable the desired nodes; the message: "render node is running" will appear. Alternatively, click "Bind all" to activate all render node machines. Once completed, close the Network window. Now it's time to render.
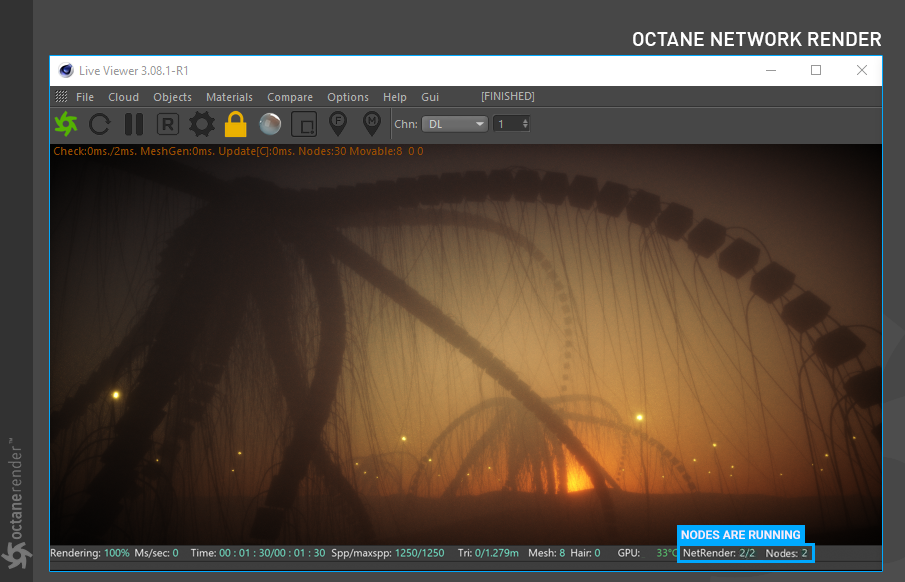
Restart Live Viewer. Live Viewer will display "NetRender" and the number of Nodes in the lower info section, confirming that network rendering is active. The Daemon command line window will continuously update log info for the render node machines. For a more advanced log, choose "Console (Shift + F10)" from the "Script" menu of Cinema 4D.
Using Network Render in Picture Viewer
To use the network render for the Picture Viewer:
- Open the Cinema 4D render settings (CTRL + B).
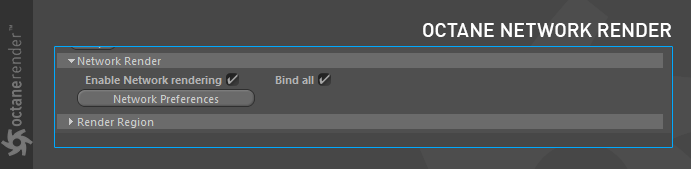
- Go to the Network Render section in the Octane Renderer Main settings.
- Check the "Enable Network Rendering" and "Bind all" options.
To switch or change network settings if needed, press the "Network Preferences" button.
Choose Render > Render to Picture Viewer in the main Cinema 4D menu bar, or click on the Render icon. Once the files are loaded and rendering begins, information about network render usage will be displayed in the Picture Viewer, as seen in the image below.
