Composite Texture Layer
The Composite Texture Layer node is a support node that is intended to work solely with the Composite Texture node. Each Composite Texture Layer node will be added to the composite stack of the parent Composite Texture node, and the contents of which are layered like any 2D image processing application that supports layering.
The Composite Texture Layer nodes are adjustment layers that can be used to fine-tune the composite at a specific point in the layer stack. The list of layers includes color adjustment operations and a number of utility operators. These adjustment layers can either process the intermediate result produced by the layers below, or they can be attached to a specific layer to adjust only that layer's input.
Additionally, layers can be grouped into isolated or non-isolated (pass-through) groups. The first type composites the layers in the group onto a transparent background before finally compositing the output of the group with the other layers in the stack. The latter uses the current state of the texture stack as the group's background.
|
|
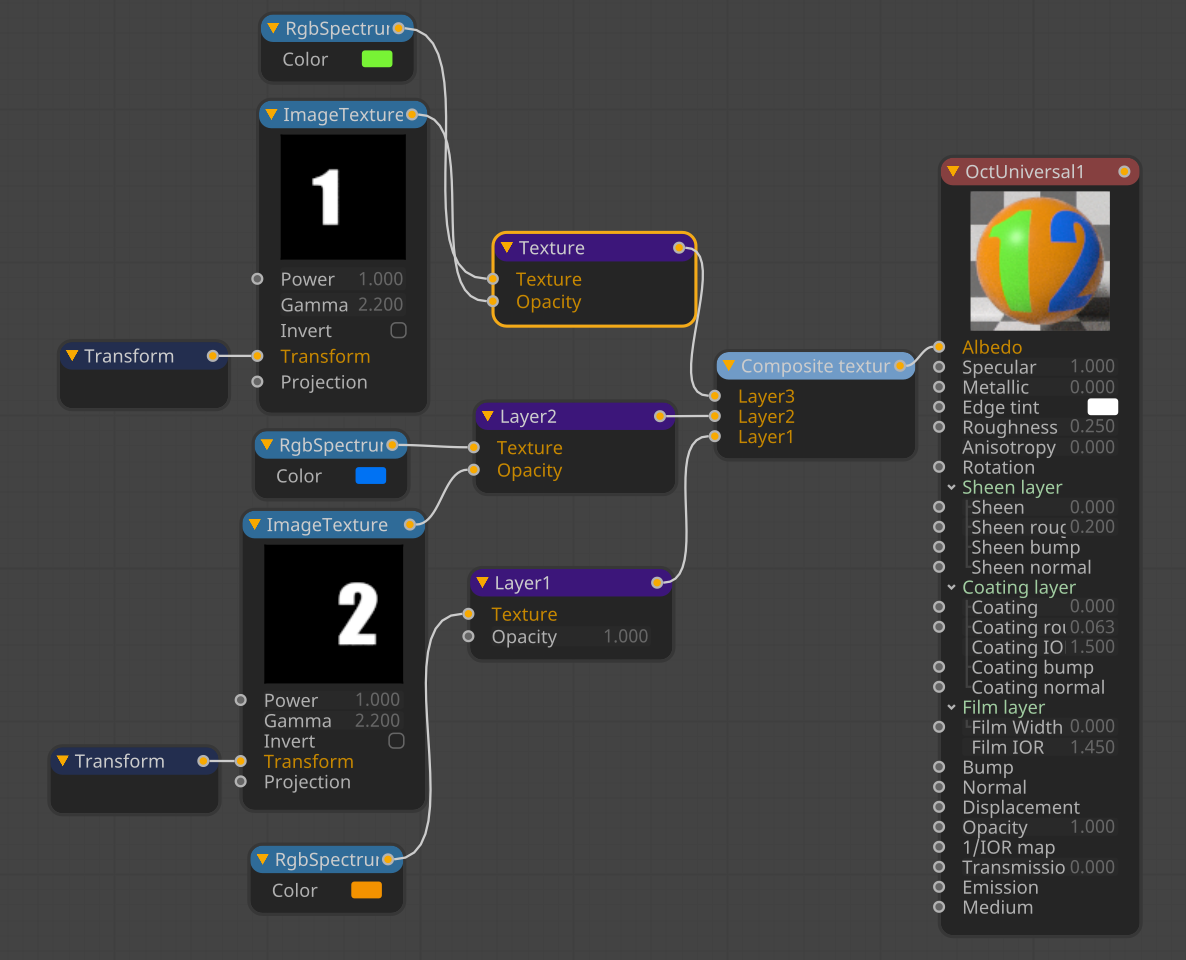
example composite texture layer node tree
|

|
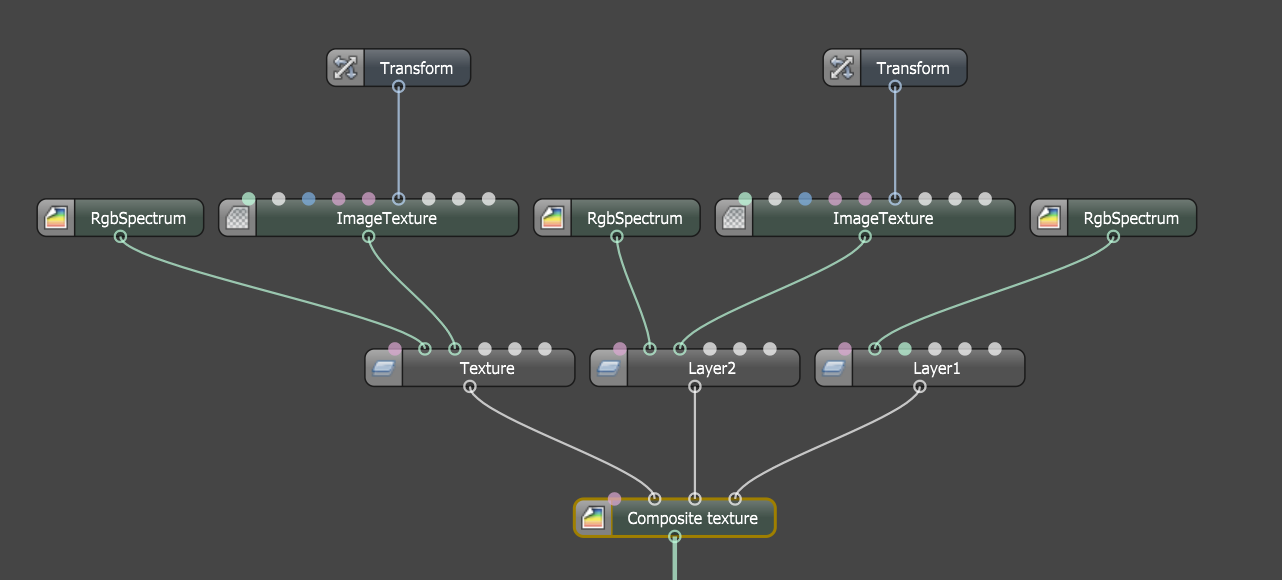
FYI These specific nodes are found in theOctaneRender for Cinema 4D plugin only, and not found in Octane Standalone, as these functions are present directly in the Composite Texture node in Octane Standalone. Upon export of the ORBX file to Octane Standalone, the Composite Texture Layer nodes are processed to conform to the Octane Standalone representation. See the following image. |
|
|
same Example in Octane standalone
|
Adding a Composite Layer Node
Select the Composite Texture node, and choose the Add Layer button. This will create a Composite Texture Layer node and connect it to the Composite Texture node automatically.

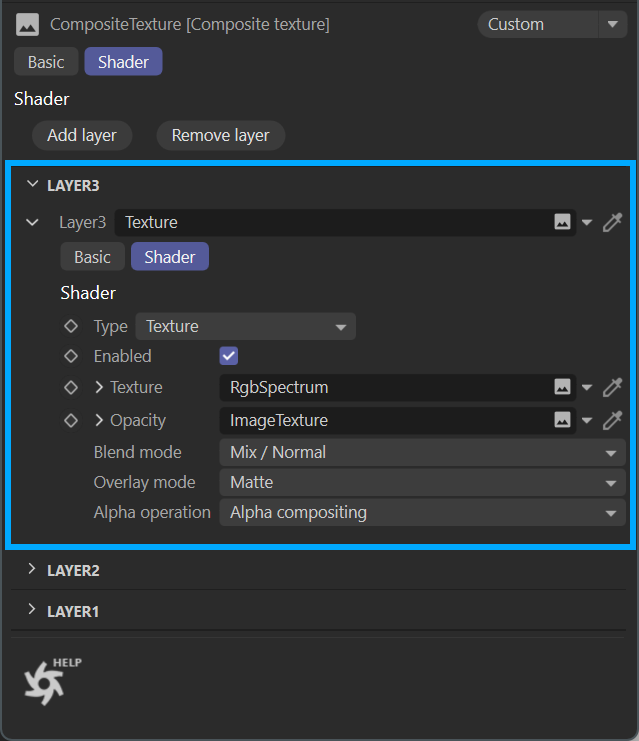
The Shader tab of the Composite Texture Layer node contains the following controls for the adjustment layers. The controls available will change based upon the adjustment layer chosen from the Type menu in this tab, as shown in the image.
Type Menu
The Type menu contains the following node options:
Layer Group
Enabled flag — Enable or disable this texture with this control.
Pass Through — In pass-through mode, this is a non-isolated compositing group. Its background is the output of the layers below it.
When disabled, this is an isolated compositing group. Its background is black and fully transparent.
Opacity — The opacity channel used to control the transparency of this layer.
Blend Mode — The blend mode of this texture for the composite operation.
Overlay Mode — This option determines how this texture is to be treated in the composite.
Add/Remove Layer Buttons — Add or remove layers.
Texture
Enabled flag — Enable or disable this texture with this control.
Texture input — Input texture for this layer.
Opacity — The opacity channel used to control the transparency of this layer.
Blend Mode — The blend mode used to mix the RGB values of this layer with those of the background.
Overlay Mode — The alpha compositing operation used to combine the blend result with the background.
Alpha Operation — The alpha operation sets the layer's output alpha, after blending and compositing with the background. This option determines how (or if) the Alpha channel is to be used in the composite. If no Alpha channel is present in the texture, there are several other blending operations which can be set for this texture.
Adjust Brightness
Enabled flag — Enable or disable this texture with this control.
Attach to Layer — When selected, this layer modifies the input of the next lower layer that is not itself attached to a layer. Otherwise, it applies to the output of the next lower layer.
Luminance — Factor by which to multiply all RGB values.
Opacity — The opacity channel used to control the transparency of this layer.
Blend Mode — The blend mode used to mix the RGB values of this layer with those of the background. Defaults to Mix/Normal.
Adjust Color Balance
Enabled flag — Enable or disable this texture with this control.
Attach to Layer — When selected, this layer modifies the input of the next lower layer that is not itself attached to a layer. Otherwise, it applies to the output of the next lower layer.
Shadows — Shadow adjustment for the cyan-red, magenta-green and yellow-blue axes.
Midtones — Midtone adjustment for the cyan-red, magenta-green and yellow-blue axes.
Highlights — Highlight adjustment for the cyan-red, magenta-green and yellow-blue axes.
Preserve Brightness toggle — Preserve the brightness of the colors. Defaults to ON
Opacity — The opacity channel used to control the transparency of this layer.
Blend Mode — The blend mode used to mix the RGB values of this layer with those of the background. Defaults to Mix/Normal.
Adjust Contrast
Enabled flag — Enable or disable this texture with this control.
Attach to Layer — When selected, this layer modifies the input of the next lower layer that is not itself attached to a layer. Otherwise, it applies to the output of the next lower layer.
Contrast — Amount of additional contrast to apply.
Opacity — The opacity channel used to control the transparency of this layer.
Blend Mode — The blend mode used to mix the RGB values of this layer with those of the background. Defaults to Mix/Normal.
ADjust Exposure
Enabled flag — Enable or disable this texture with this control.
Attach to Layer — When selected, this layer modifies the input of the next lower layer that is not itself attached to a layer. Otherwise, it applies to the output of the next lower layer.
Exposure — Amount of exposure adjustment in stops.
Opacity — The opacity channel used to control the transparency of this layer.
Blend Mode — The blend mode used to mix the RGB values of this layer with those of the background. Defaults to Mix/Normal.
Adjust Hue
Enabled flag — Enable or disable this texture with this control.
Attach Layer — When selected, this layer modifies the input of the next lower layer that is not itself attached to a layer. Otherwise, it applies to the output of the next lower layer.
Hue Shift — Hue shift in degrees.
Opacity — The opacity channel used to control the transparency of this layer.
Blend Mode — The blend mode used to mix the RGB values of this layer with those of the background. Defaults to Mix/Normal.
Adjust Lightness
Enabled flag — Enable or disable this texture with this control.
Attach Layer — When selected, this layer modifies the input of the next lower layer that is not itself attached to a layer. Otherwise, it applies to the output of the next lower layer.
Lightness — Lightness adjustment factor.
Opacity — The opacity channel used to control the transparency of this layer.
Blend Mode — The blend mode used to mix the RGB values of this layer with those of the background. Defaults to Mix/Normal.
Adjust Saturation
Enabled flag — Enable or disable this texture with this control.
Attach Layer — When selected, this layer modifies the input of the next lower layer that is not itself attached to a layer. Otherwise, it applies to the output of the next lower layer.
Saturation — Factor by which to multiply the saturation.
Opacity — The opacity channel used to control the transparency of this layer.
Blend Mode — The blend mode used to mix the RGB values of this layer with those of the background. Defaults to Mix/Normal.
Adjust Saturation(HSL)
Enabled flag — Enable or disable this texture with this control.
Attach Layer — When selected, this layer modifies the input of the next lower layer that is not itself attached to a layer. Otherwise, it applies to the output of the next lower layer.
Saturation(HSL) — Saturation shift in the HSL representation.
Opacity — The opacity channel used to control the transparency of this layer.
Blend Mode — The blend mode used to mix the RGB values of this layer with those of the background. Defaults to Mix/Normal.
Adjust White Balance
Enabled flag — Enable or disable this texture with this control.
Attach Layer — When selected, this layer modifies the input of the next lower layer that is not itself attached to a layer. Otherwise, it applies to the output of the next lower layer.
White Point — The color (before white balance) that will become white after white balance.
Opacity — The opacity channel used to control the transparency of this layer.
Blend Mode — The blend mode used to mix the RGB values of this layer with those of the background. Defaults to Mix/Normal.
Apply Gamma Curve
Enabled flag — Enable or disable this texture with this control.
Attach Layer — When selected, this layer modifies the input of the next lower layer that is not itself attached to a layer. Otherwise, it applies to the output of the next lower layer.
Gamma Curve — The gamma value used. The equation applied is: output = pow(input, 1/gamma).
Opacity — The opacity channel used to control the transparency of this layer.
Blend Mode — The blend mode used to mix the RGB values of this layer with those of the background. Defaults to Mix/Normal.
Apply gradient map
Enabled flag — Enable or disable this texture with this control.
Attach Layer — When selected, this layer modifies the input of the next lower layer that is not itself attached to a layer. Otherwise, it applies to the output of the next lower layer.
Opacity — The opacity channel used to control the transparency of this layer.
Blend Mode — The blend mode used to mix the RGB values of this layer with those of the background. Defaults to Mix/Normal.
Mode — Determines how the ratios of the input colors vary between control points.
Interpolation — Physical uses scene-linear values and creates gradients that approximate optical effects in the real world. Perceptual uses the Oklab color space and creates gradients that vary smoothly to the human eye.
Physical should be used for textures that contain non-color data, such as normals.
Gradient — Determines how the ratios of the input colors vary between control points.
Convert to Grayscale
Enabled flag — Enable or disable this texture with this control.
Attach Layer — When selected, this layer modifies the input of the next lower layer that is not itself attached to a layer. Otherwise, it applies to the output of the next lower layer.
Weights — The weights applied to the RGB input to calculate the gray scale output. Image Texture is the default.
Opacity — The opacity channel used to control the transparency of this layer. (Image Texture is the default).
Blend Mode — The blend mode used to mix the RGB values of this layer with those of the background. Defaults to Mix/Normal.
Mask with Layer Group
Enabled flag — Enable or disable this texture with this control.
Attach Layer — When selected, this layer modifies the input of the next lower layer that is not itself attached to a layer. Otherwise, it applies to the output of the next lower layer.
Opacity — The opacity of the Texture input (Image Texture is the default).
Blend Mode — The blend mode used to mix the RGB values of this layer with those of the background. Defaults to Mix/Normal.
Channel Mixer
Enabled flag — Enable or disable this texture with this control.
Attach Layer — When selected, this layer modifies the input of the next lower layer that is not itself attached to a layer. Otherwise, it applies to the output of the next lower layer.
Red Channel — The weights applied to the input to calculate the red channel in the mix. Image Texture is the default.
Green Channel — The weights applied to the input to calculate the green channel in the mix.
Blue Channel — The weights applied to the input to calculate the blue channel in the mix.
Opacity — The opacity channel used to control the transparency of this layer. (Image Texture is the default).
Blend Mode — The blend mode used to mix the RGB values of this layer with those of the background.
Clamp
Enabled flag — Enable or disable this texture with this control.
Attach Layer — When selected, this layer modifies the input of the next lower layer that is not itself attached to a layer. Otherwise, it applies to the output of the next lower layer.
Opacity — The opacity channel used to control the transparency of this layer.
Blend Mode — The blend mode used to mix the RGB values of this layer with those of the background. Default is Mix/Normal
Comparison
Enabled flag — Enable or disable this texture with this control.
Attach Layer — When selected, this layer modifies the input of the next lower layer that is not itself attached to a layer. Otherwise, it applies to the output of the next lower layer.
Operation — The comparison operation to perform on the input, e.g. A < B. Options are:
Less than [A<B] (default)
Greater than [A>B)
Equal [A==B]
Not Equal [A!=B]
Less or Equal [A,=B]
Greater of Equal [A>=B]
Argument B — The second argument to the operation. Note that argument A is implicitly set from the chosen channels of the background layer.
If True — Output texture that is picked if A op B is true. Pick Color
If False — Output texture that is picked if A op B is false. Pick Color
Opacity — The opacity channel used to control the transparency of this layer. (Image Texture is the default).
Blend Mode — The blend mode used to mix the RGB values of this layer with those of the background. Defaults to Mix/Normal.
Map Range
Enabled flag — Enable or disable this texture with this control.
Attach Layer — When selected, this layer modifies the input of the next lower layer that is not itself attached to a layer. Otherwise, it applies to the output of the next lower layer.
Input Minimum — The start value of the input range, typically a gray scale value. Defaults to Image Texture.
Input Maximum — The end value of the input range, from 0 to 1.
Clamp — If enabled, the values are clamped to the minimum and maximum range. Otherwise values outside the range will be unmodified.
Output Minimum — The start value of the output range.
Output Maximum — The end value of the output range.
Operation — The type of interpolation to perform during the mapping. Options are:
Linear
Steps
Smooth Steps
Smoother Steps
Posterize
Levels — Number of distinct output levels per channel. This input is only relevant for the Steps and Posterize interpolation methods.
Channels — The channels to which to apply the operation (others are left unmodified).
RGB
Alpha
RGB + Alpha
Opacity — The opacity of this Texture Layer input (Image Texture is the default).
Blend Mode — The blend mode used to mix the RGB values of this layer with those of the background. Defaults to Mix/Normal.
Math (Binary)
Enabled flag — Enable or disable this texture with this control.
Attach Layer — When selected, this layer modifies the input of the next lower layer that is not itself attached to a layer. Otherwise, it applies to the output of the next lower layer.
Operation —The operation to perform on the input.
Add
Arc Tangent
Cross Product
Divide
Dot Product
Exponential [A^B]
Logarithmic {log_b(a)]
Maximum Value
Minimum Value
Multiply
Remainder (always positive)
Remainder (keeps sign of a)
Subtract
Argument B — The second argument to the operation. Note that argument A is implicitly set from the chosen channels of the background layer. Defaults to RGBSpectrum
Channels — The channels to which to apply the operation (others are left unmodified).
RGB
Alpha
RGB+Alpha
Opacity — The opacity channel used to control the transparency of this layer.
Blend Mode — The blend mode used to mix the RGB values of this layer with those of the background. Default is Mix/Normal
Math (Unary)
Enabled flag — Enable or disable this texture with this control.
Attach Layer — When selected, this layer modifies the input of the next lower layer that is not itself attached to a layer. Otherwise, it applies to the output of the next lower layer.
Operation —The operation to perform on the input.
Absolute Value
Arc Cosine
Arc Sine
Arc Tangent
Degrees
Exponential [2^x]
Exponential [e^x]
Exponential [e^x-1]
Fraction
Hyperbolic Cosine
Hyperbolic Sine
Hyperbolic Tangent
Inverse Cosine
Invert
Logarithmic Base 10
Logarithmic Base 2
Logarithmic Base e
Logarithmic Base Radix
Cross Product
Divide
Dot Product
Exponential [A^B]
Logarithmic {log_b(a)]
Negate
Radians
Reciprocal
Round
Round Down
Round Up
Sign
Sine
Square Root
Tangent
Truncate
Channels — The channels to which to apply the operation (others are left unmodified).
RGB
Alpha
RGB+Alpha
Opacity — The opacity channel used to control the transparency of this layer.
Blend Mode — The blend mode used to mix the RGB values of this layer with those of the background. Default is Mix/Normal
Threshold
Enabled flag — Enable or disable this texture with this control.
Attach Layer — When selected, this layer modifies the input of the next lower layer that is not itself attached to a layer. Otherwise, it applies to the output of the next lower layer.
Threshold Level — The output is black if the luminance of the input is below this threshold, and white if it is greater than or equal to this value. Defaults to RGBSpectrum.
Opacity — The opacity channel used to control the transparency of this layer.
Blend Mode — The blend mode used to mix the RGB values of this layer with those of the background. Default is Mix/Normal
Texture Layer Switch
Enabled flag — Enable or disable this texture with this control.
Attach Layer — When selected, this layer modifies the input of the next lower layer that is not itself attached to a layer. Otherwise, it applies to the output of the next lower layer.
Opacity — The opacity channel used to control the transparency of this layer.
Blend Mode — The blend mode used to mix the RGB values of this layer with those of the background. Default is Mix/Normal