AI Denoiser
The AI Denoiser uses Machine Deep Learning to remove sampling noise images and animation frames rendered in OctaneRender®. Although there are several denoiser products on the market, the AI Denoiser in Octane is "Spectral AI Denoiser" and produces superior results. The Spectral AI Denoiser lets you render noise-free images with the Path Tracing and Photon Tracing kernels in a short amount of time. The denoiser is not trained for the PMC kernel.
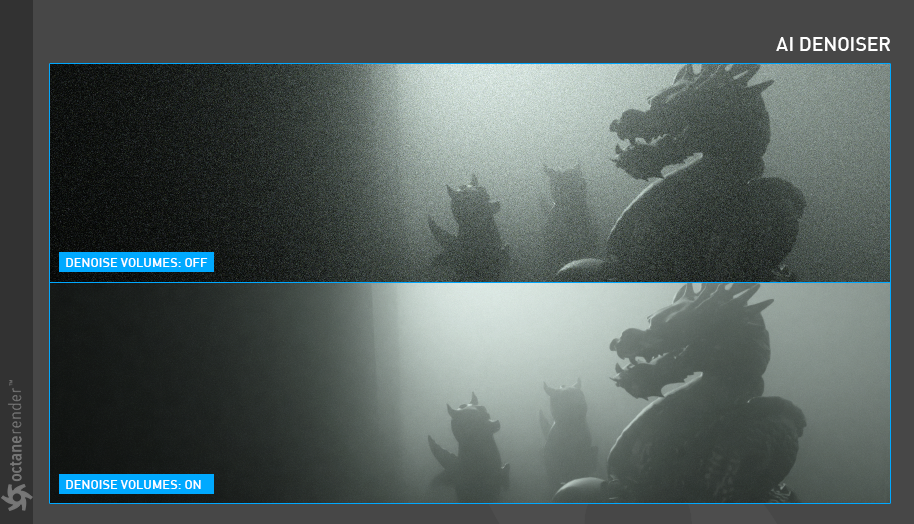
The AI Denoiser is also trained to denoise volumes and volume passes. Volumetric passes have very low frequency details, so don't use the Volumetric AI Denoiser with less than 1000 samples in order to preserve details for final render quality that would resemble a 2K to 10K sample render of the scene.
The AI Denoiser does not denoise everything that Octane can render just yet. Here is the list of currently available denoised passes:
- Denoised Beauty
- Denoised Diffuse Direct
- Denoised Diffuse Indirect
- Denoised Reflection Direct
- Denoised Reflection Indirect
- Denoised Emission
- Denoised Remainder
- Denoised Volume
- Denoised Volume Emission
The following rules apply to use AI Denoiser:
- Go to Live Viewer > Settings > Devices section and enable the "Use for Denoising" option the GPU device(s) installed. For single GPU systems, it can be automatically activated.
- AI Denoiser needs to use a lot of VRAM and GPU power. By its very nature, it requires a lot of processing power to deal with any scene. Modern GPUs will perform better.
- If stability issues occur while working with AI Denoiser, update the Nvidia drivers.
|
NOTE The denoiser requires NVIDIA® driver version 388 or higher, which must be reinstalled in custom mode as a clean install. |
Accessing the AI Denoiser
Access AI Denoiser in either of two ways:
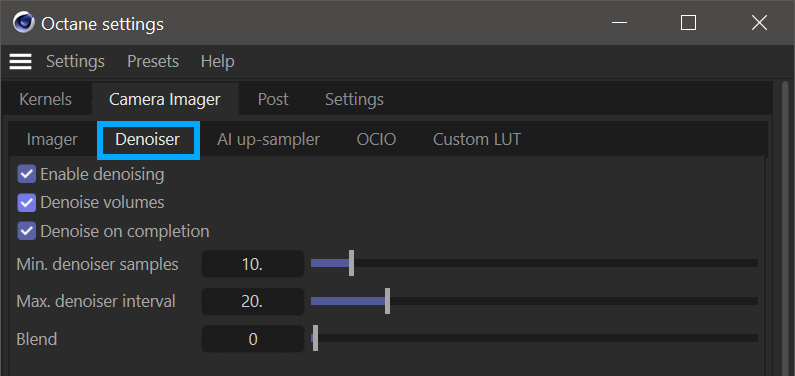
- Go to Live Viewer > Octane Settings > Camera Imager tab > Denoiser tab and check Enable Denoising.
|
|
camera tab — ai denoiser
|
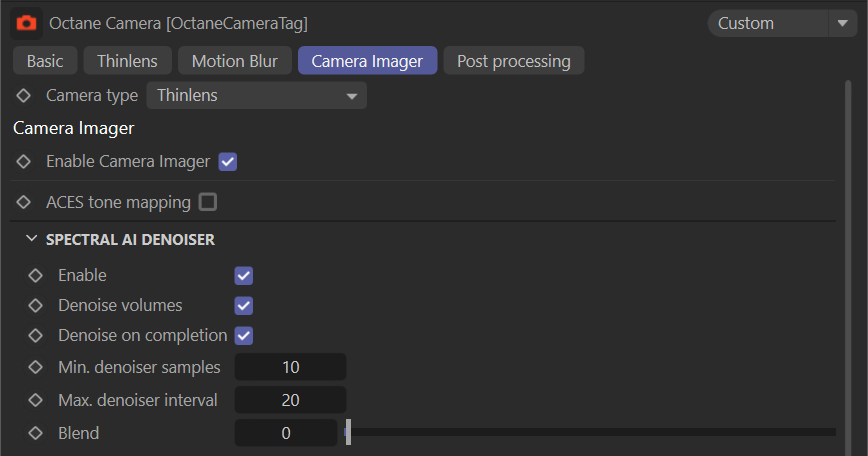
- Go to the Octane Camera tag > Camera Imager tab > Spectral AI Denoiser group and Enable.
|
|
octane camera tag — ai denoiser
|
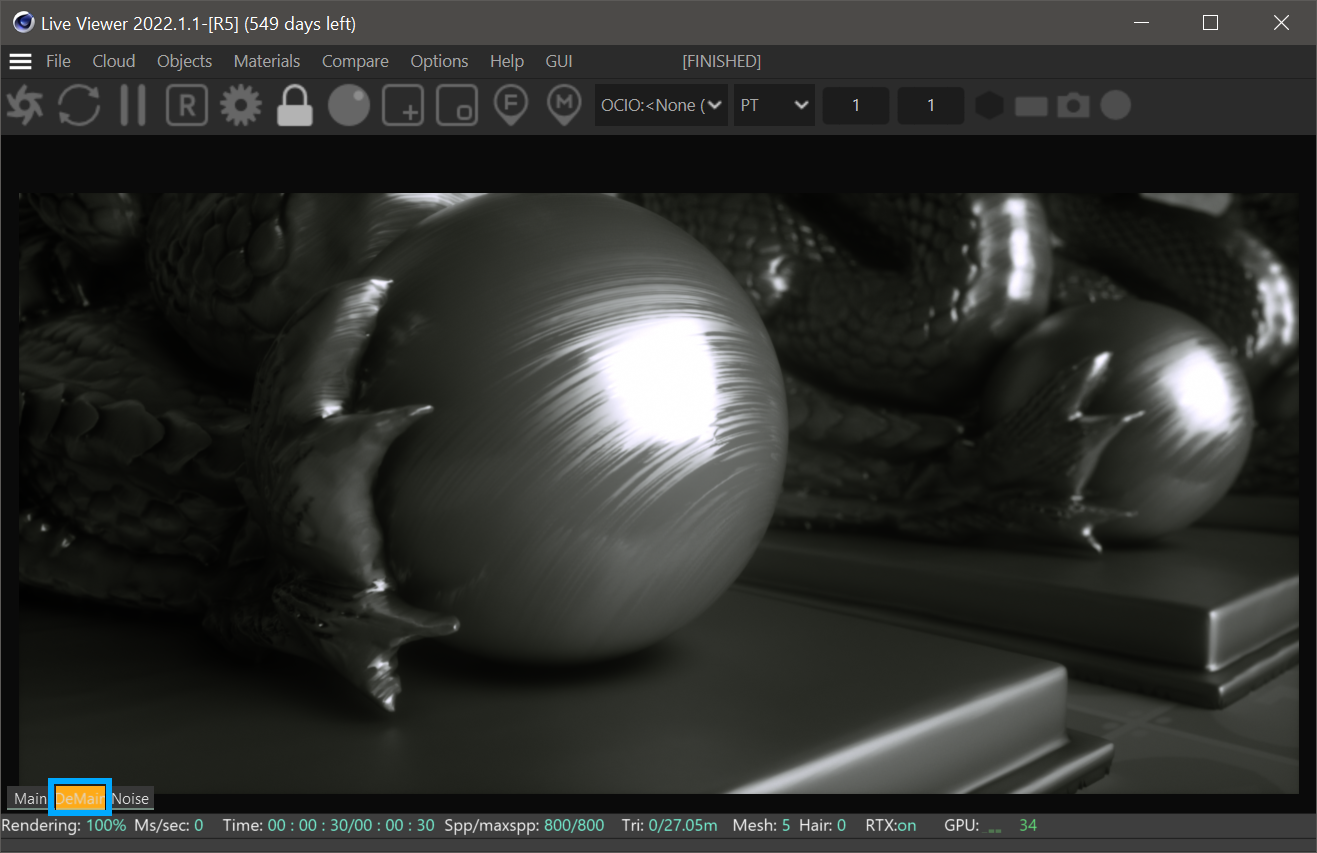
Denoised Render in Live Viewer
When denoising is active, Live Viewer will show two buttons named "Main" and "DeMain" at the bottom left of Live Viewer window. The "Main" button shows the active render. The "DeMain" button shows the Denoised Render. If the "Denoise on Completion" option is activated, the results will not be accurate until the render is complete. To see the AI Denoiser in sync with Main pass, disable "Denoise on Completion".
|
|
ai denoiser
|
Samples/AI Denoiser Relationship
The quality of the results that the AI Denoiser provides is directly linked to the number of samples that are fed into it. In short, more samples will equal better results.
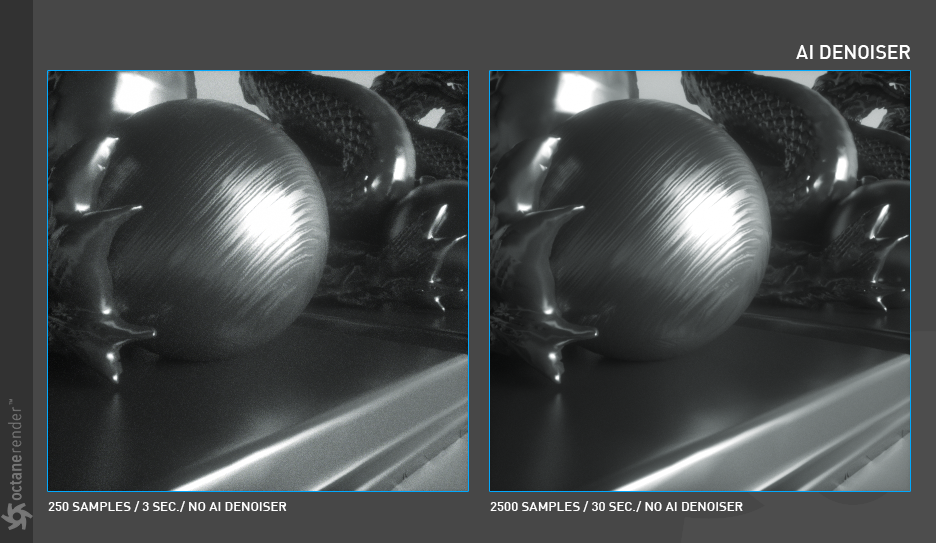
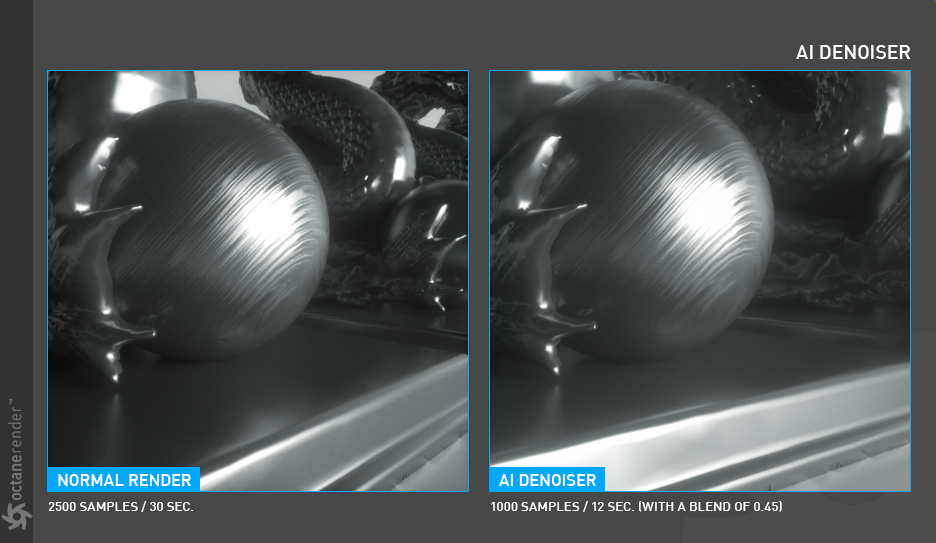
The two images below will provide context to using the AI Denoiser. On the left is a quick render, with only 250 samples. The results are adequate and fine for real time look development and lighting, but that is all. The image on the right is much better and was rendered with 2500 samples — ten times as many. We will refer to the image on the right the "TARGET RENDER".
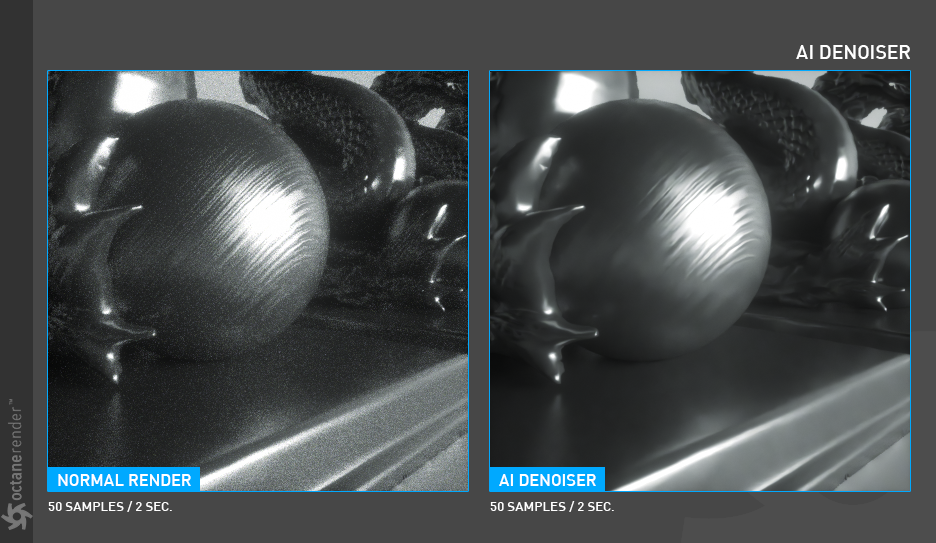
The goal of the AI Denoiser is to achieve near "TARGET RENDER" quality, but with less rendering time. As noted previously, the quality of the results achievable with the AI Denoiser depends on having enough samples to insure a good result. The image below shows the output of a normal render with 50 samples, rendering in two seconds. Notice the amount of noise in the image is significant. The image on the right was rendered with the AI Denoiser, taking the same amount of time, two seconds. Note how much detail is lost, and replaced with large splotchy regions. The amount of samples for this image is far too low.
Increasing the number of samples to 500 looks better, but we still have not reached the quality of the "TARGET RENDER". Details in Denoised render are still missing, though we managed to get rid of the splotchy effect. Still, not bad for seven seconds.

As we double the number of samples to 1000, we can see that there is a minimal difference in quality between the 2500 sample "TARGET RENDER" without the AI Denoiser and 1000 samples with "AI Denoiser". We have achieved an acceptable parity, but almost 2.5 times faster!
Approach the AI Denoiser in this manner to get high quality renderings in significantly less render time. Again, good results require sufficient samples for the AI Denoiser. Getting the best outcome is highly dependent on your aesthetic and your point of view. Each scene will be different, with different challenges and constraints. If you have a lot of detail on your scene and you don't need a close-up view of these details, you can use less samples for the AI Denoiser, but more featured shots will require more samples. In some cases, you may not be able to balance the quality to time ratio, as some scenes are not well-suited in which to use the AI Denoiser to begin with. You will discover what scenes work best as you gain experience with it. Overall, roughly 80% or more of your scenes can benefit from the AI Denoiser.
AI Denoiser Workflow
This section reviews the basic workflow for the AI Denoiser.
- Enable the AI Denoiser so that Octane will use it for the render. This can be accomplished either via the Live Viewer (Live Viewer > Settings > Camera Imager > Denoiser tab) or Octane Camera tag (OctaneCamera tag > Camera Imager tab and Enable the Camera Imager.) Access the AI Denoiser via the Spectral AI Denoiser group turn-down. Choose the options to enable and adjust the settings, which are discussed in the section following this one.
|
|
spectral ai denoiser
|

- For rendering, there are two options in this portion; one option is to set up render passes for the AI Denoiser. This option offers the most control overall, producing both a non-denoised and an AI Denoised Beauty pass (as well as other supported denoised passes.) The other option is to ignore the pass setup altogether, and just force Octane to use the AI Denoiser for the Beauty pass.
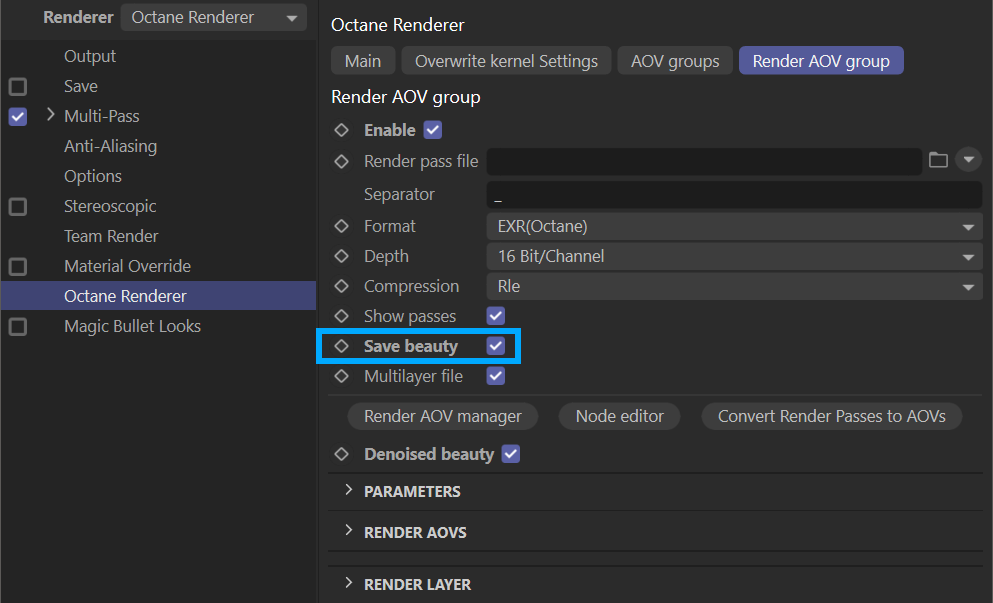
Enter Render settings (CTRL + B) and go to Render Settings > Octane Renderer > Render Passes tab > Denoiser Passes group. Enable Denoised Beauty. This output is available after the final render. If Volumetrics are present in the scene. Enable "Denoised Volume" if needed.
|
|
render settings — render aov group tab — ai denoiser
|
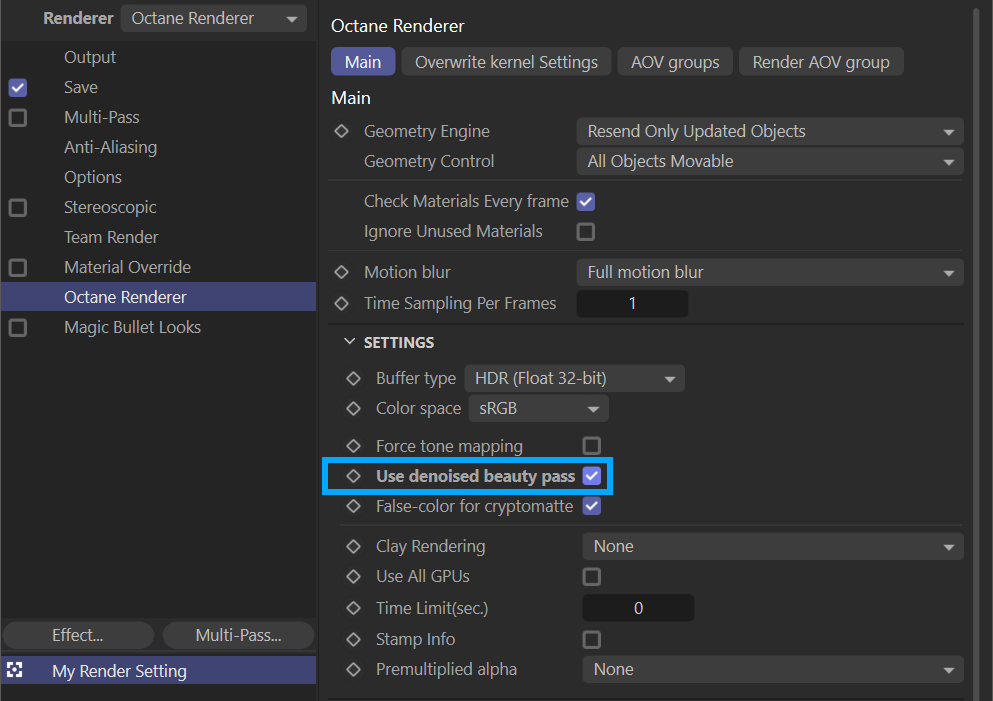
- If denoised render passes aren't needed but a denoised render is desired, use the option below. Note that the AI Denoiser results are "baked in" with this option — a clean Beauty pass will not be produced, just the Denoised Beauty pass. Go to Octane Renderer > Main tab > Settings group and check Use Denoised Beauty Pass.
|
|
render settings — main tab — ai denoiser
|
AI Denoiser Settings
The following section discusses the options for the AI Denoiser in detail:
Enable
This option enables the AI Denoiser. Default is OFF.
Denoise Volumes
Enable this option only if there are volumes in the scene that require denoising.
Denoise on Completion
This option will render the main (beauty) pass and denoise pass at the same time, and the denoising is applied to the image after the main render is completed.
Min. Denoiser Samples
Use this option to limit the start of the Denoise process after a certain number of samples have been completed. This option is disabled if Denoise on Completion is active.
Max. Denoiser Interval
This option controls how many second intervals are used to denoise. Reduce this value if the default value is too high for the brightness/darkness ratio of your scene. Reduce this value for nighttime scenes. Note that this option is disabled if Denoise on Completion is active.
Blend
This option will Blend between the main (beauty) render and denoised render. If a loss of detail is noticeable in the denoised image, use this option to blend a few details from the beauty render with the denoised render. In some scenes use this feature if the image appears to be flat, lacking in depth or if it has an artificial appearance due to the AI Denoiser. This is a post effect requiring no additional rendering. A value of 0.0 is the fully-denoised render and a value of 1.0 is the render with no denoising.