The PMC kernel is a custom mutating unbiased kernel designed specifically for GPUThe GPU is responsible for displaying graphical elements on a computer display. The GPU plays a key role in the Octane rendering process as the CUDA cores are utilized during the rendering process. rendering. Rendering with PMC creates physically accurate lighting and caustic effects. It produces the highest quality results, but it also takes the most time to render, depending on the scene.
Clay Mode - Overrides all MaterialsA set of attributes or parameters that describe surface characteristics. in a scene.
Max. Samples - Sets the maximum number of samples per pixel before the rendering process stops when producing the final rendered image. High values produce cleaner renders. For quick animations and scenes with predominantly direct lighting, a low amount of samples (500 - 1000) may suffice. In scenes with lots of indirect lighting and Mesh lights, a few thousand samples may be required to obtain a clean render.
Max. Preview Samples - This is the maximum samples rendered during Rendered Mode previews in Blender’s 3D View Editor window.
Max DiffuseAmount of diffusion, or the reflection of light photons at different angles from an uneven or granular surface. Used for dull, non-reflecting materials or mesh emitters. depth - The maximum number of times a ray can bounce/reflect/refract off of a diffuse or very rough surface. Higher values mean higher render times but more realistic results. For outdoor renders a good setting is around 4. For lighting interiors with natural light (the sun and the sky) you will need higher settings such as 8 or more. In the real world the maximum diffuse bounces would not exceed 16, it is possible to use a value higher than 16 but this is usually not necessary.
Max GlossyThe measure of how well light is reflected from a surface in the specular direction, the amount and way in which the light is spread around the specular direction, and the change in specular reflection as the specular angle changes. Used for shiny materials such as plastics or metals. depth - Controls the number of times a ray can be refracted before dying. Higher numbers mean higher render times but more color bleeding and more details in transparent materials. Low numbers can introduce artifacts or turn some refractions into pure black.
Max Scatter Depth - The maximum path depth for which scattering is calculated.
Ray Epsilon - Determines the shadow ray offset distance.
Filter Size - Film splatting width to reduce aliasing.
Alpha Shadows - This setting allows any object with transparency (specular materials, materials with opacity settings and alpha channels) to cast a shadow accordingly instead of behaving as a solid object.
Caustic Blur - Is used to reduce noise in caustic light patterns. High values may result is softness in the caustic patterns (Figure 2).

Figure 2: A comparison of caustic light patterns rendered with different Caustic blur settings.
GI Clamp - This clamps the contribution for each path to the specified value. By reducing the GI Clamp value, you can reduce the amount of “fireflies” caused by sparse but very strongly contributing paths. Reducing this value decreases noise by removing energy (Figure 3).
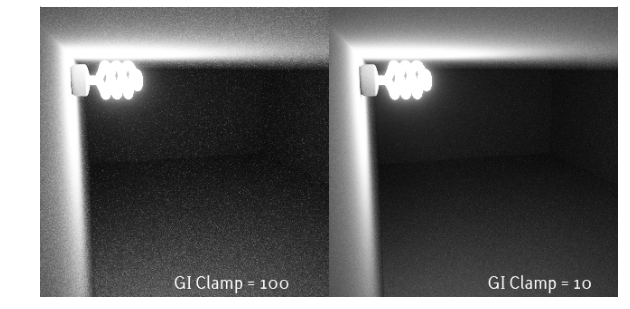
Figure 3: A comparison of renders using different GI Clamp values.
Nested Dielectrics - Enables/disables the use of the priority setting of specular materials for proper shading of nested transparent objects. The priority setting tells Octane which transparent objects using this setting should be shaded.
Irradiance mode - This renders the first surface as a white diffuse material. Irradiance mode works similar to clay mode however it is only applied to the first bounce. It disables the bump channel and makes samples that are blocked by back faces transparent. IRradiance mode is possible for Direct Light, PMC and Path Tracing KernelsBy definition, this is the central or most important part of something. In Octane, the Kernels are the heart of the render engine..
Max Subdivision Level - The maximum subdivision level that should be applied on the geometry in the scene. A value of 0 disables subdivision.
Alpha ChannelA greyscale image used to determine which areas of a texture map are opaque and which areas are transparent.- Removes background images or colors created by the Daylight environment node from the rendered image while not affecting any lighting cast by the environment. This is useful if the you want to composite the render over another image without the background being present. Objects appearing in the RGB channels have a bleeding edge, which appear as noise artifacts, but these edges are not included in the Alpha Channel itself.
Keep Environment - Used in conjunction with the Alpha Channel setting. It makes the background visible in the rendered image while also keeping the Alpha Channel.
AI Light - Enables AI lights. AI light functionality learns from the scene, and rendering becomes more efficient as more samples are rendered. When used with Adaptive SamplingA method of sampling that determines if areas of a rendering require more sampling than other areas instead of sampling the entire rendering equally., AI Light becomes even more effective as it learns pixel and light importance in a scene, and some pixels are no longer sampled.
AI Light Update - Enables dynamic updates to the AI lighting.
Light IDs Action - This parameter determines whether the L.IDs (Light IDs) and L. Inv (Light Inverse) buttons enable or disable lights with matching Light Pass ID numbers.
Path Termination Power - High values increase render speed, but lead to higher noise in dark areas.
Exploration Strength - This specifies how long the kernel investigates good paths before it tries to find a new path. Low values can create a noisy image while larger values can create a splotchy image.
Direct Light Importance - The direct light importance makes the kernel focus more on paths with indirect light. For example, imagine sunlight through a window that creates a bright spot on the floor. If the direct light importance is 1, the kernel would sample this area a lot, although it becomes clean very quickly. If the direct light importance is reduced, the kernel reduces its efforts to sample that area and focuses more on more tricky areas that are hard to render.
Max Rejects - This can control the “bias” of the render. By reducing the value, the result will be more biased, but the render time will be shorter.
Parallelism - This is used to reduce the number of samples that are investigated in parallel to make caustics appear earlier at the expense of some performance.
Work Chunk Size - The number of work blocks (of 512K samples each) done per kernel run. Increasing this value also increases the memory requirement on the system, but does not affect memory usage and may increase render speed.
White Light Spectrum - Controls the appearance of colors produced by spectral emitters (e.g. daylight environment, black body emitters). This determines the spectrum that will produce white (before White Balance) in the final image.
Use Old Color Pipeline - Use the old behavior for converting colors to and from spectra and for applying white balance. Use this to preserve the appearance of old projects (textures with colors outside the sRGB gamut will be rendered inaccurately).
Toon Shadow Ambient - The ambient modifier to control Toon shadowing.