Launching Octane from the Command Line
OctaneRender® supports passing command line parameters to utilize scripting or other automated tasks.
The following is an example of the workflow for working with OctaneRender from the command line. To utilize the command line options, you must do the following:
- Save the scene to an OCS file. You must know the full path to this scene.
Example: C:\Temp\OctaneTest.ocs
- Remember the name of the Mesh node that you want to render. This is often the node for the imported OBJ.
Example: OctaneTest.obj
- If the scene geometry changes and needs reloading, note the full path.
Example: C:\Temp\NewGeom.obj
- OctaneRender can then launch from the command line using the syntax listed below.
|
NOTE In OctaneRender v2.21 and later, the octane-cli.exe is a separate executable file specifically added for the Windows® platform to launch OctaneRender as a command line application. |
|
NOTE For Windows, the octane-cli.exe executable will behave more like a command line application: it will always block until OctaneRender finishes. Output to standard out is displayed in the terminal and can pipe into a file or an other program. It also supports terminating with CTRL-C. |
Usage
[--net-test] [-a ] ... [--script ] [--benchmark] [--dpi ] [--no-opengl] [-t ] [-m] [-R ] ... [-r ] [-l] [-n ] [--imager-exposure ] [--daylight-sundir-z ] [--daylight-sundir-y ] [--daylight-sundir-x ] [--cam-lensshift-right ] [--cam-lensshift-up ] [--cam-aperture ] [--cam-focaldepth ] [--cam-scale ] [--cam-fov] [--cam-motion-up-z ] [--cam-motion-up-y ] [--cam-motion-up-x ] [--cam-motion-target-z ] [--cam-motion-target-y ] [--cam-motion-target-x ] [--cam-motion-pos-z ] [--cam-motion-pos-y ] [--cam-motion-pos-x ] [--cam-up-z ] [--cam-up-y] [--cam-up-x ] [--cam-target-z ] [--cam-target-y ] [--cam-target-x ] [--cam-pos-z] [--cam-pos-y ] [--cam-pos-x ]
[--stop-after-script] [--no-gui] [-q] [-g ] ... [-s ][--output-exr-tm ] [--output-exr ] [--output-png16 ] [-o ] [--film-height] [--film-width ] [-e] [--] [--version] [-h]
Where
--sign-out can now be used in combination with --no-gui.
--net-test - Tests the local network and closes OctaneRender® afterwards.
-a <string>, --script-arg <string> (accepted multiple times) - Argument passed to the script. Every instance of this argument will be one element in the arg table.
--script <string> - Filename of the script to execute.
--benchmark - Run the benchmark suite.
--dpi <dpi> - Override the desktop dpi setting.
--no-opengl - Force software display.
-t <node name>, --target-node <node name> - Name of the Render Target node to render.
-m <string>, --mesh-node <string> - Name of the Mesh node to render.
-R <node name=filename>, --relink <node name=filename> (accepted multiple times) - Overrides the file name attribute in the node with the given node name (can occur multiple times).
-r <filename>, --relink-meshnode <filename> - Loads the given OBJ mesh file into the Mesh node given with --mesh-node.
-l <filename>, --link-meshnode <filename> - Creates a new Mesh node from the given OBJ mesh file.
-n <filename>, --new <filename> - Creates a new OCS project file from given command line arguments.
--imager-exposure <float> - Imager exposure amount.
--daylight-sundir-z <float> - Daylight sun direction vector Z component.
--daylight-sundir-y <float> - Daylight sun direction vector Y component.
--daylight-sundir-x <float> - Daylight sun direction vector X component.
--cam-lensshift-right <float> - Lens shift right.
--cam-lensshift-up <float> - Lens shift up.
--cam-aperture <float> - Camera aperture radius.
--cam-focaldepth <float> - Camera focal depth.
--cam-scale <float> - Orthographic camera horizontal scale.
--cam-fov <float> - Camera horizontal FOV (degrees).
--cam-motion-up-z <float> - Camera up motion 2nd vector Z component.
--cam-motion-up-y <float> - Camera up motion 2nd vector Y component.
--cam-motion-up-x <float> - Camera up motion 2nd vector X component.
--cam-motion-target-z <float> - Camera target motion 2nd position Z component.
--cam-motion-target-y <float> - Camera target motion 2nd position Y component.
--cam-motion-target-x <float> - Camera target motion 2nd position X component.
--cam-motion-pos-z <float> - Camera motion 2nd position Z component.
--cam-motion-pos-y <float> - Camera motion 2nd position Y component.
--cam-motion-pos-x <float> - Camera motion 2nd position X component.
--cam-up-z <float> - Camera up vector Z component.
--cam-up-y <float> - Camera up vector Y component.
--cam-up-x <float> - Camera up vector X component.
--cam-target-z <float> - Camera target position Z component.
--cam-target-y <float> - Camera target position Y component.
--cam-target-x <float> - Camera target position X component.
--cam-pos-z <float> - Camera position Z component.
--cam-pos-y <float> - Camera position Y component.
--cam-pos-x <float> - Camera Position X Component.
--stop-after-script - Stops OctaneRender® after the specified script finishes - this is enabled if --no-gui is set.
--no-gui - Disables creating a user interface if a script file is specified.
-q, --quiet - Starts OctaneRender® without a splash screen and minimizes the window.
-g <int>, --gpu <int> (accepted multiple times) - Adds a GPU device to use for rendering (0 = first).
-s <int>, --samples <int> - Maximum number of samples per pixel (maxsamples).
--output-exr-tm <filename> - Outputs a tonemapped EXR image file when OctaneRender® reaches maxsamples.
--output-exr <filename> - Outputs an EXR image file when OctaneRender® reaches maxsamples.
--output-png16 <filename> - Outputs a 16-bit PNG image file when OctaneRender® reaches maxsamples.
-o <filename>, --output-png <filename> - Outputs a PNG image file when OctaneRender® reaches maxsamples.
--film-height <int> - Film height.
--film-width <int> - Film width.
-e, --exit - Closes the application when rendering is done.
--, --ignore_rest - Ignores the rest of the labeled arguments following this flag.
--version - Displays version information and exits.
-h, --help - Displays usage information and exits.
<filename> - OCS project scene file name.
For example, to open a file (C:\Temp\OctaneTest.ocs), relink the geometry (C:\Temp\NewGeometry.obj), select the Mesh node (OctaneTest.obj), and render the frame for 1000 samples per pixel, save the render, and exit, you would enter: octane –e –r C:\Temp\NewGeometry.obj –m OctaneTest.obj –s 1000 –o C:\temp\test.png C:\Temp\OctaneTest.ocs
To open an Octane.orbx packaged file (C:\Geronimo\Blender\bullet1.orbx), select the Mesh node (bullet1.obj) and render the frame for 800 samples per pixel, save the rendered image to a specific directory, use filename cmd_rendered_bullet1.png, and then exit after the render, you would enter: octane –e –m bullet1.obj –s 800 –o C:\Geronimo\Blender\cmd_rendered_bullet1.png C:\Geronimo\Blender\bullet1.orbx
Other Examples
It is also possible to adjust the size of OctaneRender’s interface. This is useful, for example, in the case of using a 4k monitor wherein the font appears as 8 point (e.g., in Linux). For the Standalone version, you can override the UI size with a command line parameter such as below:
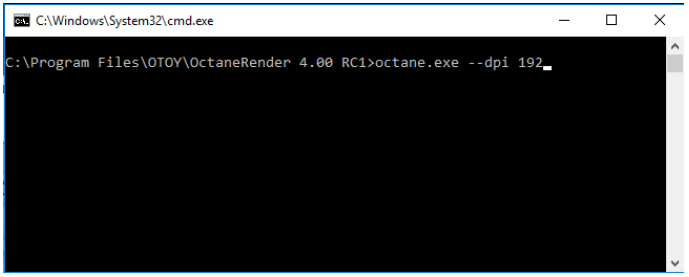
Figure 1: Adjusting screen DPI from the command line
Why Are There Two Sets Of Camera Parameters?
The second camera control (-- cam-motion) specifies the camera position in the next frame. OctaneRender® then uses the current position and the next frame position to calculate motion blur between the two camera positions.