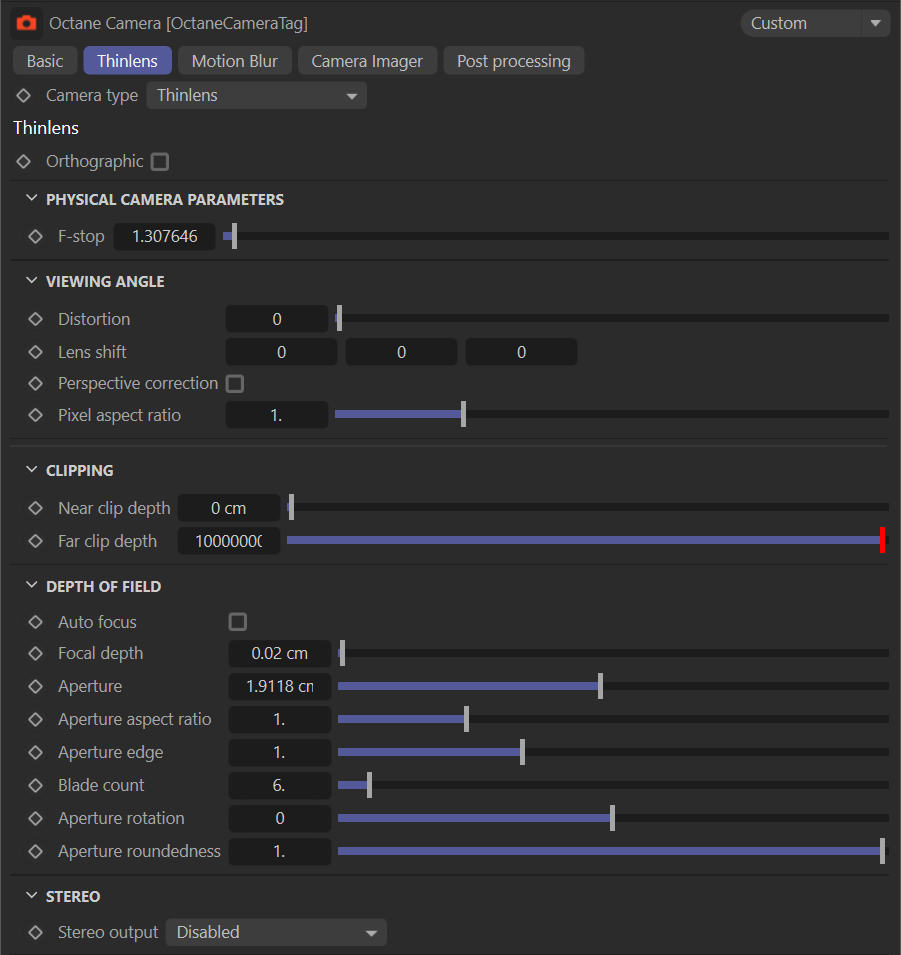
Thinlens
The Thin Lens camera in OctaneRender® is the typical camera type used for most rendering scenarios.
|
|
thin lens camera
|

Orthographic
If enabled, the camera will render an orthographic view. If disabled, the camera will show a perspective view.
Physical Camera Parameters
F-Stop
This sets the F-Stop for the lens.
Viewing Angle
Distortion
This adjusts the spherical and cylindrical distortion. The rendered image displays the entire sphere and uses equidistant cylindrical projection also known as lat-long projection.
Lens Shift
Shift value for camera in film plane. It's very same as Film Offset X/Y in Cinema 4D camera.
Perspective Correction
define
Pixel Aspect Ratio
define
Clipping
Near & Far Clip Depth
The main purpose was for interior scenes where you want to get a good shot of the whole room, but you cannot do so without a very large FOV, because you need to keep the camera inside the room. With camera clipping (near plane), you can position the camera outside the room - lower the FOV and increase the clipping plane distance in front of you until the closest walls are clipped out. The geometry is not altered, only the clipping of the camera, which means that shadows, reflections and refractions are still affected by the clipped geometry.

Depth of Field
Auto Focus
If enabled, the focus will be kept on the closest visible surface at the center of the image, regardless of the aperture, the aperture edge, and focal depth values. This setting is on by default. If you want to use manual focus, disable this option. To pick a focus point in Live Viewer, can press CTRL + MMB (middle mouse button) on the desired location in Live Viewer. To see depth of field, the "Aperture" option must be larger than zero. Zero will allow for infinite depth of field.
Focal Depth
The depth of the plane in focus, measured in meters. Focal Depth is also linked to Aperture and F-Stop. So, focus will depend on the scene size and the size of the object. Also, when you are away from or near the object, all focus options are variable.
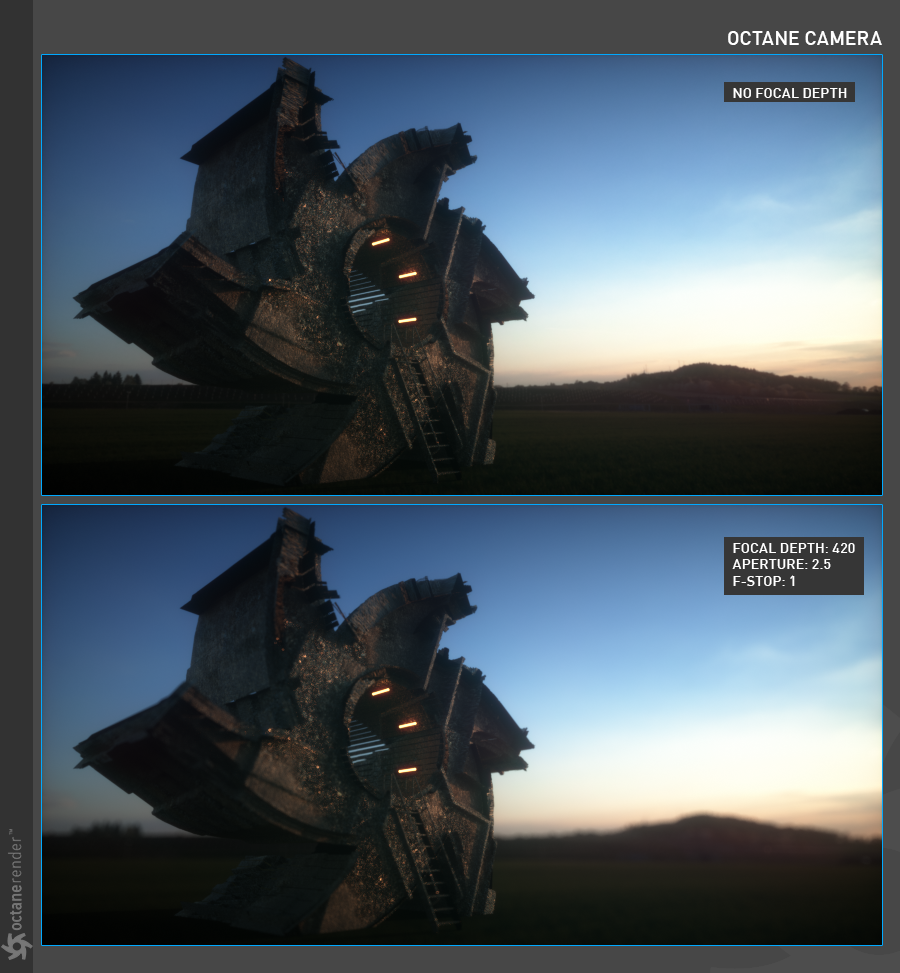
Aperture
The aperture is the radius of the lens opening of the camera used in the scene, measured in centimeters. Choosing a low value will have a wide depth of field where everything is in focus. Choosing a high value will create a shallow depth of field (DOF) where objects in the foreground and background will be out of focus. If you set Aperture to zero, you will no longer see the DOF effect. Everything is in focus.

F-Stop
This is the aperture to focal length ratio. If you change Aperture, this value changes automatically; controls whether more light enters the camera lens.
Aperture Aspect Ratio
This allows users to stretch/squash the Depth of Field disc.

Aperture Edge
This controls aperture edge detection at all points within the aperture. The lower values will give more pronounced edges to out of focus objects affected by the a shallow depth of field (DOF) such as objects in the foreground and background. The aperture edge modifies the bokeh effect of the depth of field. A high value increases the contrast towards the edge.
Blade Count
These three features work in conjunction with each other. Bokeh Side Count specifies how many bokehs in DOF will form, so you can determine the bokeh shape here. But when you change this setting, you may not notice a difference at first. This is because the default value of Bokeh Roundedness is 1. You can also change this setting according to the bokeh effect you want to see. Low values refer to a sharp bokeh shape. At higher values, the bokeh shape becomes smooth. Bokeh Rotation is used to rotate the bokeh shape. If you want the bokeh effect to be more pronounced, you can increase the Aperture setting.

Correction
If Up-vector is vertical, enabling this option keeps vertical lines parallel. This is useful for architectural rendering, when you want to render images of tall buildings from a similar height as the human eye but keeping the vertical lines parallel.

Stereo
You can enable stereo mode and choose whether to use off-axis or parallel stereo camera projections.
Stereo Output
This menu determines the output stereo mode.
Disabled: Mono images are rendered with this option.
Left: Render only the image for the left eye.
Right: Render only the image for the right eye.
Side-by-side: Renders the scene as a pair of two-dimensional images.
Anaglyphic: When active, the render will be able to be viewed with Red / Blue 3D glasses.
Over-under: The pair of two-dimensional images is placed one above the other for special viewers.
Eye Distance
This is the distance between the left and the right eye in stereo mode, measured in meters.
Left Stereo Filter / Right Stereo Filter
The left and right filter colors used to create the anaglyphic stereo affect in the render.