The Panoramic camera is meant for rendering VRImmersively engaging and experiencing depth perception in a three dimensional scene through stereo vision goggles and head-mounted displays.-related images. There are three types of Panoramic cameras available: Spherical, Cylindrical, and various Cube Map types (+x, -x, +y, -y, +z, -z). You can access the Panoramic camera type by clicking on the Octane Render Target Actor, then go to the Details panel and click on the Camera dropdown (figure 1).
Figure 1: The Panoramic Camera types
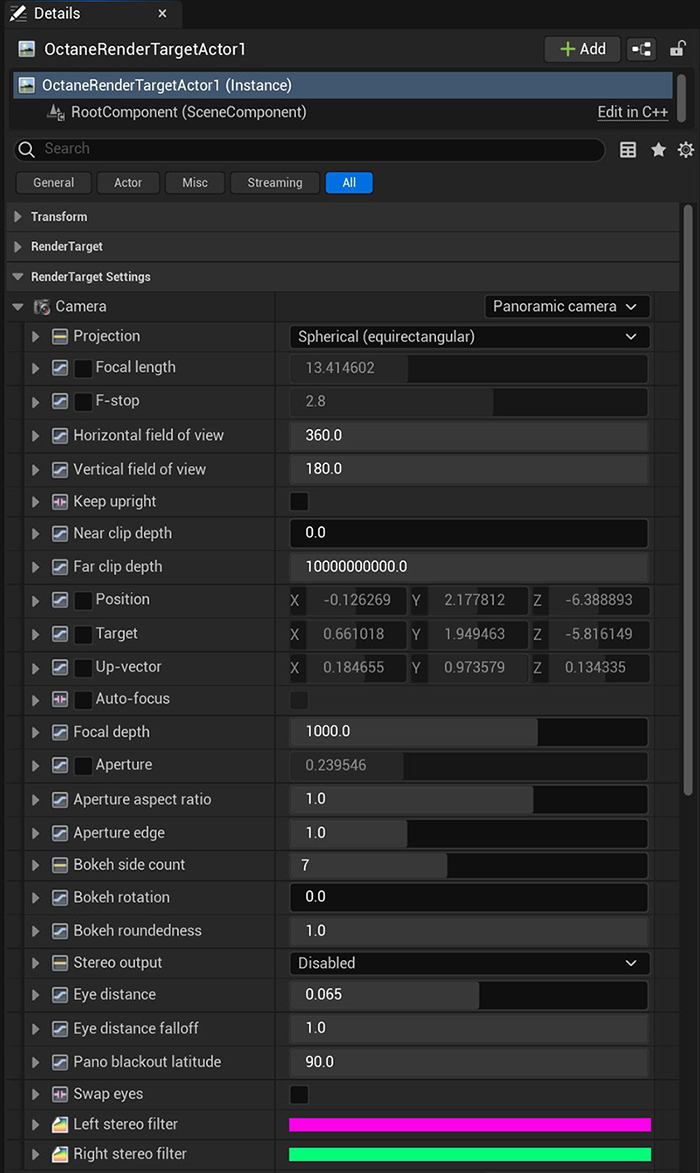
Projection - Specifies the Panoramic projection to use, with the option of either a Spherical Camera Lens or a Cylindrical Camera Lens. Single-face Cube map projections are available to render one cube face. This is useful for animation overlays in stereo panorama renderings.
Focal Length - The lens's focal length, in millimeters.
F-Stop - The aperture-to-focal-length ratio.
Horizontal Field Of ViewThe area that is visible to a camera lens usually measured in millimeters. A wide angle lens provides a larger field of view and a telephoto lens provides a narrow field of view. - Sets the camera's horizontal field-of-view for the scene, measured in degrees. Large values make more of the scene visible in the camera. Smaller values reduce the amount of the scene visible through the camera.
Vertical Field Of View - This sets the camera's vertical field-of-view for the scene, measured in degrees. Large values make more of the scene visible in the camera. Smaller values reduce the amount of the scene visible through the camera.
Keep Upright - When enabled, OctaneRender® orients the Panoramic camera towards the horizon, and the up-vector stays in its default direction (vertical).
Near Clip Depth - Distance from the camera to the near clipping plane, measured in meters. The main purpose is for interior scenes, where you can get a good shot of the whole room, but not without a very large field-of-view, because the camera needs to stay inside the room.
With camera clipping (near plane), you can position the camera outside the room - lower the field-of-view setting and increase the clipping plane distance in front until the closest walls are clipped out. The geometry is not altered, but the camera clipping is altered, which means that shadows, reflections, and refractions are still affected by the clipped geometry.
Far Clip Depth - Objects farther than the specified distance aren't visible to the camera.
Position - The camera's X, Y, and Z positions in the scene.
Target - The target position where the camera points to in the scene.
Up-Vector - The camera's up direction in the scene. By default, this is in the Y direction (0, 1, 0).
Auto-Focus - If enabled, the focus is kept on the closest visible surface at the center of the image, regardless of the ApertureDetermines how much light enters a camera lens. A large aperture produces a narrow depth of field and a small aperture produces a wide depth of field., the Aperture Edge, and Focal Depth values. This setting is enabled by default.
Focal Depth - The depth of the plane in focus, measured in meters. If you are having trouble seeing a result when you adjust this setting, double-check to make sure that Auto-Focus is disabled, because Auto-Focus overrides the Focal Depth setting.
Aperture - The camera lens opening's radius, measured in centimeters. A low value creates a deep depth-of-field, where everything is in focus. High values create a shallow depth-of-field, where objects in the foreground or background are out-of-focus.
Aperture Aspect Ratio - Squashes or stretches the depth-of-field disc.
Aperture Edge - This controls aperture edge detection at all points within the aperture. Lower values give more pronounced edges to out-of-focus objects affected by a shallow depth-of-field. Aperture Edge modifies the depth-of-field's bokeh effect. High values increase the contrast towards the edge.
Bokeh Side Count - Sets the number of edges on the blurred highlights.
Bokeh Rotation - Adjusts the quality of highlights when depth-of-field blurring is apparent. Raising the aperture increases depth-of-field blurring. Bokeh Rotation rotates the shape of the blurred highlights. This becomes more obvious when the Bokeh Roundness is lowered.
Bokeh Roundedness - Keeps blurred highlights rounded. Lowering this value reduces the roundness and increases the appearance of edges on the highlights.
Stereo Output - Specifies the output rendered in stereo.
Eye Distance - The distance between the left and the right eyes in Stereo mode, measured in meters. The stereo distance is also referred to the IPD (Inter Pupillary Distance), and is often exchanged with terms like stereo interocular distance or eye distance. For realistic depth, use values between 0.055 and 0.075.
Eye Distance Falloff - Controls how fast the eye distance reduces towards the poles. This reduces eye strain at the poles when viewing the panorama through a head-mounted display. A value of 1 reduces the eye distance from the equator to the poles, which creates a relaxed viewing experience. This also causes flat surfaces to appear curved. A value smaller than 1 keeps the eye distance constant for a larger latitude range above and below the horizon, but it rapidly reduces the eye distance near the poles. This keeps a flat surface, but causes more eye strain near the poles, which you can reduce again by setting the pano cutoff latitude to something less than 90 degrees.
Pano Blackout Latitude - This is the +/- latitude where the panorama cuts off when stereo rendering is enabled. This defines the minimum latitude (in spherical camera coordinates) where the rendering blacks out above this point.
Swap Eyes - Swaps the left and right eye's images.
Left/Right Stereo Filter - The left and right filter colors adjust the anaglyphic stereo effect's colors in the render.