Texture baking is a process where scene lighting is baked into a texture map based on an object's UV texture coordinates. The resulting texture can map back onto the surface to create realistic lighting in a real-time rendering environment. This technique is often used in game engines and virtual reality for creating realistic environments.
OctaneRender®implements texture baking as a special type of camera known as a Baking camera. Compared to the Thin Lens and Panoramic cameras, the Baking camera has one position and direction per sample. OctaneRender calculates these based on the input UV geometry and the actual geometry being baked.
For each sample, the camera calculates the geometry position and normal, then it generates a ray that points towards it using the same direction as the normal from a distance of the configured kernel’s ray epsilon. Once calculated, OctaneRender traces the ray the same way it would do with other types of camera.
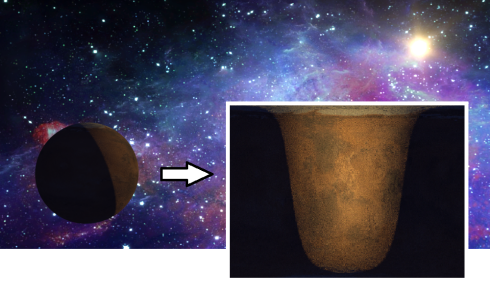
Figure 1: Lighting is baked onto a model of a planet using a Baking camera
To use a Mesh for texture baking, it needs the following:
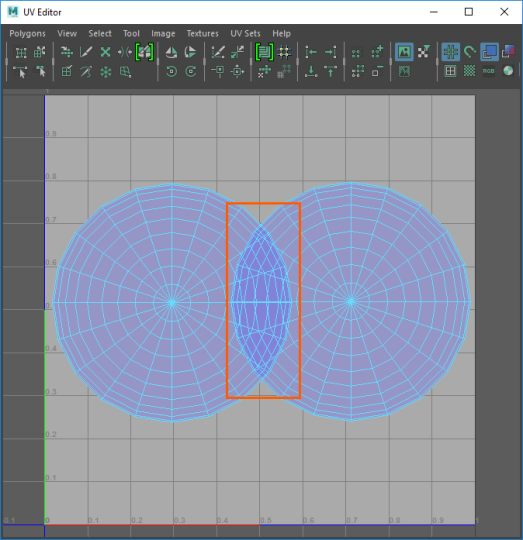
Figure 2: Overlapping UVs as shown in Maya's UV editor
The simplest way to start is to create a copy of the scene's Render Target node and switch its camera to a Baking camera.
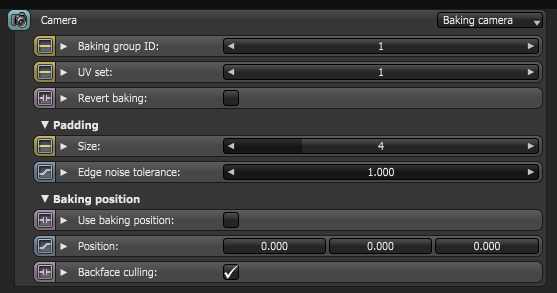
Figure 3: Baking camera parameters
Baking Group ID - Specifies the baking group to bake. All objects belong to the default baking group number 1by default. You can arrange new baking groups by using object layers or Object Layer maps similar to how render layers work.
UV Set - Choose the UV set to use for baking.
Revert Baking - Flips the camera directions. This lets the Mesh render the rest of the scene.
Padding - Extends the texture colors beyond the UV shell borders, which helps avoid the appearance of black lines on the model when the baked textures map back to the surface later on.
The padding size is specified in pixels. The default padding size is set to 4 pixels. You can also specify an edge noise tolerance, which allows removing hot pixels appearing near the UV geometry edge. Values close to 1 do not remove any hot pixels, while values closer to 0 try to remove them all.

Figure 4: A comparison of different padding settings
Edge Noise Tolerance - Specifies a tolerance to either keep or discard edge noise.
UV Region - Specifies the area that the baking camera takes into account. This can pan and zoom the camera in case your UV geometry is not within the [0,0] - [1,1] region.
Use Baking Position - If a baking position is used, camera rays are traced from the specified coordinates in world space instead of using the Mesh surface as reference. This is useful when baking position-dependent artifacts such as the ones produced by GlossyThe measure of how well light is reflected from a surface in the specular direction, the amount and way in which the light is spread around the specular direction, and the change in specular reflection as the specular angle changes. Used for shiny materials such as plastics or metals. or SpecularAmount of specular reflection, or the mirror-like reflection of light photons at the same angle. Used for transparent materials such as glass and water. materials.
Position - Camera position for position-dependent artifacts such as reflections, etc.
Backface Culling - Determines whether geometry back faces will be baked or not.
Baking Groups - In order to tell the Baking camera which geometry to bake, connect the geometry to the baking render target, and in the case of having multiple objects and baking groups, select the right Baking Group ID in the Baking camera. For example, if you wanted to bake a room's lighting into the wall textures (provided the walls do not have overlapping UVs), you would set the camera's Baking Group ID to 2 and the Baking Group ID of each of the walls to 2 as well. Then you can render by selecting the Baking Render Target node and save the resulting image. Then if you wanted a separate texture for the floor, you would set the floor's Baking Group ID to 3 and the Baking Group ID of the camera to 3 as well, and then render and so on until all the textures for the items in the room are baked. Each time you bake a texture, you would save the image and then use the image as part of a Texture map for the object as part of a shading network.
The example below illustrates the a minimal baking configuration Nodegraph:
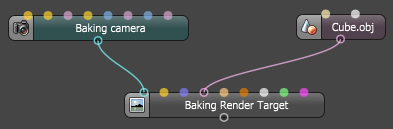
Figure 5: A basic texture baking arrangement
You can use render layers, passes, imager settings, etc. in the same fashion as other types of cameras, allowing extracting lighting and material information.

Figure 6: Any of the Octane render passes can bake into textures