Uploading VRImmersively engaging and experiencing depth perception in a three dimensional scene through stereo vision goggles and head-mounted displays. quality synthetic rendered images to the Samsung Galaxy Gear VR
If you are rendering images for viewing on the Gear VR headset, ensure that the images are the following:
After having rendered an image via OctaneRender, you can upload and view this image on the Gear VR through these steps below.
The above are the basic steps. The updated build of the ORBX Media Player also fully supports both ZIP packages as well as ORBX and has new features to support ORBX videos and interactive media. 18K cube map renders may be stitched together to create videos (code to link two cubemaps together) using high level JSON/lua fields. Here is a link for a sample project using LUA and some sample content: https://render.otoy.com/forum/download/file.php?id=46517.
Fast facts:
To know more about the ORBX Player: view 11:11-15:24 at https://www.youtube.com/watch?v=0LLHMpbIJNA
Is running an 18k cubemap sequence longer than 11 frames possible? Is there a limit?
To load more than a few dozen SCM frames you need to compress and package as OKX compressed textures, which we do on ORC right now for each specific platform/GPUThe GPU is responsible for displaying graphical elements on a computer display. The GPU plays a key role in the Octane rendering process as the CUDA cores are utilized during the rendering process. combo we support in the player (right now GVR only). OKX for mobile takes a while to encode – up to 9 mins per frame. But if you render on ORC, this can be done between frames.
We are adding script nodes (see above post) that accept camera node inputs for a set of keyframes on a path, and ORC can generate the in between frames for you. Right now, if you send a stereo cube map ORBX to orc, and render it, you can also have it packaged and compressed to ORBX file which can be loaded in your scene or played back as a video file in the player.
Can I brand the ORBX viewer to make our VR panoramas appear so much more valuable/professional as opposed placing them as one of many apps in a main entertainment-oriented interface?
We are working on signed/certs for ORBX media packages. If you have OMP to load an ORBX link or local file (via android intent, icon shortcut, shell app, URL web link, etc.) it will bypass the home screen/media browser and run the ORBX project as if it were a stand alone app. This is how it will also work on the PC.
Packaging your project folder as a ZIP actually works in the current app pretty well for things like images+scripts. But it can break other media depending on the ZIP software you use, which is not in our hands. The reason we have ORBX containers is they are meant to be packaged by our software for the target device in order to make sure the assets work optimally. We are also adding digitial signatures, encryption and buffered streaming cache to ORBX containers that is based on your Octane ID and the settings you set for the package. If you launch a signed ORBX file with the player (via a URI request or android intent from another app for example), you will bypass the home screen and run the ORBX content directly with whatever other paramaters the URI defines.
Will ORBX viewer 3 also allow precise hotspot positioning and the ability to use .png sequences for animated hotspots?
The ORBX 3 player will add support for mesh layers (including hidden bounding box of scene objects) exported from Octane 3. You can pretty much use this for precise and nearly automatic hotspot scene authoring. The hotspot metadata could be handled in a script node you attach to the object layer.
Normal Maps and Bump Maps
Normal Maps and Bump Maps both serve the same purpose. By using an image (Bump or Normal), the geometry of the surface can have the appearance of more detail. This should not be confused with displacement mapping where the image used actually affects the geometry.
Bump Maps are typically grey scale images and OctaneRender™ uses the values to determine how much to affect the geometry at that location of the pixel.
Normal Maps work slightly different. They are color images that use RGB values to add directionality to the raised or lowered areas.
Note: Normal maps take precedence over bump maps, therefore you actually can not use both a normal map and a bump map at the same time. In fact, if there is both a Normal Map and a Bump map applied on the same material, the Normal Map will take a higher priority and be used and the Bump Map will be ignored.
In OctaneRender™, the normal map is interpreted in tangent space. The X-axis is the tangent vector in the dP/dU direction, the Y-axis is the other tangent vector and the Z-axis is the normal direction.
My Normal Maps from Z-Brush don’ t export properly. What can I do?
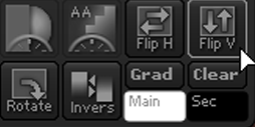
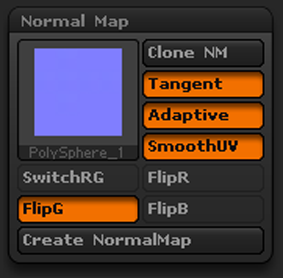
To get Z-Brush normal maps to work in OctaneRender™, you must enable the “Flip G” button under the Normal Map settings (Z-Brush Normal Map Settings) and the “Flip V” on the File Export (Click on the “Flip V” button prior to export).