OctaneRender provides a unique, refreshing and exciting rendering experience due to the ability to interact with the scene with final render quality. This interactivity allows for renders that might not be possible with traditional render engines. The user can continue to hunt for that perfect camera angle where all the reflections of the lights are just right or they can continue to adjust the DOFThe distance between the nearest and farthest objects in a scene that appear acceptably sharp in an image. Although a lens can precisely focus at only one distance at a time, the decrease in sharpness is gradual on each side of the focused distance, so that within the DOF, the unsharpness is imperceptible under normal viewing conditions. source: wikipedia (https://en.wikipedia.org/wiki/Depth_of_field) in real-time.
Render Viewport Navigation
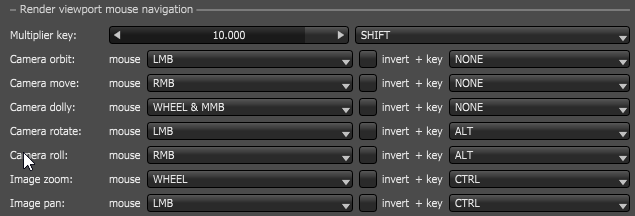
The Render Viewport can be manipulated like traditional 3D viewports with rotation, panning and zooming controls. Navigation keys can be customized via the File->Preferences->Controls dialog. Because of this flexibility, predefined navigation control schemes based on popular 3D software can be applied. Items in the Controls tab also include settings for the camera multiplier, mouse presets, and scroll wheel actions. The viewport mouse navigation controls can be inverted if preferred.
The default controls are the following:
The Render Viewport Icons
Recenter View

The Recenter View button centers the render view display area in the render viewport. This is useful if the render view display area was moved and part of it is no longer visible or centered. This will recenter the render view display area without affecting the current zoom level.
Camera Reset

The Camera Reset button allows the camera to be reset back to the original position. If the scene was just created from an imported object, then the Camera Reset button will reset the camera position to the default coordinates similar to when the object was just imported. If the scene was saved as an Octane Scene File, then the camera would be reset to the position of the Octane Scene File.
Camera View

The Camera View button provides preset camera views of the scene in the render viewport.
Stop Render

This aborts the rendering process and frees all resources being used by the current scene.
Restart Render

Halts the current rendering process while keeping the loaded contents in memory and then automatically starts the rendering process all over again at zero samples.
Pause Render

This will pause the rendering process without losing the currently rendered data and also keeping the contents of the GPUThe GPU is responsible for displaying graphical elements on a computer display. The GPU plays a key role in the Octane rendering process as the CUDA cores are utilized during the rendering process.’s memory intact. Pausing the render is useful when there is a need to temporarily free the GPU cores in order to run other GPU-intensive applications meanwhile with the intention of continuing the render process later.
Start Render

Starts the rendering process from the point where it was paused.
Fit Rendered Image to Vieport Size

The viewport can scroll up and down to accommodate the current visible size of the rendered image. Enabling this facility will adjust the resolution of the rendered image automatically to the current size of the viewport. If this is enabled, the rendering will be restrarted every time the size of viewport window is adjusted since the resolution of the image will also change. This is disabled by default.
Focus Picking Mode

The Focus Picker tool helps navigating a scene that is very complex or that has become difficult to navigate. To enter Focus Picking mode, click on the icon located under the Render Viewport. It is then used to click on any part of the scene to make the point under the mouse pointer to become the focus of the camera. Right-clicking on the mouse when this is enabled invokes a context menu to allow picking of objects along the path of a ray directly affecting that point in the scene.
White Balance Picking Mode

If this is enabled, the user will be able to select any part of the scene to see white point colors applicable to the whole scene on the basis of a diffuse within the scene. This does not cause the render to be restarted, however, the current white point color will be used throughout the render. To restore the original balance used in the scene, simply click on an empty part of the scene while still in this mode.
MaterialThe representation of the surface or volume properties of an object. Picker

If this is enabled, the user will be able to select any part of the rendered scene to inspect the material applied to it. Right-clicking on the mouse when this is enabled invokes a context menu to allow picking of materials applied to the objects along the path of a ray directly affecting that point in the scene. The material node is then automatically invoked and appears on the node inspector pane.
Object Picker

If this is enabled, the user will be able to select particular objects in the rendered scene to be able to inspect its attributes on the Node Inspector pane. Right-clicking on the mouse when this is enabled invokes a context menu to allow picking of the objects along the path of a ray directly affecting that point in the scene. The object’s node graph representation is also automatically selected on the graph editor pane.
Camera Target Zoom Picking

The Camera Target Zoom Picker tool helps navigating a scene that is very complex or that has become difficult to navigate. To enter Camera Target Zoom Picking, click on the icon located under the Render Viewport. It is then used to click on any part of the scene to make the point under the mouse pointer to become the center of rotation and zooming. A quick roll of the mouse wheel will cause the render to zoom into the newly selected point. Right-clicking on the mouse when this is enabled invokes a context menu to allow picking of objects along the path of a ray directly affecting that point in the scene.
Render Region Picking

The Render Region Picker tool allows users to specify a region in the viewport. This assists in viewing changes quickly and also allows more control to reduce noise in specific areas. To use Render Region Picking, click on the icon located under the Render Viewport. Rectangular areas can now be selected in the viewport to which the rendering will be restricted. A feathered border is placed around the selected area. To disable this feature and return to rendering the whole image, click once anywhere in the viewport. The samples rendered in this region are taken into account in the samples per pixel statistics of the viewport. This represents the average samples per pixel over the full image.
Film Region Picking

The Film Region Picker tool allows users to specify a region in the scene to set new values for Region Start and Region Size for Film Settings parameters which configures the render film. Although the resolution will remain the same, the film region is the only part that is rendered. Users may reset the film region back to its full size by double-clicking on the render viewport while the toggle is enabled.
Clay Mode Rendering Settings
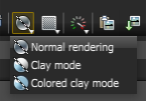
Using Clay Rendering allows users to show the details of the model which are still in progress. This comes in handy when users want to see details without the complex texturing that are already applied or when colors and/or textures have yet to be applied.
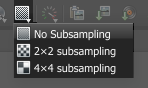
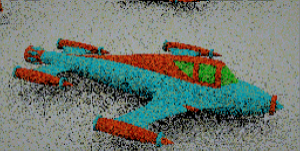
Using sub-sampling allows for smoother navigation of the scene by reducing the render resolution. In order to improve navigation at the cost of visual quality, 2×2 or 4×4 sub-sampling settings can be adjusted by using the checkerboard buttons under the Render Viewport. The reduced settings apply when the scene is being navigated and then returns to the render settings after navigation has stopped. The following figures show the difference between navigating with no sub-sampling versus navigating with 4×4 sub-sampling.

Render Priority Settings
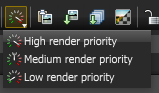
This sets the priority for the active GPUs when the Use Priority option is enabled correspondingly on the Devices preferences tab.
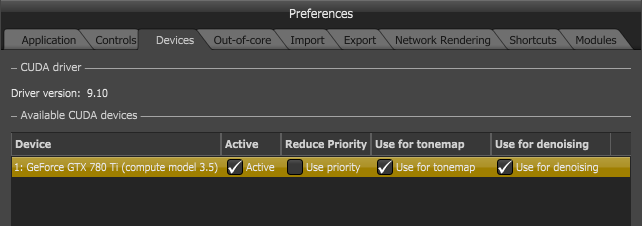
The render priority is necessary when a GPU is not dedicated to rendering but is also shared among different processes in one machine. For example, a machine that only has one GPU, will share the GPU for processes across the whole system including the Operating System. In this case, setting the Render Priority to LOW and enabling Use Priority on Preferences > Devices for that single GPU, will be best for interactivity.
Copy Paste Preview Image

This copies the current rendered image to the clipboard in Low Dynamic RangeImage formats that have 8 bits per color channel such as the common image formats JPEG, PNG, GIF among others. format which can be pasted on to different applications.
Save Current Render

This saves the current render to disk according to some specific file format. The choices are:
A .PNG file is not a high dynamic range image but it supports an alpha channel and allows for lossless image compression, both of which are useful for large visualization stills or compositing. The EXR file format on the other hand offers high dynamic-range which is useful in a linear workflow and maintaining quality with lossless compression across pipelines in compositing projects. Octane can export 32-bit EXR files or half of that at 16 bits per channel which is more common because this takes less time to render without compromising the output quality for most projects.

This invokes the Render Passes Export window.
Viewport Background Image

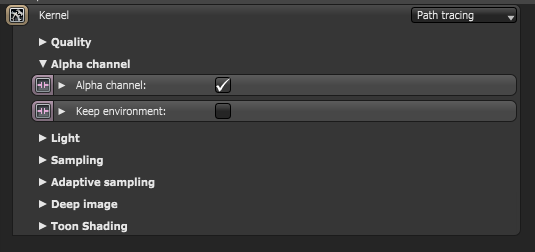
This allows users to place a background image on the render viewport. To see the background image, the Kernel’s alpha channel should be enabled.
The background image is not rendered at all but is placed only for the purpose of streamlining the model against a backplate that is later used in post.
Lock Viewport

This locks and unlocks the viewport controls. Locking the viewport controls help prevent accidental change or restart of the render.
Object Control Alignment Mode
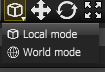
This specifies the coordinate system that is used while modifying placement and scatter nodes using handles for rotation, scaling, and translation in the viewport. The user may choose to align with the world axis or with the local axis while working with the gizmos for object controls.

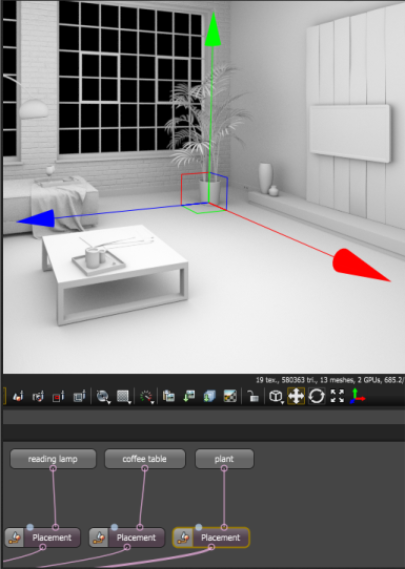
Placement Translation Tool (Toggle Move Gizmo)

This provides the possibility to modify the translation of placement and scatter nodes using handles directly in the viewport. The move tool allows movement along each axis or constrained to the plane defined by two axis using different parts of the control. Since OctaneRender is not 3D-modeling software, this will not modify any mesh geometry.
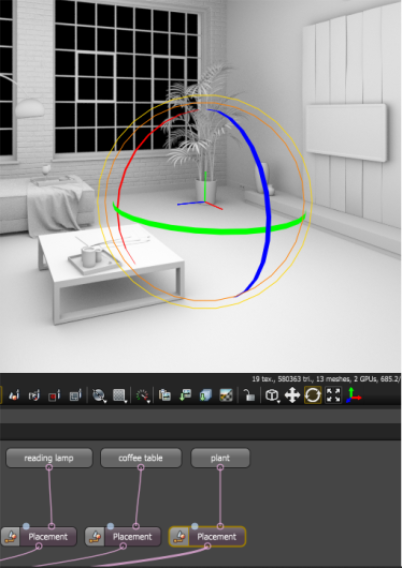
Placement Rotation Tool (Toggle Rotate Gizmo)

This provides the possibility to modify the rotation of placement and scatter nodes using handles directly in the viewport. The rotation tool allows rotation around each of the axis via the axis rotation bands, a free rotation via the inner orange circle and the rotation around the camera-object axis via the outer yellow circle. This tool also allows you to rotate objects multiple times around the picked axis. Since OctaneRender is not 3D-modeling software, this will not modify any mesh geometry.
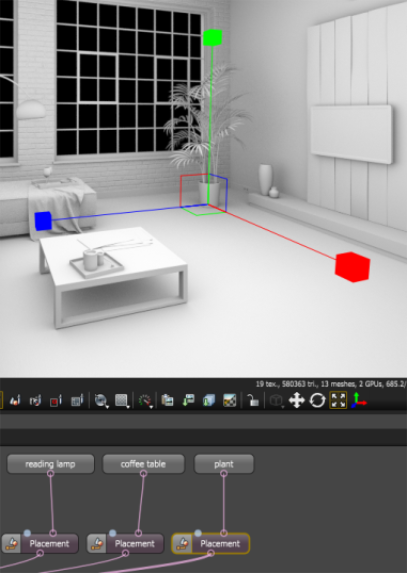
Placement Scale Tool (Toggle Scale Gizmo)

This provides the possibility to adjust the scale of placement and scatter nodes using handles directly in the viewport. The scale tool allows the scale along each axis by selecting one of the axis lines, constrained to two axis by selecting one of the corners near the origin and the uniform scaling by selecting one of the axis end handles. Since OctaneRender is not 3D-modeling software, this will not modify any mesh geometry.
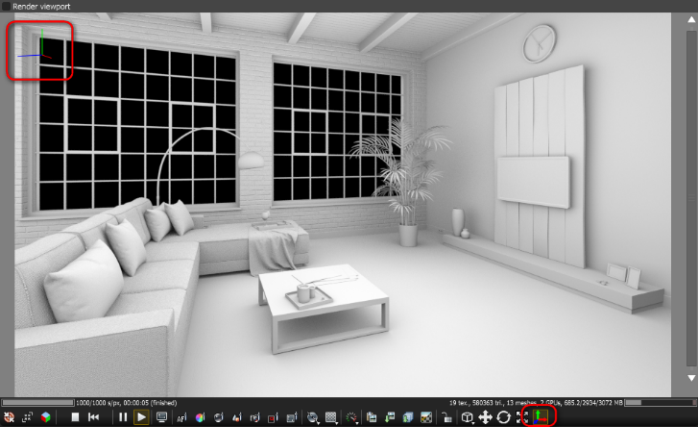
Display World Coordinate

This displays a small representation of the world coordinate axis at the top left corner of the viewport.
The Node Graph Editor can be scrolled with the mouse wheel when holding down the <CTRL> key (or CMD key on Macintosh platforms). Like the Viewport, the Node Graph Editor also has panning and zooming controls:
When zoomed out a lot, connections cannot be edited although items can still be moved. When an item or a node is dragged out of the node graph editor window, the node graph window is auto-panned to make that node visible.
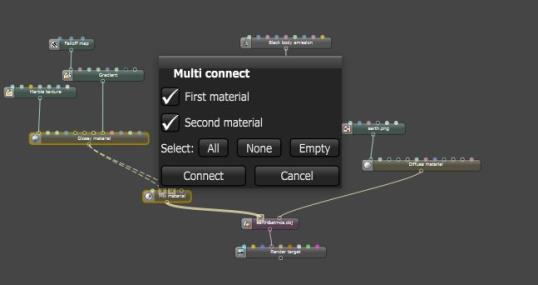
Multi-connect feature – This allows users to connect multiple nodes at a time. by holding down the <CTRL> key (or CMD key on Macintosh platforms) while connecting some selected nodes to a pin on another node. It is therefore inactive if only one connection is possible.
Connection cutter – This cuts off multiple connections by holding down the <CTRL> key (or CMD key on Macintosh platforms) and then click-dragging with to form a line over the connections that are to be removed.
Search Dialog – Simultaneously pressing <CTRL> key + F key invokes the Search Dialog, which is used to quickly find and select nodes and dynamic pins that contain the entered search string.
