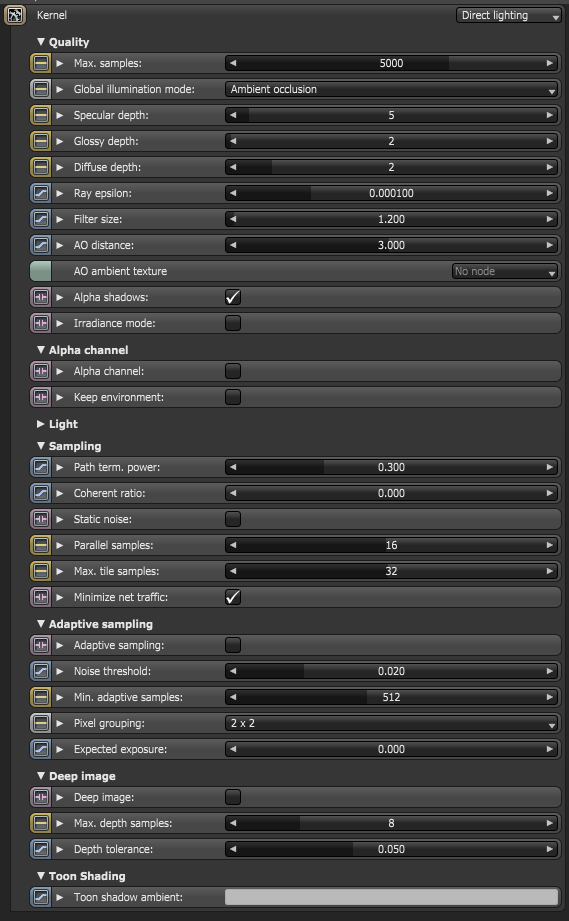
The Direct Light Kernel is generally used for faster preview rendering. Direct Lighting is not unbiased and will not yield photorealistic results, however because of its speed it can be the ideal choice for rendering animations or stills depending on the demands of the project. Figure 1 shows the Direct Lighting settings in the Node Inspector.

Figure 1: The Direct Lighting settings in the Node Inspector
Max. Samples
Sets the maximum number of samples per pixel before the rendering process stops. The higher the number of samples per pixel, the cleaner the render. There is no rule as to how many samples per pixel are required for a good render, it is subjective and may vary depending on the content and complexity of the scene being rendered.
There are five types of Global Illumination modes in the Direct Lighting Kernel:
Only direct lighting from the sun or area lights is included. Shadowed areas receive no contribution and will be black.
Standard ambient occlusion. This mode can often provide realistic images but offers no color bleeding.
This gives a GI quality that is in between Ambient Occlusion and Pathtracing but without caustics. The advantage is much faster rendering than Pathtracing and PMC. It is similar in some ways to "bruteforce" indirect GI in other engines.
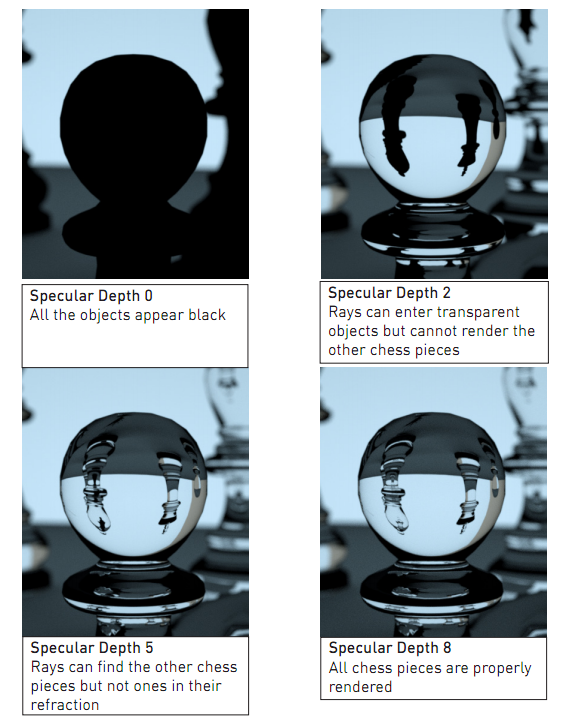
Controls the number of times a ray can be refracted before dying. Higher numbers mean higher render times but more color bleeding and more details in transparent materials. Low numbers can introduce artifacts or turn some refractions into pure black.
Examples of various Specular Depth’s using the Direct Lighting Kernel with GI Mode (0) None are shown in Figure 2.

Figure 2: A comparison of renderings using different specular depth settings
Glossy depth controls the number of times a ray can be reflected before dying. Higher numbers mean higher render time. Low numbers (under 4) can introduce artifacts, or turn some reflections into pure black.
Diffuse Depth
Gives the maximum number of diffuse reflections if GI Mode is set to Diffuse (4).
Ray Epsilon
is the distance between the geometry and the light ray when calculating ray intersections for lighting and shadowing. Larger values push rays away from the geometry surface. Lower values are more accurate, but can cause artifacts on large or distant objects. Ray Epsilon is similar to raytracing bias in other rendering engines. Adjust Ray Epsilon to reduce artifacts in large scale scenes.
Filter Size
Sets the filter size in terms of pixels. This can improve aliasing artifacts in the render. However, if the filter is set too high, the image can become blurry.
Alpha Shadows
Allows any object with transparency (specular materials, materials with opacity settings, and alpha channels) to cast a shadow accordingly instead of behaving as a solid object.
Irradiance Mode
This renders the first surface as a white diffuse material. Irradiance mode works similar to clay mode however it is only applied to the first bounce. It disables the bump channel and makes samples that are blocked by back faces transparent.
AO Distance
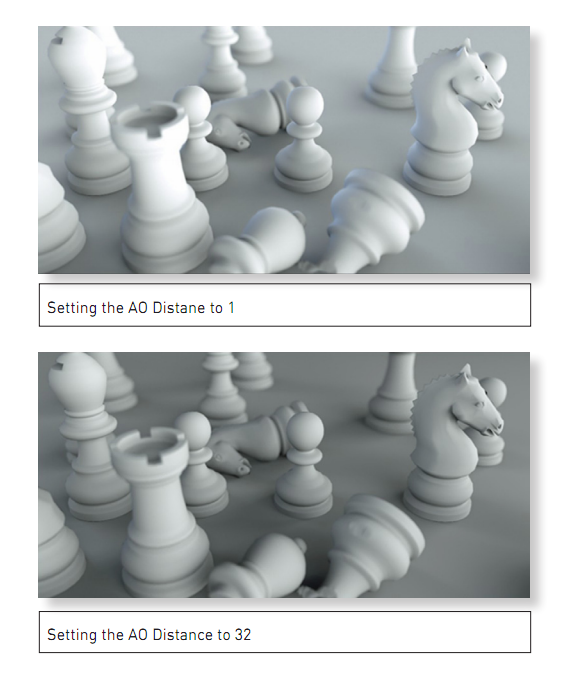
Is the distance of the ambient occlusion shadowing spread in units. This setting should be adjusted in order to achieve realistic results depending on the scale of the objects in the scene. For example a small value is more appropriate for small objects such as toys and larger values for an object such as a house (Figure 3).

Figure 3: A comparison of renderings using different AO Distance settings
AO Ambient Texture
The AO Ambient texture allows users to specify an ambient occlusion texture which will then be used for the AO calculation instead of the environment. If AO texture is off the environment is used instead. This is useful to get rid of the blue tint on white walls caused by the blue sky (e.g. in OctaneDayLight).
Alpha Shadows
This enables direct light through opacity maps. If disabled, ray tracing will be faster but render incorrect shadows for alpha-mapped geometry or specular materials with "fake shadows" enabled. Alpha Shadows allows any object with transparency (specular materials, materials with opacity settings, and alpha channels) to cast a shadow accordingly instead of behaving as a solid object.
Irradiance mode
This renders the first surface as a white diffuse material. Irradiance mode works similar to clay mode however it is only applied to the first bounce. It disables the bump channel and makes samples that are blocked by back faces transparent.
This option removes background images or colors created by the SunSky environment node from the rendered image while not affecting any lighting cast by the environment. This can be useful if the you want to composite the render over another image and does not want the background to be present. Note that objects appearing in the RGB channels will have a bleeding edge which may appear as noise artifacts however these edges are not included in the alpha channel itself.
Keep Environment
Is used in conjunction with the Alpha Channel setting. It allows the background to be visible in the rendered image while at the same time, keeping the alpha channel.
Light
This section provides options to use the Light Linking And Light Exclusion capabilities of Octane and the AI Light lighting algorithm in Octane v4 for light sampling in scenes with complex lighting. For more information about the AI Light algorithm and its attributes, refer to AI Light in this documentation.
Path Termination Power
This parameter provides a system where users can tweak samples/second vs. convergence (how fast noise vanishes). Increasing this value will cause the kernels to keep paths shorter and spend less time on dark areas (which means they stay noisy longer) but may increase samples/second. Reducing this value will cause kernels to trace longer paths on average and spend more time on dark areas. In short, high values increases the render speed but may lead to higher noise in dark areas.
Coherent Ratio
Increasing this value will increase the render speed but may introduce low-frequency noise or blotches. Eliminating the blotchy appearance may require minimum of a few hundred or even a few thousand samples per pixel to go away depending on the contents of the scene.
Static Noise
Keeps noise patterns static between rendered frames in a sequence when enabled. Note that the noise is fully static as long as the same GPUThe GPU is responsible for displaying graphical elements on a computer display. The GPU plays a key role in the Octane rendering process as the CUDA cores are utilized during the rendering process. architecture is being used for rendering. Different architectures will produce slightly different numerical errors which manifest as small differences in the noise pattern.
Parallel Samples
Controls how many samples are calculated in parallel. Smaller values require less memory to store the samples state but may cause the render to be a bit slower. High values require more memory but can reduce render time. The change in performance depends on the scene and the GPU architecture.
Maximum Tile Samples
Controls the number of samples per pixel that Octane will render before storing the result in the render buffer. A higher number means that results arrive less often in the film buffer.
Minimize Net Traffic
Distributes only the same tile to the net render slaves until the max samples/pixel has been reached for that tile and only then will the next tile is distributed to slaves when enabled. Work done by local GPUs is not affected by this option. This way a slave can merge all its results into the same cached tile until the master switches to a different tile.
This is an option to enable rendering of deep pixel images used for deep image compositing. It is covered in the Deep Image Rendering topic of this guide.
Maximum Depth Samples
This is used when deep image rendering is enabled. It sets the maximum number of depth samples per pixel and is described in the Deep Image Rendering section of this guide.
Depth Tolerance
This is used when deep image rendering is enabled. The depth samples whose relative depth difference falls below this tolerance value are merged together. This is covered in the Deep Image Rendering section of this guide.
Toon Shadow Ambient
This is the ambient modifier of Toon Shadowing.