
The following render controls are used in the OctaneRender Layout, Setup window and Viewport window.
Preview

When enabled, the viewport render resolution will be scaled by the Preview Percent value in the Octane preferences. This option allows you to see faster updates using a lower resolution render, while working on your scene. Disable it for final renders.
Lock

When enabled, the Octane render will not restart for scene or material changes. Enable this to prevent any accidental restarts of your final render.
Resume / Pause

Start, pause and resume rendering
Refresh

Reload the scene from Modo into Octane
Stop

Stops the render and frees GPUThe GPU is responsible for displaying graphical elements on a computer display. The GPU plays a key role in the Octane rendering process as the CUDA cores are utilized during the rendering process. memory
Focus Pick

Pick the Focus Distance by clicking geometry in the Octane viewport. The value is keyed in the Octane Camera > Camera > Focal Depth channel.
MaterialThe representation of the surface or volume properties of an object. Pick

Select a material by clicking on geometry in the Octane viewport. This will select the Modo material or Octane Override in the Modo Shader Tree. Left click selects the top-most material. Right click will display a menu when multiple materials can be selected. This is useful for picking materials behind other transparent materials, such as glass. Emitter MaterialsA set of attributes or parameters that describe surface characteristics. from on-the-fly lights are not pickable.
White Balance Pick

Pick the White Balance by clicking a point in the Octane viewport. The value is stored in the Octane Camera > Imager > White Point channel.
Render Region Pick

Pick the Render Region by dragging in the Octane viewport. The Render Region persists if the render is restarted or a new scene is loaded. Right click the viewport to cancel the Render Region.
Save Render

Saves the Octane viewport image. The following options are available:
No Live Geometry

Stops the plugin from processing mesh changes to all mesh items, even if meshes have Live Geometry Updating enabled.
Export Render

Exports the scene to OCS/ORBXThe ORBX file format is the best way to transfer scene files from 3D Authoring software programs that use the Octane Plug-in such as Octane for Maya, Octane for Cinema 4D, or OctaneRender Standalone. This format is more efficient than FBX when working with Octane specific data as it provides a flexible, application independent format. ORBX is a container format that includes all animation data, models, textures etc. that is needed to transfer an Octane scene from one application to another. format. See Exporting to ORBX for more details. The following options are available:
Kernel

Access the Octane kernel settings. See Kernel Settings for more details.
Camera

Access the Octane camera, imager and post processing settings. See Camera and Post ProcessingEffects such as Bloom and Glare that are applied after a scene has been rendered. for more details.
Environment

Access the Octane environment settings. See Environment for more details.
Visible Environment

Access the Octane visible environment settings. See Visible Environment for more details.

Access the Octane render pass settings. See Render Passes for more details.
Log

Open the OctaneRender Log Window. Octane and CUDA errors will appear in this window.

Open the CUDA Device Settings. See Device Settings for more details.
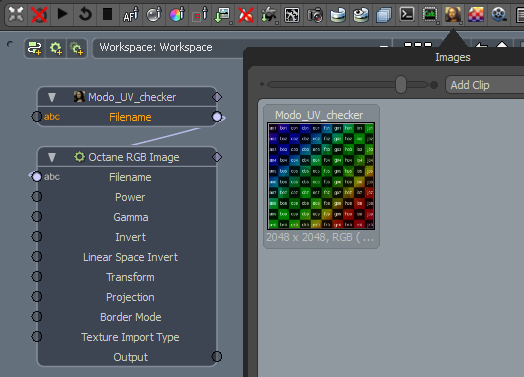
Images

Opens the Modo Images popover. You can drag images onto the schematic and then connect the filename to an Octane RGB, Alpha or Float Image filename.
Texturemaps

Reloads all textures from disk. The Viewport must be opened in order to enable this function. Use this option if you are editing textures in an external application.
Animate

Render the current animation timeline in OctaneRender. See Rendering Animations for more details.
Show Setup Window

Open the OctaneRender Setup Window. See OctaneRender Setup Window for details.
Select Viewport Render Pass

Selects which render pass will be displayed in the viewport.