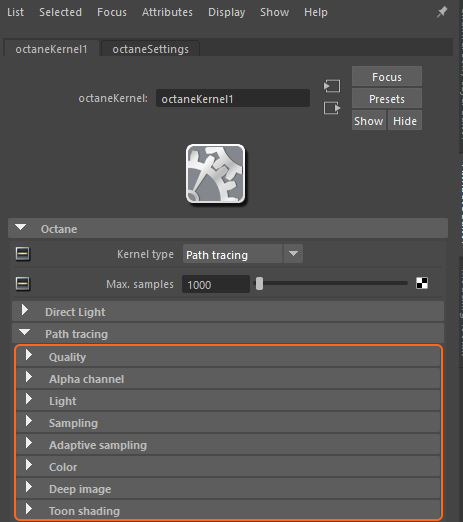
The Path Tracing and PMC render kernels are the best choices for rendering photorealistic images. The increase in quality comes with the cost of increased render times. Path Tracing may have difficulty rendering scenes that use small light sources, and may not render proper caustics well. In these situations, the PMC render kernel is the better choice. Testing renders using each of the render kernels is the best way to determine what kernel is the best choice for a given scene. This Kernel has a series of sub-rollouts of attributes (figure 1).
Figure 1: The Path Tracing settings in the Attribute Editor window
Max. Samples - Sets the maximum number of samples per pixel before the rendering process stops. Higher values result in cleaner renders.
DiffuseAmount of diffusion, or the reflection of light photons at different angles from an uneven or granular surface. Used for dull, non-reflecting materials or mesh emitters. Depth - The maximum number of times a ray can bounce off of a diffuse or very rough surface. Higher values mean higher render times, but more realistic results. For outdoor renders, a good setting is around 4. For lighting interiors with natural light from the sun and sky, you need settings of 8 or higher. In the real world, the maximum diffuse bounces would not exceed 16. It is possible to use a value higher than 16, but this is not necessary.
SpecularAmount of specular reflection, or the mirror-like reflection of light photons at the same angle. Used for transparent materials such as glass and water. Depth - Controls the number of times a ray refracts before dying. Higher values lead to higher render times, but more color bleeding and more details in transparent materials. Low values introduce artifacts or turn some refractions into pure black.
Scatter Depth - The maximum path depth that allows scattering.
Max Overlapping Volumes - Determines how much space to allocate for overlapping volumes. Ray marching is faster with lo values but it can cause artifacts where many volumes intersect.
Ray Epsilon - The distance between the geometry and the light ray when calculating ray intersections for lighting and shadowing. Larger values push rays away from the geometry surface. Smaller values are more accurate, but cause artifacts on large or distant objects. Ray Epsilon is similar to ray tracing bias in other rendering engines. Adjust Ray Epsilon to reduce artifacts in large-scale scenes.
Filter Size - Sets the filter size in terms of pixels. This can improve aliasing artifacts in the render. However, if the filter is set too high, the image becomes blurry.
Alpha Shadow - Allows any object with transparency (Specular materials, materials with Opacity settings and Alpha Channels) to cast a shadow instead of behaving as a solid object.
Caustic Blur - Reduces noise in caustic light patterns. High values result in soft caustic patterns.
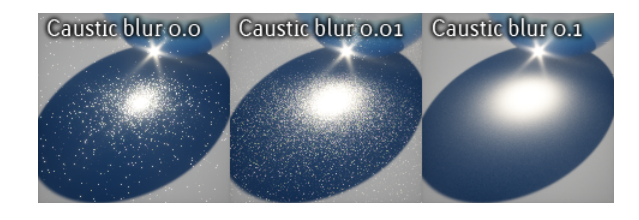
Figure 2: A comparison of caustic light patterns rendered with different Caustic Blur settings
GI Clamp - Clamps the contribution for each path to the specified value. By reducing the GI Clamp value, you can reduce the amount of fireflies caused by sparse but very strong contributing paths. Reducing this value reduces noise by removing energy.
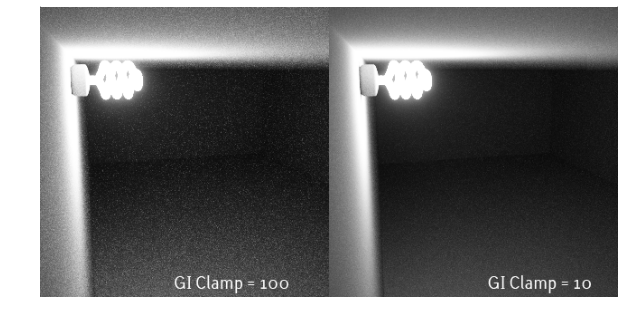
Figure 3: A comparison of renders using different GI Clamp values
Nested Dielectrics - If disabled, the surface IORs are not tracked and surface priorities are ignored.
Irradiance Mode - This renders the first surface as a white Diffuse material. Irradiance Mode works similar to Clay Mode, but it applies to the first bounce. It disables the Bump channel and makes samples that are blocked by back faces transparent.
Max Subdivision Level - The maximum subdivision level applied on the scene's geometry. A value of 0 disables subdivision.
Alpha ChannelA greyscale image used to determine which areas of a texture map are opaque and which areas are transparent. - Removes background images or colors created by the SunSky environment node from the rendered image while not affecting any lighting cast by the environment. This is useful if the you want to composite the render over another image without the background being present. Objects appearing in the RGB channels have a bleeding edge, which appear as noise artifacts, but these edges are not included in the Alpha Channel itself.
Keep Environment - Used in conjunction with the Alpha Channel setting. It makes the background visible in the rendered image while also keeping the Alpha Channel.
Light linking provides a way to include and exclude illumination contributions of light sources on objects in a scene. The light IDs are set in Emitter nodes under the Emission rollout for the Diffuse MaterialThe representation of the surface or volume properties of an object., and this light ID corresponds to the Light IDs found here in the KernelSettings. Octane has eight Light IDs, and you can also choose whether to enable the sun and environment separately.
Path Termination Power - Tweaks samples-per-second vs. convergence (how fast noise vanishes). Increasing this value causes the kernels to keep paths shorter and spend less time on dark areas, which means they stay noisy longer, but it also increases samples-per-second. Reducing this value causes kernels to trace longer paths on average and spend more time on dark areas. In short, high values increase the render speed, but they may lead to higher noise in dark areas.
Coherent Ratio - Increasing this value increases the render speed, but it also introduces low-frequency noise or blotches. Eliminating the blotchy appearance requires a few hundred or a few thousand samples per pixel to go away, depending on the contents of the scene.
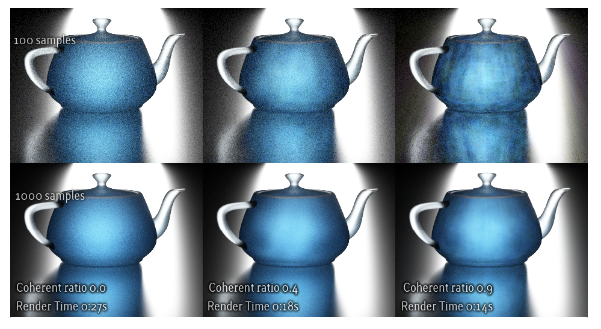
Figure 4: A comparison of renders using Coherent Ratio values
Static Noise - Keeps noise patterns static between rendered frames in a sequence. The noise is static as long as the same GPUThe GPU is responsible for displaying graphical elements on a computer display. The GPU plays a key role in the Octane rendering process as the CUDA cores are utilized during the rendering process. architecture is used for rendering. Different architectures produce different numerical errors, which manifest as small differences in the noise pattern.
Parallel Samples - Controls how many samples Octane calculates in parallel. Smaller values require less memory to store the sample's state, but increase render time. Larger values require more memory, but reduce render time. The change in performance depends on the scene and the GPU architecture.
Max Tile Samples - Controls the number of samples per pixel that Octane will render before storing the result in the render buffer. Higher values mean that results arrive less often in the film buffer.
Minimize Net Traffic - Distributes the same tile to the net render slaves until Octane reaches the max samples-per-pixel for that tile, and then it distributes the next tile to slaves when enabled. This option doesn't affect work done by local GPUs. A slave can merge all of its results into the same cached tile until the master switches to a different tile.
Enable Adaptive SamplingA method of sampling that determines if areas of a rendering require more sampling than other areas instead of sampling the entire rendering equally. - Enables adaptive sampling.
Noise Threshold - Specifies the smallest relative noise level. When the noise estimate of a pixel is less than this value, sampling switches off for this pixel. Good values are in the range of 0.01 - 0.03. The default is 0.02, which is pretty clean.
Min. Adaptive Samples - Specifies the minimum number of samples to calculate before adaptive sampling kicks in. A pixel's noise estimate has a large initial error. The higher you set the noise threshold, the higher you should also set this parameter to avoid artifacts.
Pixel Grouping - Specifies the number of pixels handled together. When all of the pixels in a group reach the noise level, sampling stops for all of these pixels.
Expected Exposure - This value should be close to the same value as the image's exposure, or 0 (the default value) to ignore these settings. Adaptive sampling uses this parameter to determine what pixels are bright and dark, which depends on the Octane Imager's exposure setting. If the value is not 0, adaptive sampling adjusts the noise estimate of the image's very dark areas. It also increases the Min. Adaptive Samples limit for very dark areas, because very dark areas tend to find irregular paths to light sources, resulting in over-optimistic noise estimates.
Controls the white light spectrum produced by spectral emitters (daylight, environment, black body).This determines the spectrum that will produce white (before white balance) in the final image.
Deep image rendering stores the Z-depth location of an object with samples of a rendered image. It works best in scenarios where traditional compositing techniques fail, such as compositions where masking out overlapping objects is too difficult, or scenes that render images images using depth-of-field or motion blur, or compositing footage in rendered volumes. Instead of having single RGBA values for a pixel, a deep image stores multiple RGBA channel values per pixel together with a front and back Z-depth (Z and ZBack channels, respectively). This combination (R, G, B, A, Z, ZBack) is called a deep sample.
Most major compositing applications now support deep image compositing. The disadvantage of deep image rendering is the large amounts of memory required to render and store deep images. The standard output format is OpenEXR.
Deep ImageRenders frames with multiple depth samples in addition to typical color and opacity channels. - Enables deep pixel image rendering for deep image compositing.
Maximum Depth Samples - When Deep Image Rendering is enabled, this sets the maximum number of depth samples per pixel.
Depth Tolerance - When Deep Image Rendering is enabled, Octane merges the depth samples whose relative depth difference falls below this value.
Toon Shadow Ambient - This is the ambient modifier of Toon Shadowing.