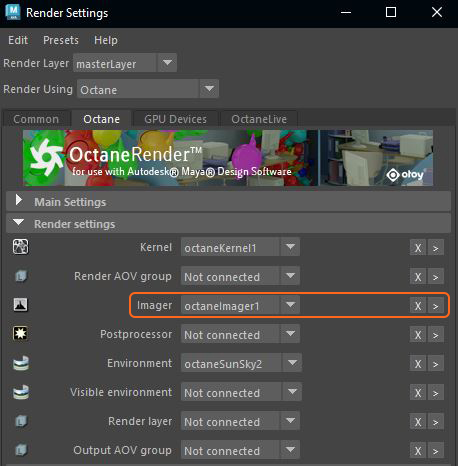
Camera Imager Settings can be added from the Octane tab in the Render Settings window (figure 1). These settings provide additional camera controls such as exposure and tone mapping.
Figure 1: Adding a Camera Imager Node in the Octane Render Settings window
A Camera Imager Node can also be added to a specific camera in the Octane rollout under the Render Settings Override sub-rollout (figure 2).
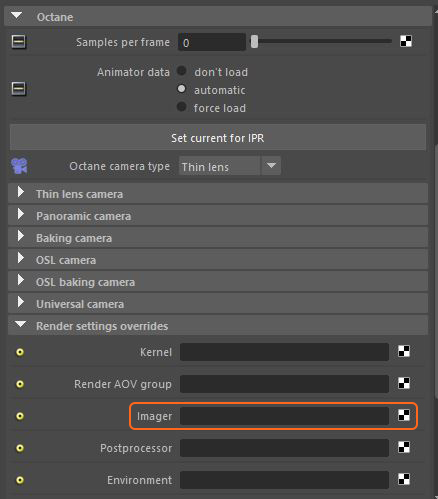
Figure 2: Adding a Camera Imager Node directly to a camera
Exposure - Controls the scene's exposure. Smaller values darken a scene, while higher values brighten the scene. Exposure has no effect on any of the render layer passes.
ACES Tone MappingRefers to applying a curve to an image to reduce dynamic range -
Highlight Compression - Reduces burned out highlights by compressing them and reducing their contrast.
GammaThe function or attribute used to code or decode luminance for common displays. The computer graphics industry has set a standard gamma setting of 2.2 making it the most common default for 3D modelling and rendering applications. Apply Order - Determines the order that OctaneRender® applies the Response Curve, Gamma, and the Custom LUT to the scene. Typically, 3D LUTs are defined for sRGB input values - i.e., you want to apply the custom LUT last, but there might also be 3D look-up tables for linear input data, in which case you want to apply the custom LUT first.
Response - A list of preset measured camera response curves to provide various predefined color grades to a rendering. To disable color grading, choose the Linear/Off option.
Neutral Response - The camera response curve does not tint the render result.
Gamma - Adjusts the rendered image's luminance values.
Custom LUT - Select a custom Look Up Table to use.
White Point - Specifies the color to adjust the tint to produce and simulate the relative temperature cast throughout the image by different light sources. The default color is white, acting as a white balance to achieve the most accurate colors possible.
Vignetting - Increases the amount of darkening in the corners of the render. Moderate use can increase the render's realism. Vignetting is not applied to any of the beauty passes except the main pass.
Saturation - Adjusts the amount of color saturation for the render.
Hot Pixel Removal - Removes the bright pixels (or fireflies) during the rendering process. While many of the pixels can disappear if the render progresses, the Hot Pixel Removal feature removes the bright pixels at a much lower sample-per-pixel rate.
Disable Partial Alpha - Makes partially-transparent pixels (Alpha value is less than 0) fully opaque.
Dithering - Adds random noise, which removes banding in very clean images.
White Saturation - When the sun is too bright, it can create multicolored reflections. Increasing this value changes the colors to white. This is also applicable to all sources of light, so fully-saturated parts of the render can push towards pure white with this option. This helps avoid large patches of fully=saturated colors caused by very bright light sources such as very bright colored emitters or reflected sunlight off colored surfaces.
Minimum Display Samples - The minimum amount of samples that Octane calculates before displaying the image. This feature can reduce the noise when navigating, and is useful for real-time walkthroughs. When using multiple GPUs, we recommend setting this value as a multiple of the number of available GPUs for rendering. For example, iff you’re rendering with four GPUs, set this value to 4 or 8.
Maximum Tonemap Interval - The maximum interval between tonemaps, in seconds.
OCIO View - The OCIO view to use when displaying in the render viewport.
OCIO Look - The OCIO look to apply when displaying in the render viewport, if using an OCIO view.
Enable Denoising - Enables the spectral AI denoiser, which denoises some beauty passes, including the main beauty pass, and writes the outputs into separate render passes.
Denoise Volumes - The spectral AI denoiser denoises volumes in the scene when enabled. Otherwise, volumes are not denoised by default.
Denoise On Completion - Beauty passes denoise once at the end of a render. Disable this option if you're rendering with an interactive region.
Minimum Denoiser Samples - The minimum number of samples per pixel taken until the denoiser kicks in. This is valid when the Denoise on Completion option is disabled.
Maximum Denoiser Interval - The maximum interval between denoiser runs, in seconds. This is valid when the Denoise on Completion option is disabled. The Denoiser Interval tells the denoiser to run when Octane reaches this value. It is used for the Interactive render region, which renders up to 1 million or until stopped. For this specific reason, Octane provides the option for periodic denoising.
Denoiser Blend - Accepts a value between 0 and 1 to blend the original image with the denoised results. A value of 0 results in a fully denoised image, and a value of 1 results in an image without any denoising applied.
Upsampler Mode - Selects the upsampler mode for rendering. The image renders at a lower resolution divided by the sampling mode, then it upscales to the final resolution.
AI Upsampling - When you have an Upsampler Mode selection made and you have this option enabled, the render scales using AI upsampling. Otherwise, scaling is done using traditional methods.
Upsampling On Completion - Beauty passes upsample once at the end of a render.
Min. Upsampler Samples - The minimum number of samples per pixel until the upsampler activates. This parameter doesn't apply if you select No Upsampling in Upsampler Mode.