Render layers allow you to separate your scene geometry into one part that you want to be visible and the rest that “captures” the side effects of the visible geometry on it.
This feature is meant for compositing and not to hide parts of the scene, for which you either would disable the object in the scene editor to not render or use the general visibility options. As a consequence, render layers really make sense only if you enable the alpha channel in the render kernel.
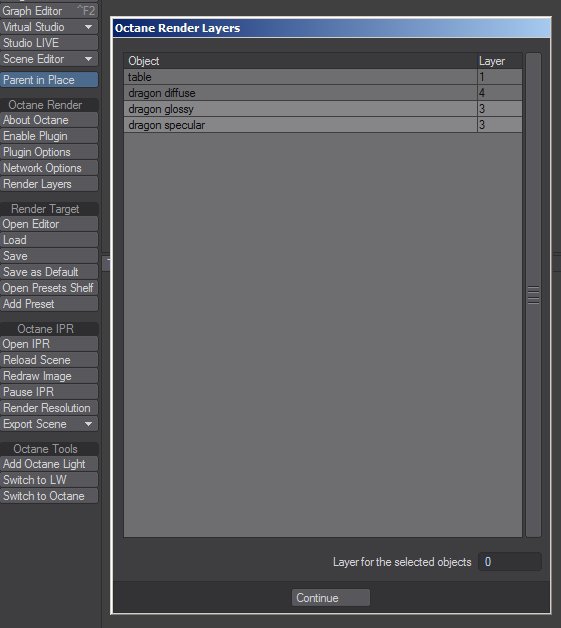
There is a new command in the Octane menu bar to open the render layers editor panel. To assign one or more objects to a layer you only need to select them and set the layer number with the “Layer for the selected objects” option. The layers information is stored in the .lws scene file, so you can use your objects in more than one scene and configure the layers for each scene without problems.
Preview the render layers in the IPRProvides artists a quick preview of the image prior to the final render, and efficiently allows for adjusting some elements in the scene such as lights, shaders and textures interactively. An IPR image contains shading and lighting data including some for visibility, in addition to the software render.
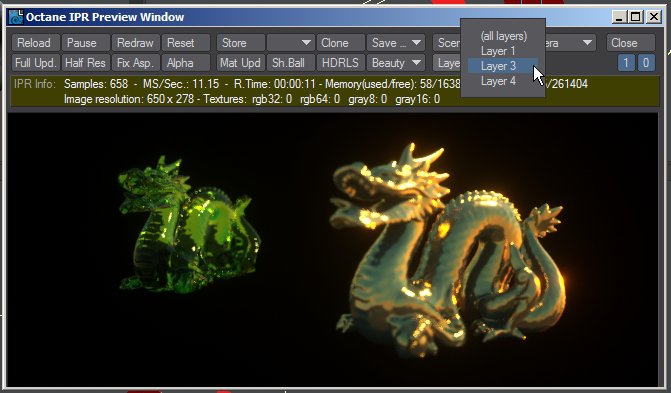
There is a new drop down menu in the IPR window to select the layer to be rendered among all the available layers.
Enable the layers rendering in the render target
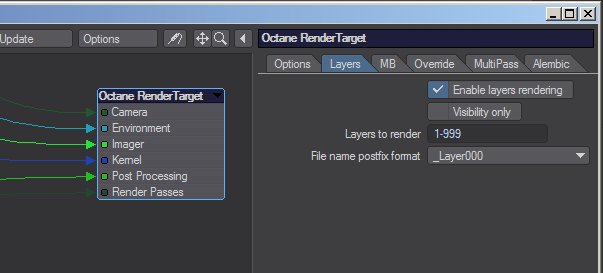
There is a new tab in the render target root node options panel to enable the F9/F10 layers rendering, select the layers to be rendered and the file name postfix format. Each layer is rendered to a separate file in the same rendering session, without reload or update scene to make the rendering as fast as possible. You can render all your layers using only one scene.
The Visibility Only enabled means that everything on the non-active layers is ignored. That should speed things up a bit. A limitation is that you cannot capture shadows and reflections in their respective layers.
The render layers passes
There is a new tab in the render passes node to enable the layers passes. These new render passes are a useful tools to composite a render on a backplate in post.
The main beauty pass will only render the current layer and cut out everything else, but the real power is in the shadow and reflection layer passes, where the “side effects” of the render layer are captured. You can use those to compose the render layer on some background and with shadows and reflections.
The new render passes are named shadows, black shadows, colored shadows, and reflections. These passes only work in conjunction with the render layers. If you enable them in your project without any further configuration, you will only see empty renders for these passes. More formally, these passes capture the “effect” from geometry part of the active render layer onto geometry part of all the other render layers. The first thing that needs to be done is configure object layers for the geometry using the render layers editor panel.
During rendering, objects that aren’t on the active render layer are ignored by camera rays. This means that all objects in the active layer are isolated in the beauty pass. There is no need anymore to isolate objects from the render via masks. The main advantage is that you can easily isolate out of focus or motion blurred objects. This is impossible with masks in some cases. If you still like to use masks and do DOFThe distance between the nearest and farthest objects in a scene that appear acceptably sharp in an image. Although a lens can precisely focus at only one distance at a time, the decrease in sharpness is gradual on each side of the focused distance, so that within the DOF, the unsharpness is imperceptible under normal viewing conditions. source: wikipedia (https://en.wikipedia.org/wiki/Depth_of_field) and motion blur in post, you can still render out an alpha mask of the render layer with the render layer mask info channel or render layer mask pass. Lets quickly look at an example where masks fail. When trying to mask out the blurry blue sphere, it’s impossible to avoid leaking through the yellow sphere. With render layers the yellow sphere was never in the render to begin with. You could of course render out the scene without DOF and motion blur and do them in post. But I think that with the fast render times of Octane this is a bit of an obsolete work flow in most cases.

Render layers allow you to separate your scene geometry into one part that you want to be visible and the rest that “captures” the side effects of the visible geometry on it.
This feature is meant for compositing and not to hide parts of the scene, for which you either would disable the object in the scene editor to not render or use the general visibility options. As a consequence, render layers really make sense only if you enable the alpha channel in the render kernel.
The Render Layers panel
There is a new command in the Octane menu bar to open the render layers editor panel. To assign one or more objects to a layer you only need to select them and set the layer number with the “Layer for the selected objects” option. The layers information is stored in the .lws scene file, so you can use your objects in more than one scene and configure the layers for each scene without problems.
Preview the render layers in the IPR
There is a new drop down menu in the IPR window to select the layer to be rendered among all the available layers.
Enable the layers rendering in the render target
There is a new tab in the render target root node options panel to enable the F9/F10 layers rendering, select the layers to be rendered and the file name postfix format. Each layer is rendered to a separate file in the same rendering session, without reload or update scene to make the rendering as fast as possible. You can render all your layers using only one scene.
The Visibility Only enabled means that everything on the non-active layers is ignored. That should speed things up a bit. A limitation is that you cannot capture shadows and reflections in their respective layers.
The render layers passes
There is a new tab in the render passes node to enable the layers passes. These new render passes are a useful tools to composite a render on a backplate in post.
The main beauty pass will only render the current layer and cut out everything else, but the real power is in the shadow and reflection layer passes, where the “side effects” of the render layer are captured. You can use those to compose the render layer on some background and with shadows and reflections.
The new render passes are named shadows, black shadows, colored shadows and reflections. These passes only work in conjunction with the render layers. If you enable them in your project without any further configuration, you will only see empty renders for these passes. More formally, these passes capture the “effect” from geometry part of the active render layer onto geometry part of all the other render layers. The first thing that needs to be done is configure object layers for the geometry using the render layers editor panel.
During rendering, objects that aren’t on the active render layer are ignored by camera rays. This means that all objects in the active layer are isolated in the beauty pass. There is no need anymore to isolate objects from the render via masks. The main advantage is that you can easily isolate out of focus or motion blurred objects. This is impossible with masks in some cases. If you still like to use masks and do DOF and motion blur in post, you can still render out an alpha mask of the render layer with the render layer mask info channel or render layer mask pass. Lets quickly look at an example where masks fail. When trying to mask out the blurry blue sphere, it’s impossible to avoid leaking through the yellow sphere. With render layers the yellow sphere was never in the render to begin with. You could of course render out the scene without DOF and motion blur and do them in post. But I think that with the fast render times of Octane this is a bit of an obsolete work flow in most cases.
Black shadows: Captures black shadows, i.e points on the non-active layer geometry where light is fully blocked by objects on the active layer. If light is blocked, shadows are always captured regardless of the material that receives the shadow. It’s assumed that the object that receives the shadows has a white diffuse material. e.g. shadows cast on a polished mirror like surface would not be visible in the render but we capture them in the shadow pass anyway. This pass only uses the alpha channel and should be composed in via the normal blend mode (regular alpha blending).
Colored shadows: Captures colored shadows cast by objects on the active layer geometry. Only objects with a specular material with fake shadows enabled can cast colored shadows. (TIP: when enabling fake shadows make sure that the kernel has alpha shadows enabled, otherwise it won’t work). This pass doesn’t have an alpha channel and should be composed in via the multiply blend mode.
Shadows: This pass is there for convenience. It combines black shadows (in the alpha channel) with colored shadows (in the RGB channels) in a single image. The blend mode is multiply. It captures the same shadows as the matte material with the difference that the matte materials captures all shadows in the alpha channel and hence doesn’t keep color information.
Reflections: Captures light reflected off of objects on the active layer on objects on the non-active layers. This pass respects the materials so the look of the reflections really depends on the materials used.