The OctaneRender® for Houdini® plugin can render the Houdini Volume and VDBDreamworks’ open-source C++ library housing the data structures and tools implementation for storing and manipulating volume data, like smoke and other amorphous materials. The purpose of OpenVDB is mostly to have an efficient way to store volumetric data in memory and on disk. It has evolved into a more general toolkit that also lets you accomplish other things, such as fracturing volumes, converting meshes to volumes and vice versa. However, it does not include a computational fluid dynamics solver, and therefore it cannot procedurally generate smoke or fire. OpenVDB is fully integrated as a library in OctaneRender. For more information about OpenVDB, please see http://www.openvdb.org/. primitives, and it can also manage and render OpenVDBDreamworks’ open-source C++ library housing the data structures and tools implementation for storing and manipulating volume data, like smoke and other amorphous materials. The purpose of OpenVDB is mostly to have an efficient way to store volumetric data in memory and on disk. It has evolved into a more general toolkit that also lets you accomplish other things, such as fracturing volumes, converting meshes to volumes and vice versa. However, it does not include a computational fluid dynamics solver, and therefore it cannot procedurally generate smoke or fire. OpenVDB is fully integrated as a library in OctaneRender. For more information about OpenVDB, check at http://www.openvdb.org/. files.
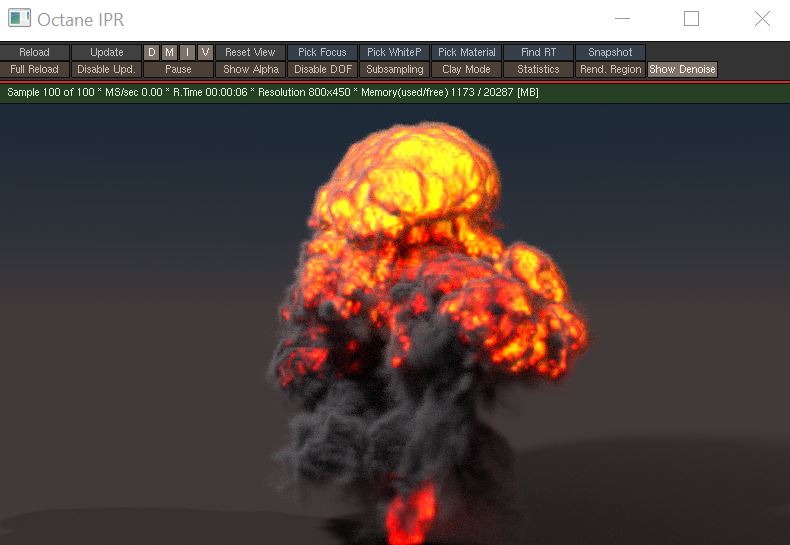
Figure 1: A Houdini volume rendered with OctaneRender®
To render the internal Houdini Volume or OpenVDB Primitives, you should enable the volumetric rendering in the Octane ObjParms - Volume tab on the Pyro or Volume geometry node (Figure 2). In this tab, you can also configure the volume grids used for volume rendering and their scale. You can also configure the velocity grids used to render the volume motion blur in this tab. You can also configure additional vector grids and set them to any of the AbsorptionDefines how fast light is absorbed while passing through a medium., ScatteringDefines how fast light gets scattered when traveling through the medium., or Emission volume grids.
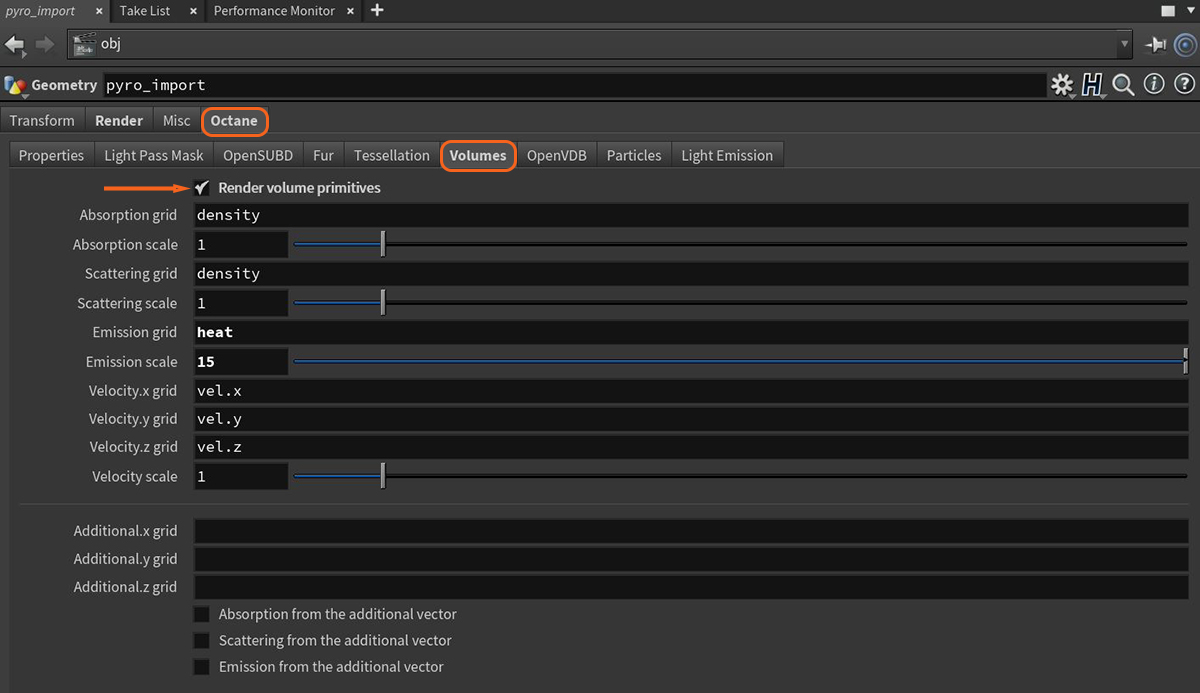
Figure 2: Configuring volume rendering in the Octane Object Spare Parameters tab
The same workflow can render external OpenVDB files. In this case, you must set the OpenVDB file and its parameters in the OpenVDB tab (Figure 3).
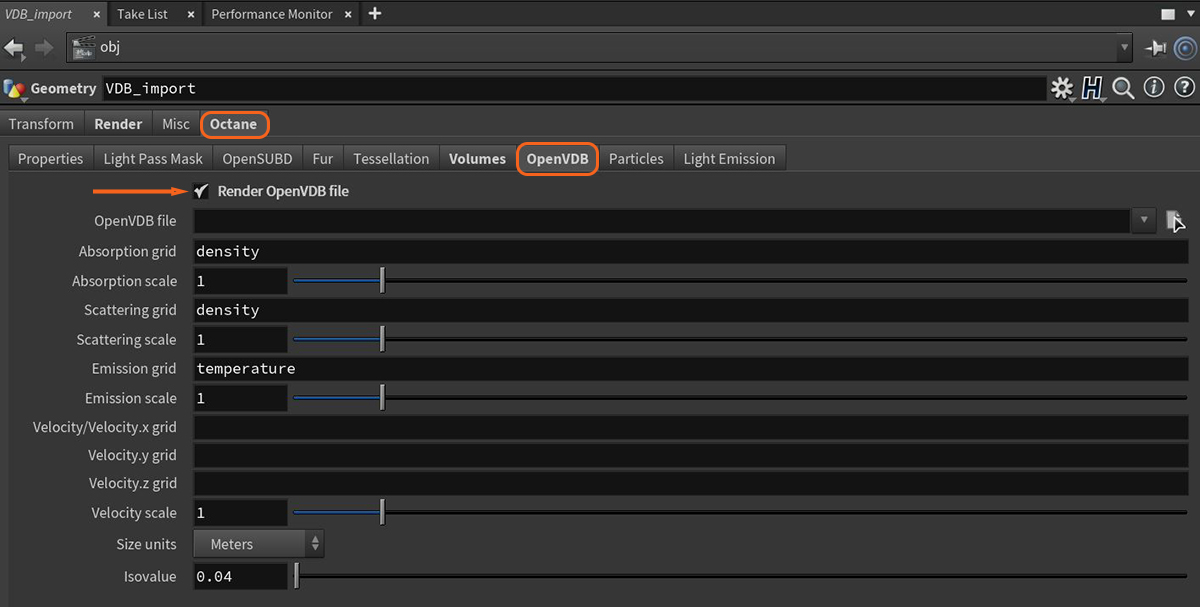
Figure 3: Configuring OpenVDB rendering in the Octane Object Spare Parameters tab
VDB files contain one or more volume datasets, or grids. For VDBs saved from a fire simulation, these include temperature and density grids. These correspond to the Volume's absorption and emission characteristics in terms of rendering. You can edit the import preferences of your Volume node to change what volume dataset or grid is applied to Scattering, Absorption, and Emission - similar to the Mesh node. When you export the Volume VDB from your simulation software, you can name each grid. Enter these into the import preferences in OctaneRender as you desire.
Some volume datasets are known as level sets, and they are encodings to store a thin eggshell surface. OctaneRender supports loading these volumes as well. The Isovalue parameter lets you to set the surface thickness.
You can add a material to the volume from the Render tab on the Pyro or volume import geometry node (Figure 4).
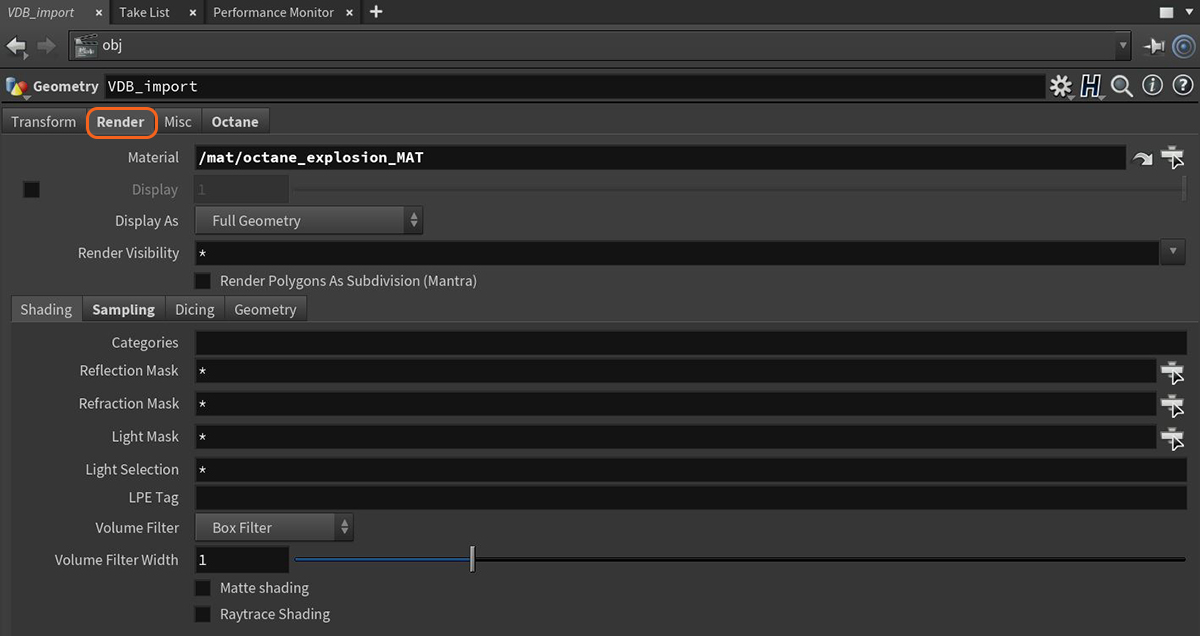
Figure 4: Adding a MaterialThe representation of the surface or volume properties of an object. to a volume rendering
The Medium Volume VOP node handles volumetrics shading when you link it to the Medium input in the Octane material's Output VOP (Figure 5).
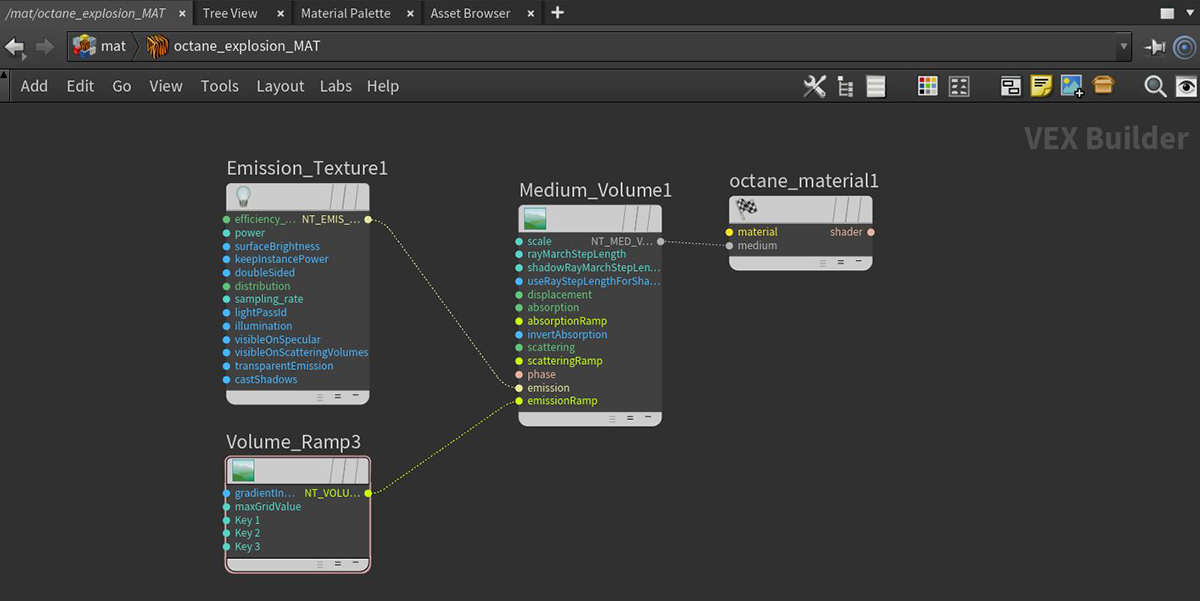
Figure 5: Setting up a typical shading network for volume rendering
Similar to the Medium node, Volumes can have Scattering, Emission, and Absorption settings. These colors have a huge influence on the volume's appearance. The Phase Function also affects a Volume as it would affect a Medium node, and modifying the Volume's Scale value scales the density values of the volume linearly. This also increases Emission, as Absorption values are also used as particle density.
The Volume node's Volume Step Length parameter has a default value of 4m. If your volume is smaller than this, decrease the Step Length. Decreasing this value reduces the render speed. Increasing this value causes the ray marching algorithm to take longer steps. If the Step Length exceeds the Volume’s dimensions, then the ray marching algorithm takes a single step through the whole Volume. To get the most accurate results, keep the Step Length as small as possible. To simplify your workflow, first set the Volume Step Length to an acceptable value.
Volumes are rendered in an unbiased way, so they can scatter multiple times. They can also cause self-shadowing effects. To reduce the maximum scatter events in a volume, reduce the DiffuseAmount of diffusion, or the reflection of light photons at different angles from an uneven or granular surface. Used for dull, non-reflecting materials or mesh emitters. Depth parameter in the Kernel node.
A Blackbody or Texture emission node configures the shading of the emission grids. When using the Blackbody node, make sure that the data used for the Emission grid contains temperatures in Kelvin. It is common to find VDBs that have unitless temperatures with arbitrary ranges such as 0 - 1, or even 0 - 45, as is the case with some sample VDBs from openvdb.org.
Typical temperature values range between 0 to 6500, where lower values tend towards longer wavelengths (red colors), and higher values tend towards blue or white. In order to get realistic results from the Blackbody emission for volumes, disable Normalize in the Emission node. Lower temperatures give off less light than higher temperatures, but when normalized, the radiance emitted by all temperatures is equal.
When using the Texture node, the input temperature grid is interpreted as emission power, not emission temperature. This is more linear in that the higher the temperature value, the more light is given off at that point. If you use Volume gradients, you have more precise control of the color.
Using the Volume medium node, you can apply Color Ramps independently to the Absorption, Scattering, and Emission parameters (Figure 6).
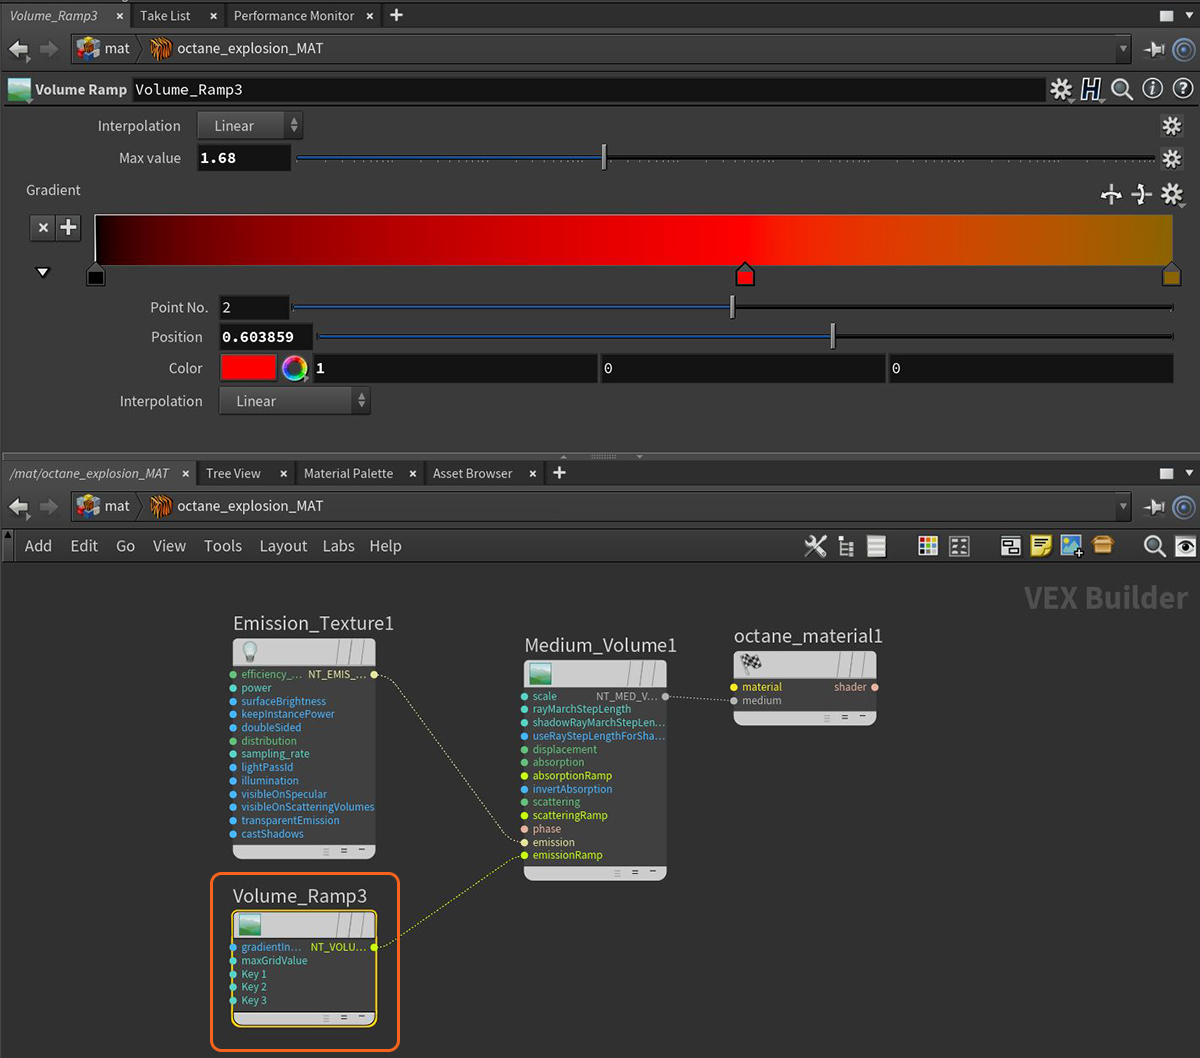
Figure 6: Applying a Volume Ramp to the Ramp inputs on a Volume medium node
Note: Volume ramps are restricted to static colors for performance reasons - it is not possible to attach a series of other texture mappings or generators to colors in the ramps.
There is an important consequence of volume animations specifically related to Volume ramps: ramps have a Max Value, which you must set to a reasonable value. This value scales grid values between 0 and 1 so that the ramp can map these back to colors in the Color gradient. This is needed because maximum values in the grids sometimes have wide variances throughout VDB sequences. If you set a Max Value too high or too low, this will still work, but you will only see a subset of the colors in the gradient that you specify. The maximum values for grids in the current VDB selected are now shown in the Volume node’s Inspector window. A good rule of thumb is to choose a value near these, but you can customize as you like. The Max Value should be set to the channel's highest value for all the volumes in a sequence. Please see the info provided by the Volume node in the node stack.
The Absorption ramp takes the grid value as input. In the Color gradient, the colors near 0 on the left are used for mapping low grid values to some custom color (as in this case, the lowest values are mapped to white). Higher grid values are mapped to colors to the right of the color gradient. Bear in mind that less saturated colors cause less-pronounced absorption. Emission and Scattering ramps operate in the same way.
It is important to ensure the volume is not too dense. Don't be tricked into thinking a Volume is less dense by a higher Volume Density and a higher Volume Step Length in the kernel. We recommend reducing the Volume Step Length to an acceptable performance and accuracy level, and then reduce the Volume Density. Otherwise, you may risk rendering a solid object at a high Step Length, giving deceiving results.