Network rendering lets you utilize additional GPUs in other computers to render images. OctaneRender® distributes compiled render data and not scene data, so no file management is required. It is similar to working with additional GPUs by allowing the distributed rendering of single images over multiple computers connected through a fast local area network. Network rendering requires a Primary Node and one or more Render Nodes on different computers. The OctaneRender® instance that drives the rendering is the Primary Node, and the OctaneRender® instances that help are the Render Nodes.
Since an OctaneRender® Render Node requires an activated Standalone license, we recommend running Standalone first to activate a Standalone license on that computer. It is best to copy the whole folder of the released archive onto the Render Node computer. Make sure that the Primary Node and Render Node are not blocked by any firewalls in the network or operating system
The Standalone version or the octane.exe act as Primary Node and a special console version of OctaneRender®, octane_node.exe, can run on other computers as Render Nodes. They should all be on different computers, or they would have to share the same GPUs.
The OctaneRender® Primary Node does all the render data processing. The Render Node does not need to have a powerful CPU, but the Render Node needs enough RAM to store the render data plus some render results. The Render Node's operating systems can also be different since the communication between the machines is cross-platform. No data is stored on the Render Node’s discs, it's all stored in memory.
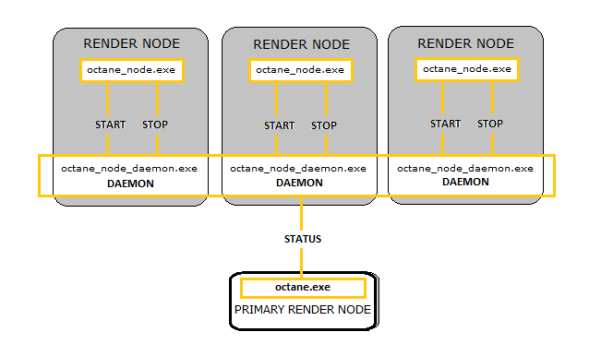
Each time network rendering is required, the Render Node process has to launch on the Render Node machines. The Render Node daemon makes the control of the Render Nodes more practical, as it can launch at startup on each machine in the network. The daemon is the little program that starts a Render Node process on the machine on request by a Primary Node, monitors it, and stops it on request by a Primary Node. Monitoring means making sure that a running Render Node sends a regular heartbeat to the daemon, and if that doesn’t happen, it first tries to stop the Render Node, and then it kills the process as a last resort if necessary. The daemon runs all the time, and starts/stops a Render Node process if a Primary Node requests it. The daemon also listens for the heartbeat of the Render Node to check if the Render Node process is still running. This Render Node daemon eliminates needing to launch the Render Node process manually on each computer each time rendering is required on the Render Node.
Figure 1: A diagram of the Primary Render Node, Render Node, and daemon processes
The Standalone edition’s network rendering feature also works with OctaneRender® plugins. OctaneRender® licenses are assigned per machine, so you can make any machine a Primary Render Node or Render Node.
To set up the daemon, run the batch script _install_daemon.bat on the Render Node computer. During the setup, OctaneRender® asks you to choose a port for Primary Node requests. After that, the daemon resides on that machine, active at all times.
When a Primary Node invokes a daemon, the Render Node launches to get some information about the number of GPUs, version, bitness, etc., and closes again. After that there is no Render Node process running, so the daemon waits for Primary Nodes to detect it by scanning the complete local network in regular intervals. The daemon should appear in the daemon list of the network preferences of the Primary Nodes. If it does not, it could be because:
When you enable a daemon in the Primary Node's settings, the Render Node launches and appears in the Primary Node's status bar. One Primary Node can activate one daemon at a time. If daemon is occupied by another Primary Node, you will see the daemon state change accordingly. The automatic port configuration is an option on the Primary Node that enables the same computer to use multiple Primary Nodes.
To enable network rendering for a Primary Render Node, click on the Octane ROP node, then click on the Network Options button (Figure 2).
Figure 2: Accessing the Network Options from the Octane ROP
Select the Enable Network RenderingThe utilization of multiple CPUs or GPUs over a network to complete the rendering process. checkbox in the OctaneRender Network Preferences window (Figure 3). The Network Settings dialog includes an option to turn automatic port configuration for the Primary Render Node on or off. If enabled, you can use multiple Primary Render Nodes on the same computer.
Figure 3: Enabling the Network Rendering feature
While you're rendering an image, the render data is sent to the new Render Node and it starts contributing to the image. The render data update on the Render Node is driven by the Primary Render Node, and you can see the progress in the statistics information.
The Render Node version of OctaneRender® is a console build, and it requires a Standalone license. The console build Render Node is released as a Windows® build, but the Primary Render Node and Render Nodes can be on different platforms.
To launch a Render Node, either launch it from the command line, or let a daemon launch it. To launch a Render Node via the command line, run it via:
Code: octane_node.exe --net-master-address --net-master-port
For example:
Code: octane_node.exe --net-master-address xxx.xxx.xxx.103 --net-master-port 21000
Figure 4: The Console display output
The line Launching net render node (10021500) with master xxx.xxx.xxx.103:21000
indicates that the Render Node of version 10021500 connected with the Primary Render Node at IP address xxx.xxx.xxx.103 on port 21000.
To stop the Render Node, press Ctrl-C.
The daemon is a lightweight program that launches after login, and runs all the time unless you shut it down. It fulfills various roles:
To set up the daemon, run the batch script _install_daemon.bat on the Render Node computer. The Render Node asks you what port the daemon should listen to for Primary Render Node requests. If you want to keep the default settings in the brackets, press the Return key (Figure 5).
Figure 5: Running the daemon program
After confirming your selection, the daemon creates a batch file run_octane_node_daemon.bat in the startup folder of your Start menu (Start > Programs > Startup …). The daemon launches the next time you log into your Windows® account. A new terminal window appears in your taskbar. When you open it, you can see the daemon starting up. The daemon launches the Render Node process to gather some information, and then it displays the results (Figure 6).
Figure 6: The Render Node daemon batch file
On macOS® and Linux systems, the concepts are exactly the same as on Windows®.