The Direct Lighting kernel is used for faster preview rendering. Direct Lighting is not unbiased, and should not be used when you aim for photorealism. This kernel is good for creating quick animations or renders.
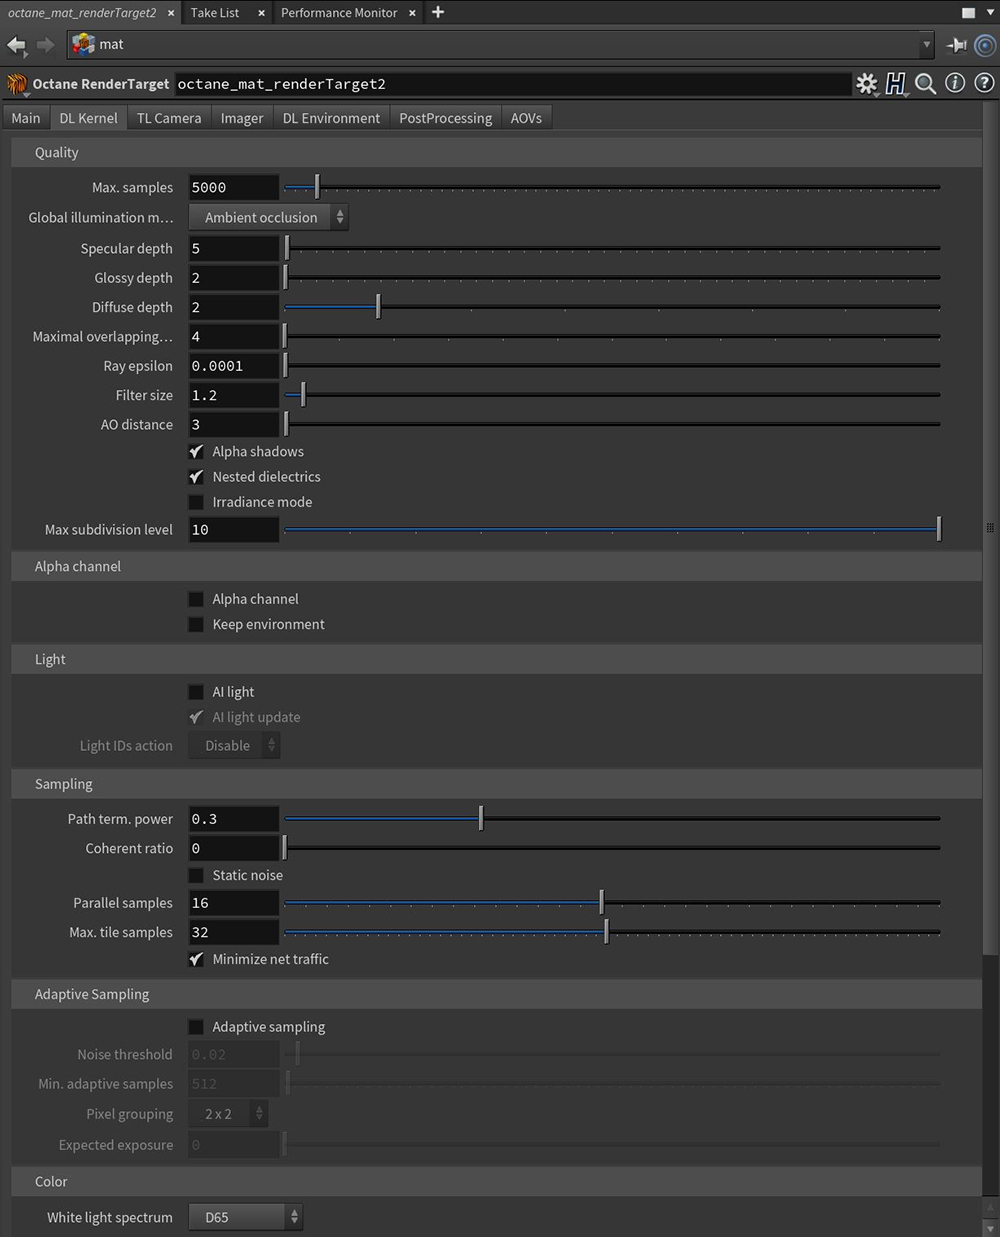
Figure 1: The Direct Lighting kernel parameters
Max Samples - This sets the maximum number of samples per pixel before the rendering process stops. Higher values result in cleaner renders. The number of samples per pixel required for a good render depends on the scene.
Global Illumination Mode - There are three different Global Illumination modes in the Direct Lighting kernel.
SpecularAmount of specular reflection, or the mirror-like reflection of light photons at the same angle. Used for transparent materials such as glass and water. Depth - Controls the number of times a ray refracts before dying. High values mean slower render times, but more color bleeding and more details in transparent materials. Low values introduce artifacts or turn some refractions into pure black.
GlossyThe measure of how well light is reflected from a surface in the specular direction, the amount and way in which the light is spread around the specular direction, and the change in specular reflection as the specular angle changes. Used for shiny materials such as plastics or metals. Depth - Controls the number of times a ray reflects before dying. Higher values mean slower render times. Values lower than 4 introduce artifacts or turn some reflections into pure black.
Diffuse Depth - Gives the maximum number of diffuse reflections if Global Illumination Mode is set to Diffuse.
Maximal Overlapping Volumes ' - Determines how much space to allocate for overlapping volumes. Ray marching is faster with lo values but it can cause artifacts where many volumes intersect.
Ray Epsilon - The distance to offset new rays so they don’t intersect with the originating geometry. This value should be left at the default value.
Filter Size - This sets the pixel size for the render filter. This can improve aliasing artifacts in the render. If the filter is set too high, the image becomes blurry.
AO Distance - The distance of the ambient occlusion in units. Always check if the amount is correct relative to the scene scale. For example, you don’t need a value of 3 if your object is a small toy. However, if your model is a house or something large, increase the value.
Alpha Shadow - This setting allows any object with transparency (specular materials, materials with opacity settings and alpha channels) to cast a shadow instead of behaving as a solid object.
Nested Dielectrics - If disabled, the surface IORs are not tracked and surface priorities are ignored.
Irradiance Mode - This setting works similar to Clay Mode, but is applied to the first bounce, disables Bump, and makes samples that are blocked by back faces transparent.
Max Subdivision Level - The maximum subdivision level that should be applied on the geometry in the scene. A value of 0 disables subdivision.
Alpha ChannelA greyscale image used to determine which areas of a texture map are opaque and which areas are transparent. - This option removes the background and renders it as transparent (zero alpha). This can be useful if you want to composite the render over another image and don't want the background to be present.
Keep Environment - This option works in conjunction with the Alpha Channel setting. It allows the background to render with zero alpha, but is still visible in the final render. This allows even further flexibility in compositing images.
AI Light - Enables AI Lights. AI Light functionality learns from the scene, and the rendering becomes more efficient as more samples are rendered. When used with Adaptive SamplingA method of sampling that determines if areas of a rendering require more sampling than other areas instead of sampling the entire rendering equally., AI Light becomes even more effective, as it learns pixel and light importance in a scene and no longer samples some pixels.
AI Light Update - Enables dynamic light update.
Light IDs Action - This parameter determines whether the Light ID's action enables or disables lights with matching Light Pass ID numbers.
Path Termination Power - High values increase render speed, but also increase noise in dark areas.
Coherent Ratio - Increasing this value increases the render speed, but it also introduces low-frequency noise (aka blotches), which requires a few hundred or a few thousand samples per pixel to go away, depending on the scene.
Static Noise - When enabled, the noise is static, so it doesn’t change between frames.
Parallel Samples - This controls how many samples are calculated in parallel. If this is set to a small value, OctaneRender® requires less memory to store the sample's state, but rendering is slower. If this is set to a high value, then OctaneRender requires more graphics memory, and rendering becomes faster. The change in performance depends on the scene and the GPUThe GPU is responsible for displaying graphical elements on a computer display. The GPU plays a key role in the Octane rendering process as the CUDA cores are utilized during the rendering process. architecture.
Max Tile Samples - This controls the number of samples per pixel that OctaneRender will render until it takes the result and stores it in the film buffer. Higher values mean that results arrive less often in the film buffer.
Minimize Net Traffic - If enabled, OctaneRender distributes the same tile to the net Render Nodes until the tile reaches the max samples/pixel, and then OctaneRender distributes the next tile to Render Nodes. This option doesn't affect work done by local GPUs. A Render Node can merge all of its results into the same cached tile until the Primary Render Node switches to a different tile.
Adaptive Sampling - When enabled, the kernel stops rendering clean areas of the image and focuses on noisy areas.
Noise Threshold - Specifies the smallest relative noise level. When the noise estimate of a pixel is less than this value, sampling switches off for this pixel. Good values are in the range of 0.01 - 0.03. The default is 0.02, which is pretty clean.
Min. Adaptive Samples - Specifies the minimum number of samples to calculate before adaptive sampling kicks in. A pixel's noise estimate has a large initial error. The higher you set the noise threshold, the higher you should also set this parameter to avoid artifacts.
Pixel Grouping - Specifies the number of pixels handled together. When all of the pixels in a group reach the noise level, sampling stops for all of these pixels.
Expected Exposure - This value should be close to the same value as the image's exposure, or 0 (the default value) to ignore these settings. Adaptive sampling uses this parameter to determine what pixels are bright and dark, which depends on the Octane Imager's exposure setting. If the value is not 0, adaptive sampling adjusts the noise estimate of the image's very dark areas. It also increases the Min. Adaptive Samples limit for very dark areas, because very dark areas tend to find irregular paths to light sources, resulting in over-optimistic noise estimates.
White Light Spectrum - Controls the appearance of colors produced by spectral emitters (daylight, environment, black body).This determines the spectrum that will produce white (before white balance) in the final image.
Deep ImageRenders frames with multiple depth samples in addition to typical color and opacity channels. - Enables rendering deep pixel images used for deep image compositing.
Maximum Depth Samples - Used when Deep Image Rendering is enabled. It sets the maximum number of depth samples per pixel. For more details, read the Deep Image Rendering topic in this manual.
Depth Tolerance - Used when Deep Image Rendering is enabled. OctaneRender merges depth samples whose relative depth difference falls below this tolerance value. For more information, see the Deep Image Rendering topic in this manual.
Deep Render PassesRender passes allow a rendered frame to be further broken down beyond the capabilities of Render Layers. Render Passes vary among render engines but typically they allow an image to be separated into its fundamental visual components such as diffuse, ambient, specular, etc.. - Includes render passes for deep image pixels.
Toon Shadow Ambient - This is the ambient modifier of Toon Shadowing.