Starting The Live Viewer
Step 1:
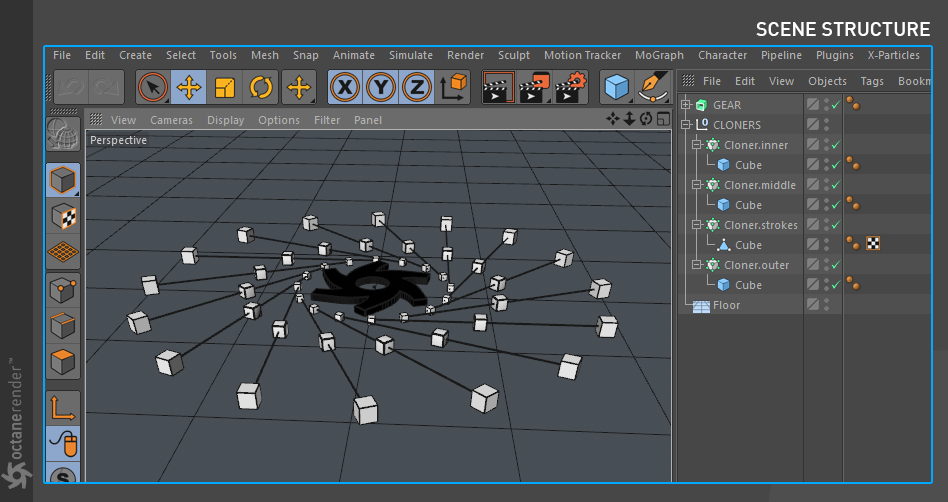
Open the Cinema 4D demo file (figure 1). There is an Octane Logo in the middle with cloner objects surrounding it. The scene also contains animation.
Note: Cinema 4D's native Floor Object can now be used with Octane.
Figure 1: The Octane demo scene.
Step 2:
Open Octane Plugin by choosing Live Viewer Window from the Octane menu (figure 2).
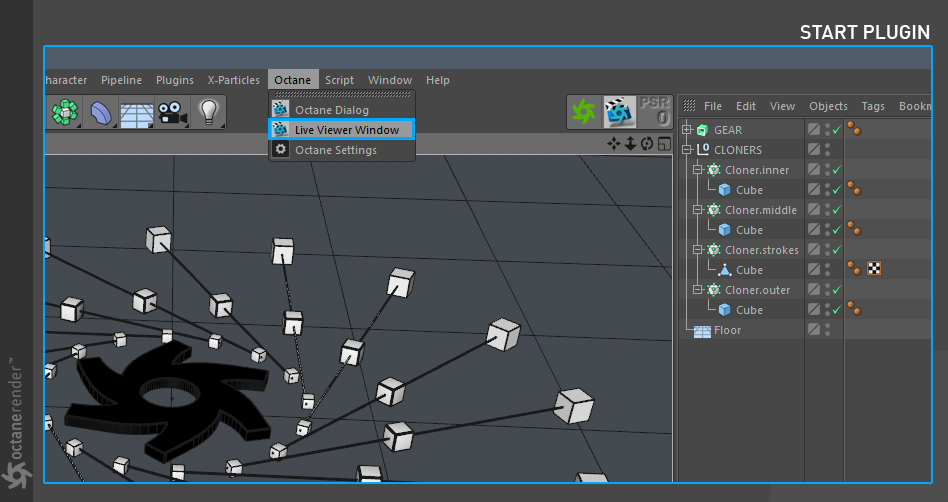
Figure 2: Opening the Live Viewer Window from the Octane menu.
Step 3:
It's time to start Octane. Press the gear shaped icon in the Live Viewer Window(figure 3). The Live Viewer will update the scene in real time. Every edit made in Cinema 4D's viewport will be a real time update here.
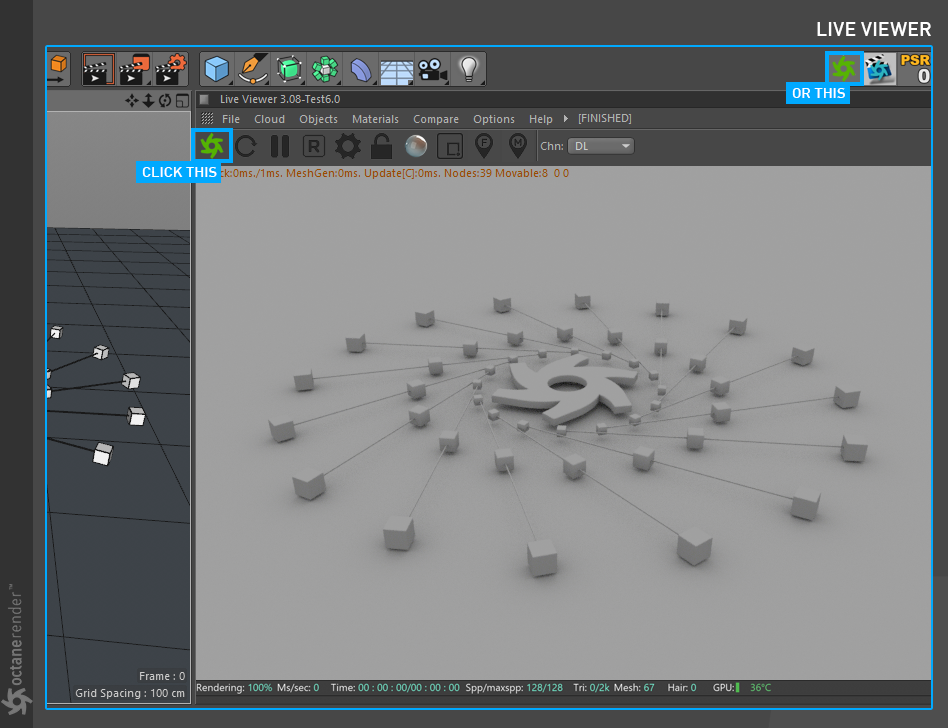
Figure 3: Starting a render in the Live Viewer Window.
Creating OctaneRender MaterialsA set of attributes or parameters that describe surface characteristics.
Step 4:
Go to the MaterialThe representation of the surface or volume properties of an object. menu in the LV window and choose the Octane DiffuseAmount of diffusion, or the reflection of light photons at different angles from an uneven or granular surface. Used for dull, non-reflecting materials or mesh emitters. Material (figure 4). Change the material name to Inner_Diffuse.
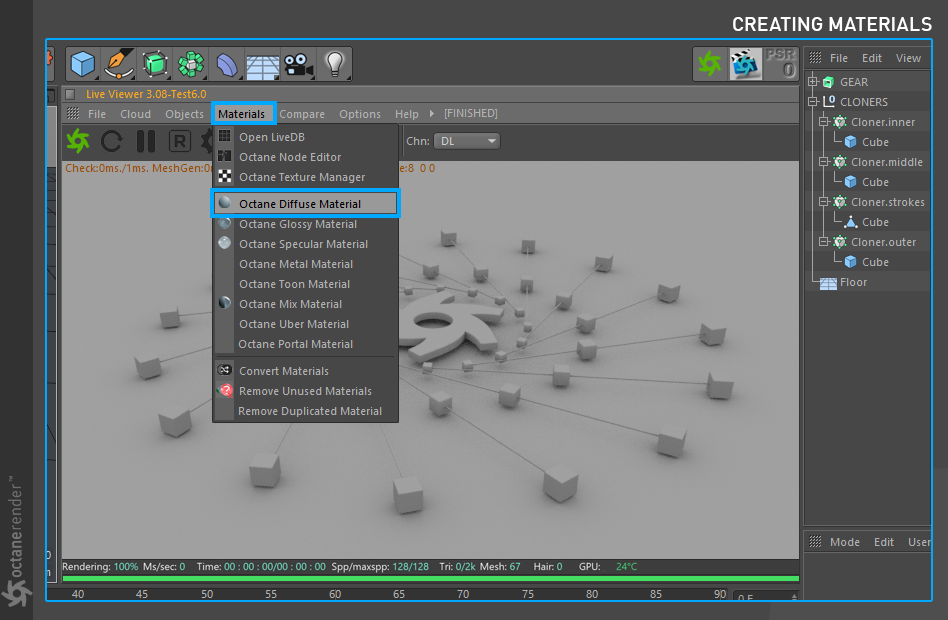
Figure 4: Creating an Octane Diffuse Material.
Step 5:
Go back to the Materials menu and create GlossyThe measure of how well light is reflected from a surface in the specular direction, the amount and way in which the light is spread around the specular direction, and the change in specular reflection as the specular angle changes. Used for shiny materials such as plastics or metals. and SpecularAmount of specular reflection, or the mirror-like reflection of light photons at the same angle. Used for transparent materials such as glass and water. materials. Change the names to Outer_Glossy and Middle_Specular (figure 5).

Figure 5: Creating Octane Glossy and Specular Materials
Step 6:
Continuing with material creation. Go to the Material menu again from the LV window and create three more Glossy materials (figure 6). Change the names to STROKE, FLOOR and GEAR respectively.
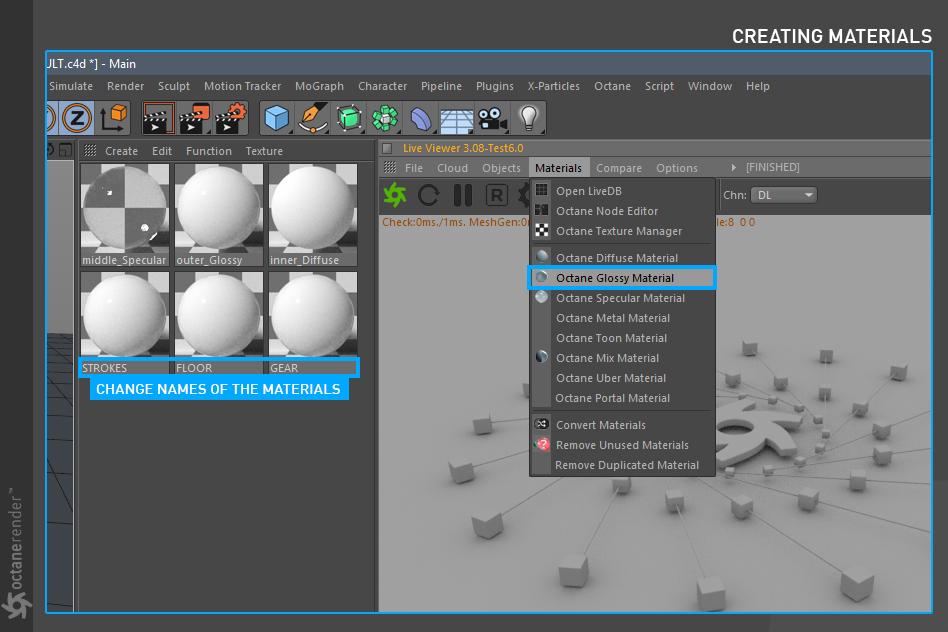
Figure 6: Creating three additional Glossy Materials.
Adjusting Material Properties
Step 7:
Double-click Inner_Diffuse to open the material. Change the properties of the Inner_Diffuse material as seen in the picture below (figure 7).
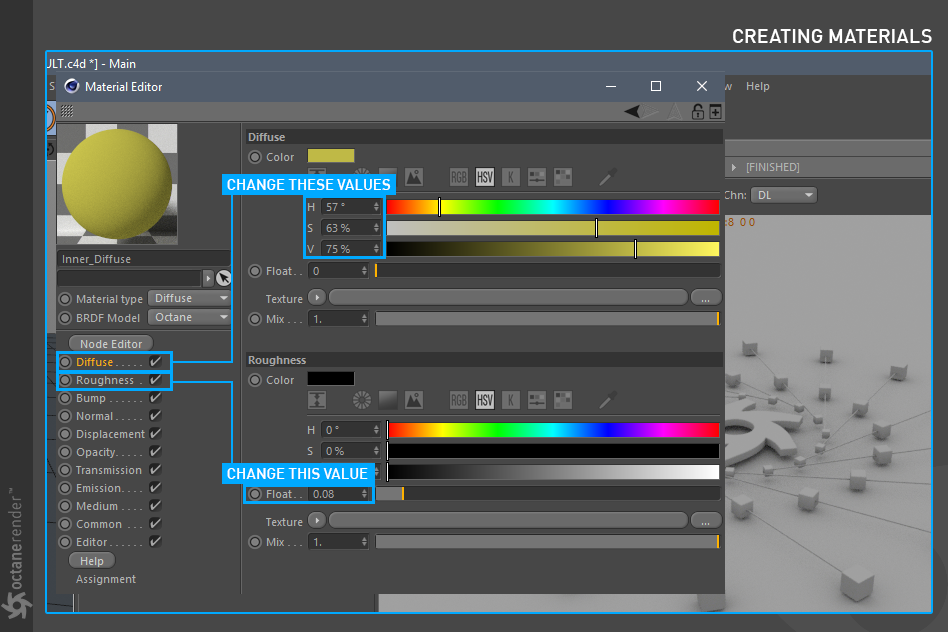
Figure 7: Editing the properties of the Octane Diffuse Material.
Step 8:
Double-click the outer_glossy material and change its properties as seen in the picture below (figure 8).
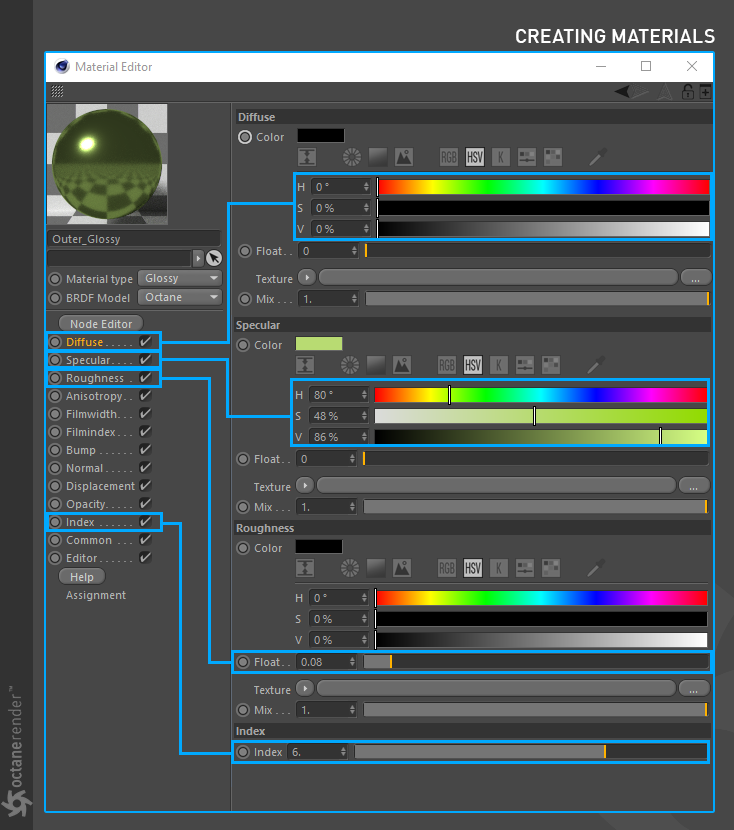
Figure 8: Editing the properties of the outer_glossy Octane Material.
Step 9:
Now do the same procedure for the remaining four materials. These materials are Middle_Specular, GEAR, STROKES and FLOOR. The following picture show the properties of each (figure 9).

Figure 9: Editing the properties for the remaining scene materials.
Apply Materials to the Objects
Step 10:
There are two ways to assign materials to objects:
Assign the materials to the objects as seen in the picture below (figure 10.
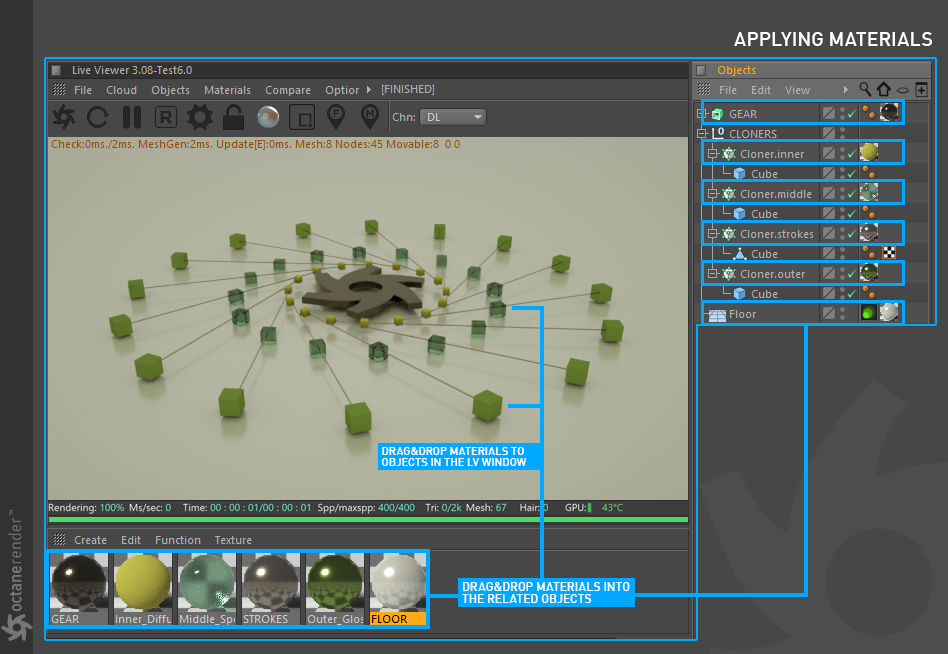
Figure 10: Assigning the Octane Materials to objects in the scene.
Before finishing this section, go to Settings in the Live Viewer Window and change the settings in the KernelsBy definition, this is the central or most important part of something. In Octane, the Kernels are the heart of the render engine. section as shown in the picture below (figure 11).
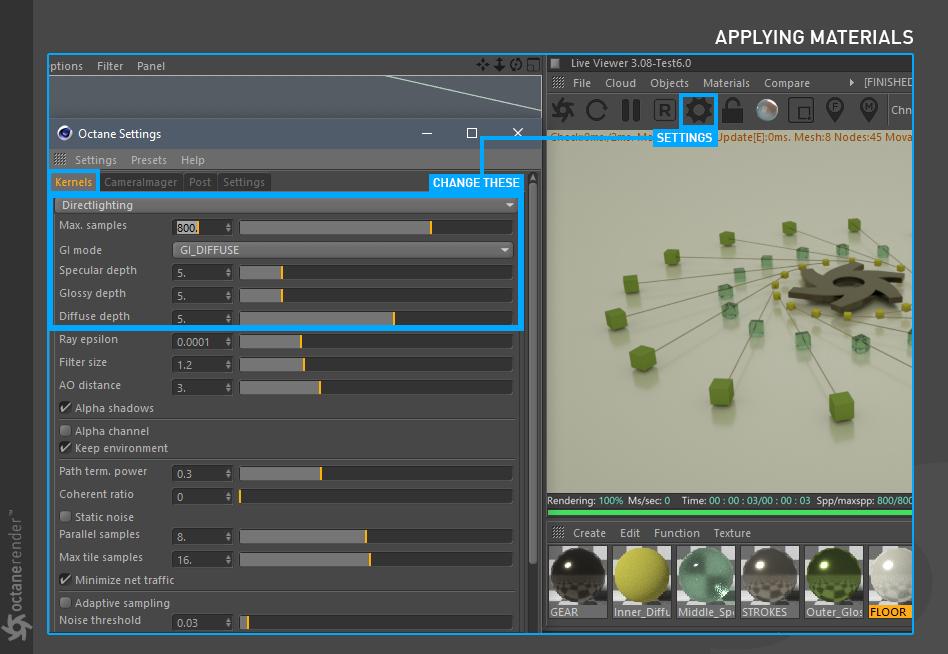
Figure 11: Adjusting the Kernel settings.
Add OctaneRender Lights to the Scene
Step 11:
Go to the Object menu in the LV window and select Octane Daylight (figure 12).
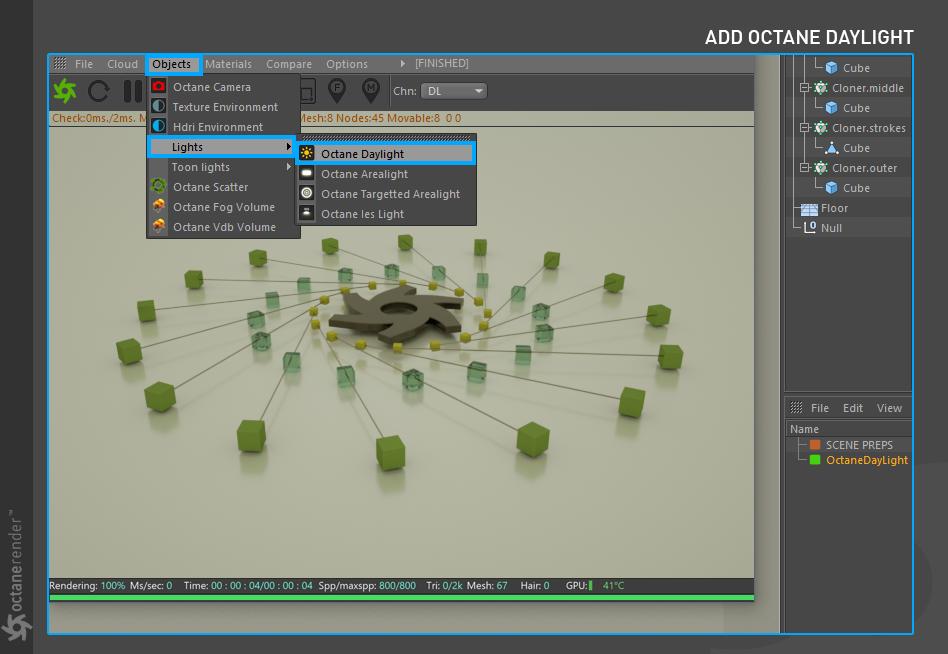
Figure 12: Adding an Octane Daylight to the scene.
Step 12:
Two things happened in the scene:
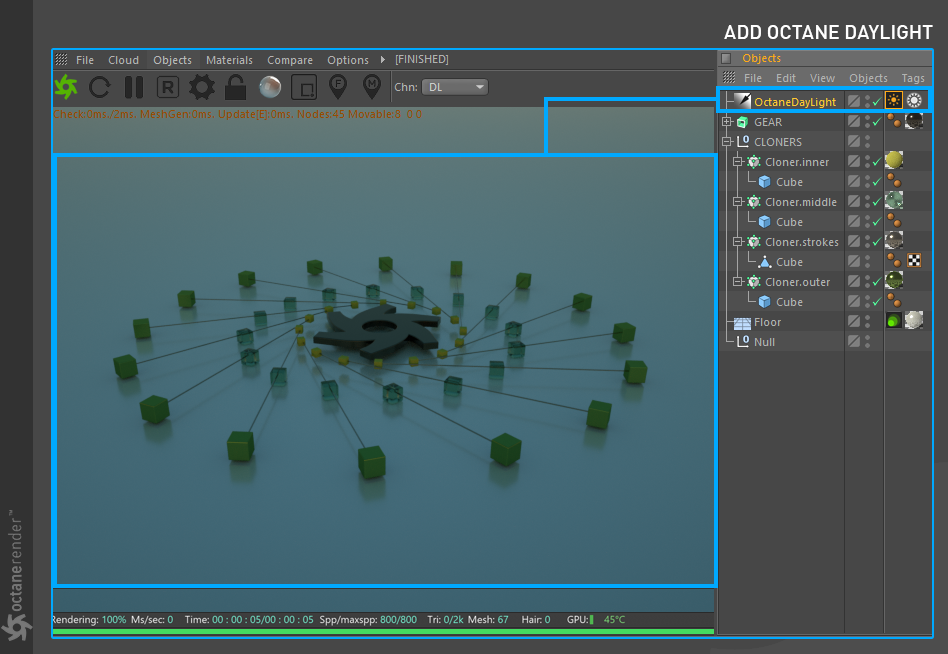
Figure 13: The scene render using the default properties of the Octane Daylight.
Step 13:
Select the Octane Daylight from the Object Manager. In the Attributes Window, go to the Coord. tab and change its rotation parameters (figure 14). Then select the Daylight Tag and change the values to match the values in figure 14.
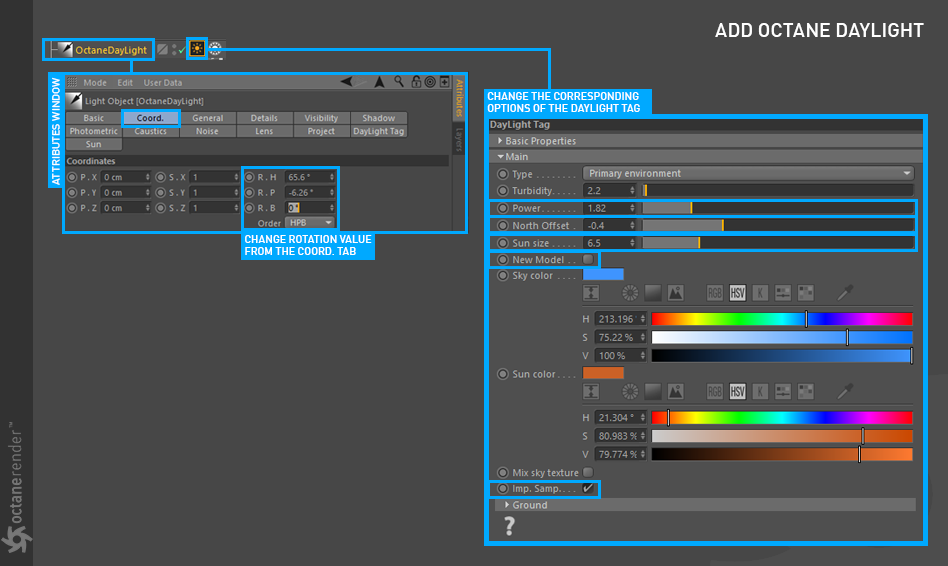
Figure 14: Adjusting the properties for the Octane Daylight.
Octane Daylight is a sun-based model. The most important property is Rotation. The R.H value is similar to the North Offset function in the Octane Daylight Tag. But there is no direct connection between them. When one changes, the other does not change. The R.P value controls the light falling vertically or parallel to the scene.
Step 14:
After editing the parameters of the Octane Daylight, light, the render in the LV window changed considerably. The materials characteristics are more visible and the shadows have changed shape and soften according to the light's angle (figure 15).
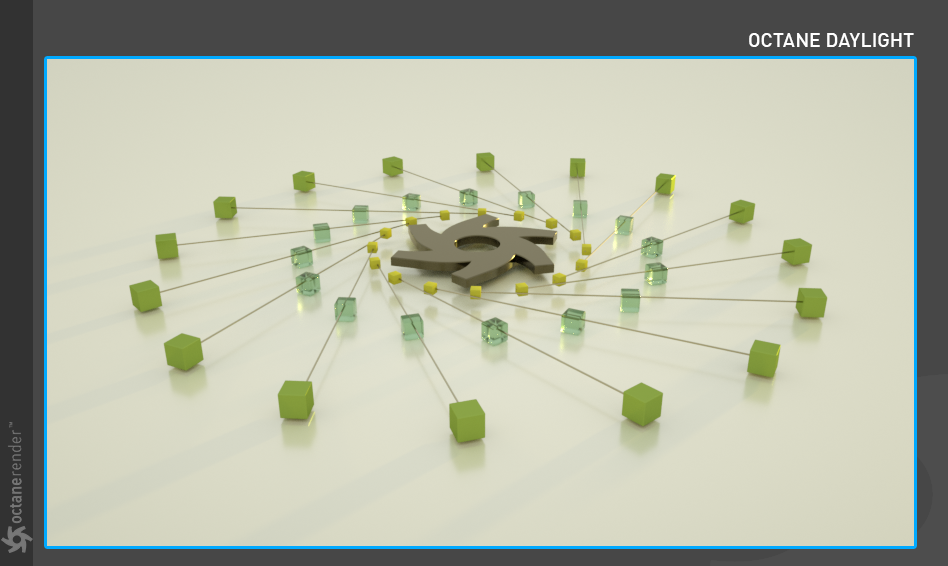
Figure 15: An updated rendering with the Octane Daylight properties adjusted.
Step 15:
Adding HDRIAn image which presents more than 8 bit per color channel unlike most common image formats. Lighting to the scene. To do this, go to the Objects menu in the Live Viewer window and select Hdri Environment (figure 16).
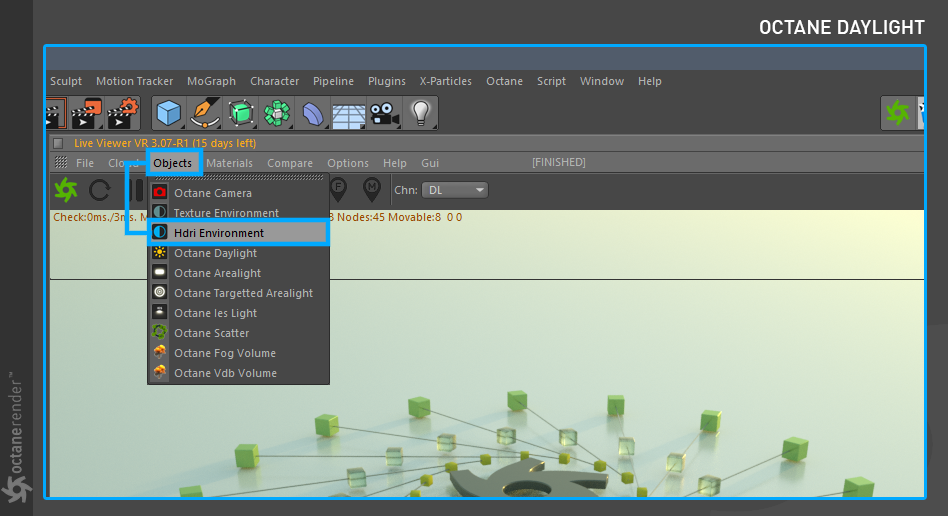
Figure 16: Adding a HDRI environment to the scene.
Step 16:
Now there are two new objects named Octane Sky and Hdri Environment Tag in our scene. This lighting model requires an image in HDR format to work properly. Light values that are defined in these HDR pictures also illuminates the scene. In this example, a HDR image downloaded from an Open Source site was used. You can use your own HDR images if you want. Now enter the settings seen in the following images (figure 17).
Note: If you want to use the OctaneDaylight and the HDR Environment together, you need to make a small adjustment by selecting the Octane Daylight Tag from Object Manager and activating the Mix sky texture.
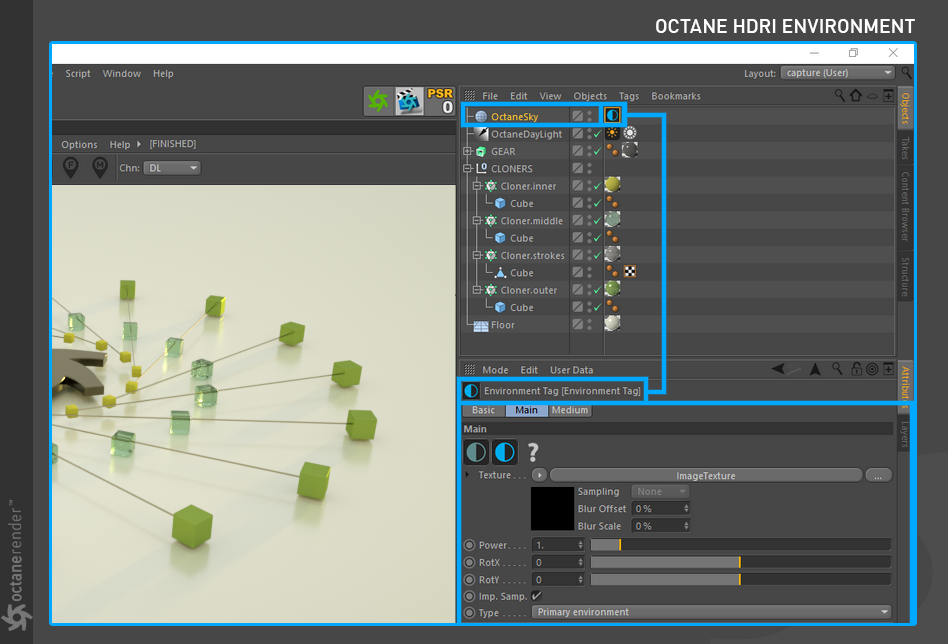
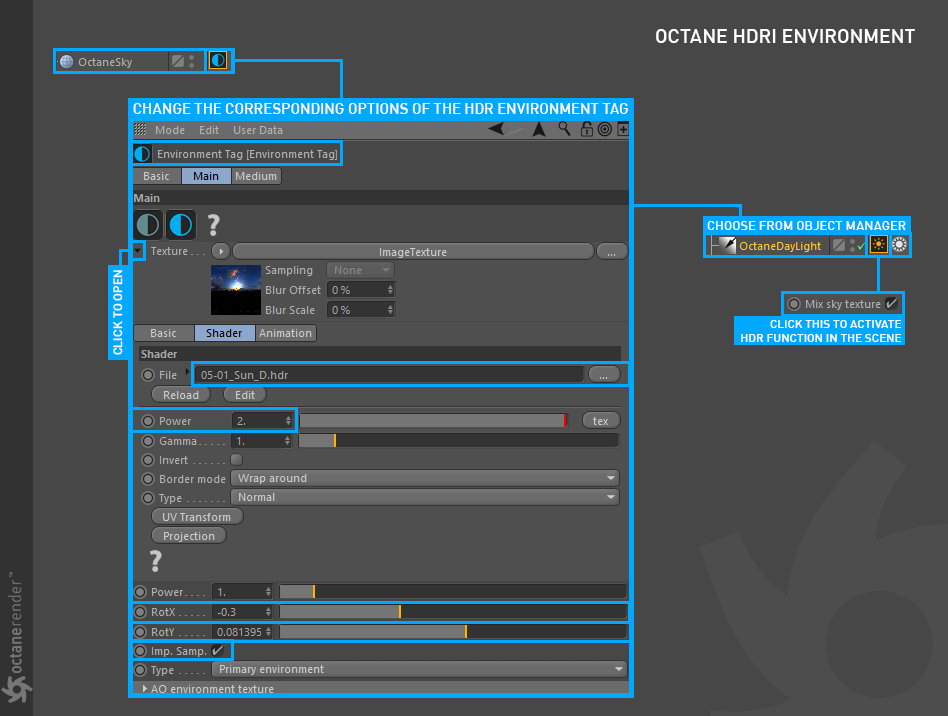
Figure 17: Adjusting the setting for a HDRI image.
Step 17:
After adjusting the HDR values, the scene has changed considerably. Instead of the green-yellow mood, the scene has a more consistent darkness-to-lightness ratio (figure 18).
Note: You can change the appearance of the image in the LV window by playing with the RotX and Roty values in the HDR environment Tag settings.
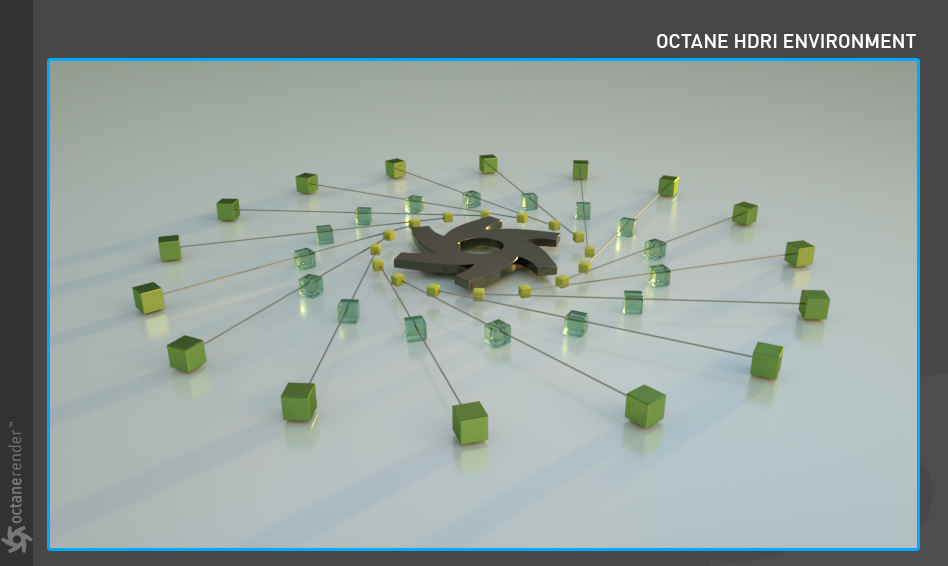
Figure 18: The scene illuminated with a HDRI image.
Setting Up an OctaneRender Camera
Step 18:
Go to the Objects menu in the LV Window and select Octane Camera (figure 19).
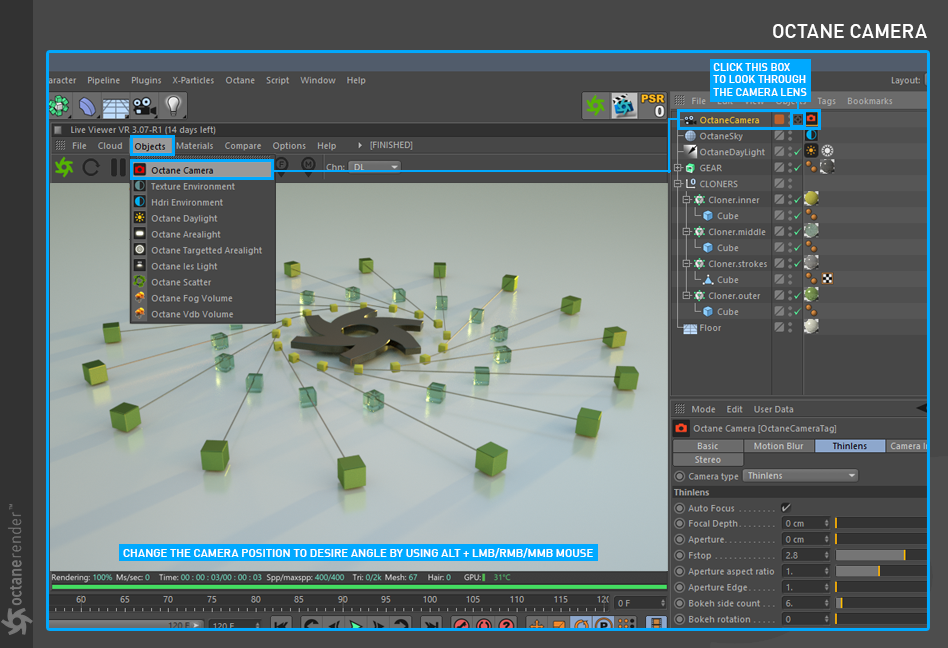
Figure 19: Adding an Octane Camera to the scene.
Step 19:
Editing settings of the Octane Camera Tag. To do this, select Octane Camera Tag from the Object manager and change the settings to match the picture below (figure 20).
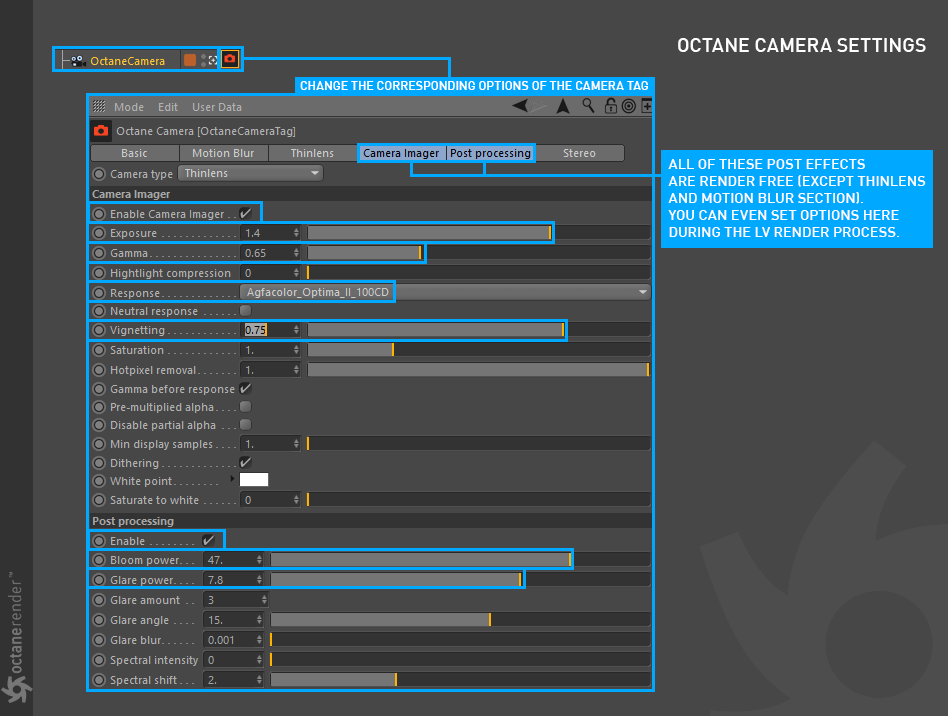
Figure 20: Editing the properties of an Octane Camera.
Finalize the Rendering in the Live Viewer
Step 20:
The Octane Specular material may still not render accurately. This is due, in part, to the default rendering Kernel which is set to Direct Lighting Mode (figure 21).

Figure 21: The Direct Lighting Kernel and its rendered results for Specular materials.
The Pathtracing Kernel is better suited for rendering Specular materialUsed for transparent materials such as glass and water. types. Select Pathtracing from the Kernels tab and adjust the settings as pictured below (figure 22).
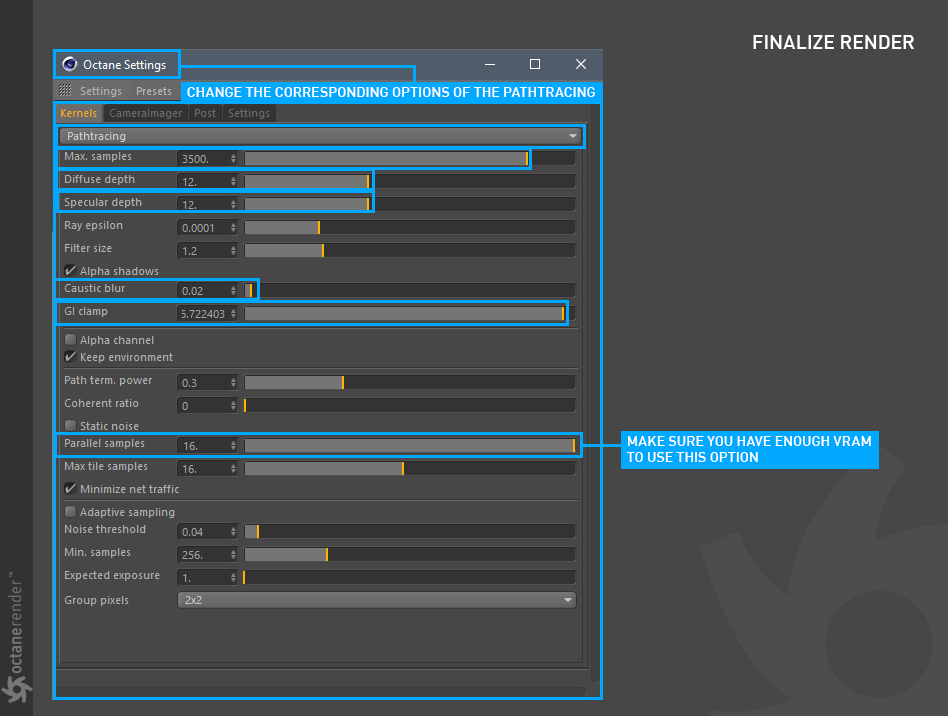
Figure 22: The settings for the Pathtracing Kernel.
Step 21:
After adjusting the Path tracing settings, all the materials reflected their true character and unnecessary shadows disappeared (figure 23). In addition, the Specular Material on the middle cubes produce correct result as it should. While the reflections are a little more obvious, a special reflection called "caustic" began to appear on the scene. Also the light distribution is much better than before.
Because the Path Tracing and PMC kernel modes produces accurate and correct result by using the unbiased feature, takes time to clean the noise on the scene during the image sampling. This is referred to as "Unbiased RenderingUnbiased rendering does not introduce any “errors” or shortcuts into the rendering process. It will calculate all scene data using real-world calculations. This type of rendering is known for producing exceptional render quality.".

Figure 23: The results of using the Pathtracing Kernel.
Set Up a Final Render With OctaneRender
Step 22:
Go to the Render Settings window of Cinema 4D and select Edit Render Settings (or press CTRL + B). In the opened window, adjust the settings as seen in the pictures below (figure 24).

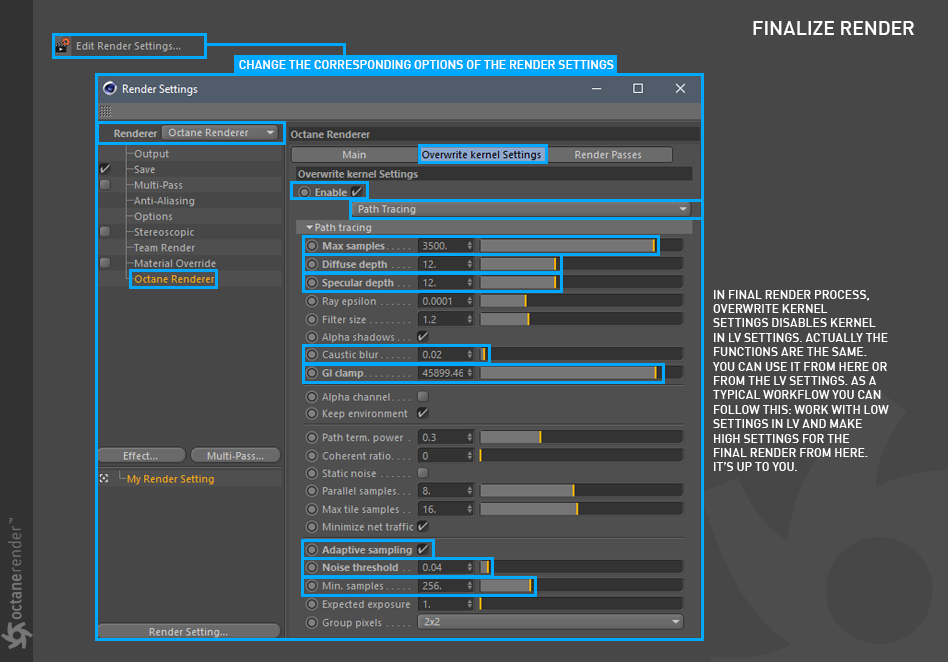
Figure 24: Adjusting the Render Settings.
To begin the rendering process, select Render to Picture Viewer from the Render menu of Cinema 4D (or press Shift + R).