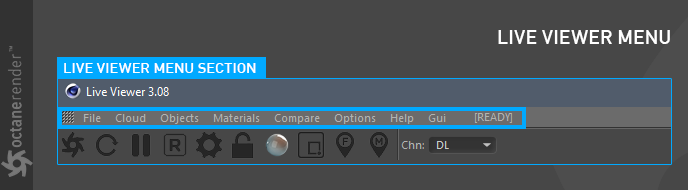
This section covers the options available in the Live Viewer menu bar (figure 1).
Figure 1: The menu bar available in the Live Viewer window.
File Menu
The File menu is used for saving rendering or importing ORBXThe ORBX file format is the best way to transfer scene files from 3D Authoring software programs that use the Octane Plug-in such as Octane for Maya, Octane for Cinema 4D, or OctaneRender Standalone. This format is more efficient than FBX when working with Octane specific data as it provides a flexible, application independent format. ORBX is a container format that includes all animation data, models, textures etc. that is needed to transfer an Octane scene from one application to another. files (figure 2).
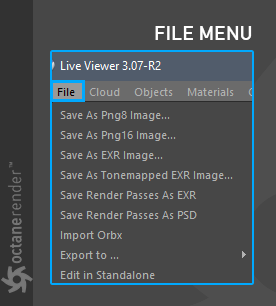
Figure 2: The options available in the File menu.
Save As Png8 Image
Used to save the picture in LV in 8-bit PNG format.
Save As Png16 Image
Used to save the picture in LV in 16-bit PNG format.
Save As EXRAlso known as OpenEXR. This image file format was developed by Industrial Light & Magic and provides a High Dynamic Range image capable of storing deep image data on a frame-by-frame basis. Image
Used to save the picture in EXR format. Image depth is 32-bit per channel which provides good depth but creates a large file size.
Save As Tonemapped EXR Image
Used to save the picture in Tonemapped EXR format. The picture below illustrated the difference between normal and "Tonemapped EXR" pictures saved from the LV (figure 3). The advantage of the Tone map output is that it's 32-bit per channel and allows for adjustments to brightness / contrast, shadow, highlight, etc.
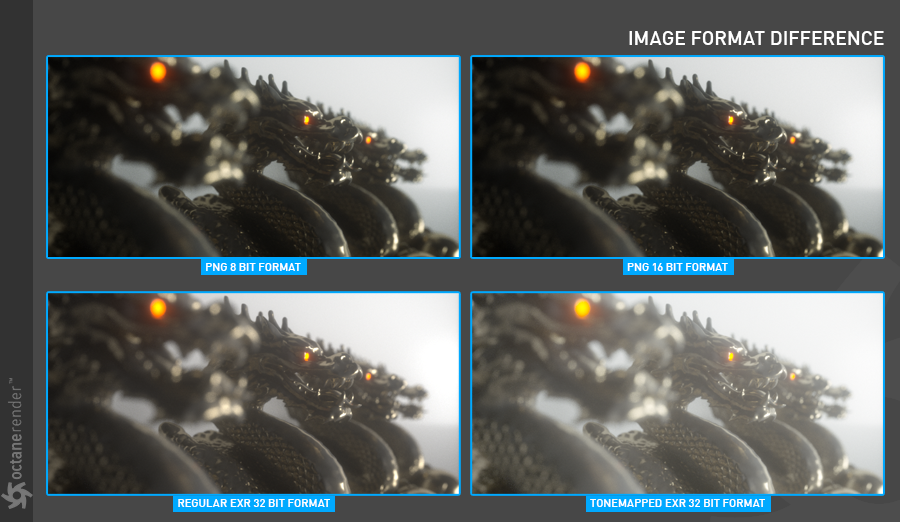
Figure 3: A comparison of non-tonemapped EXR and tonemapped EXR renderings.
Used to save render passes in EXR format. To do this, the "Render Passes" option must be active in the render menu (see section "Render Passes" for more information).
Save As Render Passes as PSD
Used to save render passes in PSD format (Adobe Photoshop). To do this, the "Render Passes" option must be active in the render menu (see section "Render Passes" for more information).
Import Orbx
Used to load materials in Octane Orbx format. This optioncan be used to import scenes created in the Octane Standalone software.
Export to Standalone Scene (ocs)
Used to export the current scene as an Octane Standalone scene.
Export to Package (orbx)
Used to save the current scene in packed Orbx format. All the data from the scene is included in this package. However, it is only for "single frame" output. The file can then be opened and use in Octane Standalone.
Export to Animated Package (orbx)
Used to save the current scene in packed Orbx format. All the data from the scene is included in this package. it is only for "animation" output. The file You can then be opened and use ithis file in Octane Standalone.
Edit in Standalone
This option will send the current scene directly to the Standalone software.
CloudMenu
This menu is used for working with cloud-based render farm option (figure 4). For more detailed description, refer to the "Rendering" section.
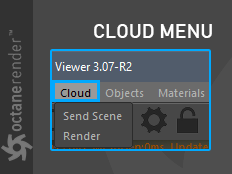
Figure 4: The Cloud options for cloud-based rendering.
Objects Menu
The Objects menu provides access to many of the essential tools used with OctaneRender for C4D. All of the options are described in detail in the relevant sections. A quick summary is provided here (figure 5).
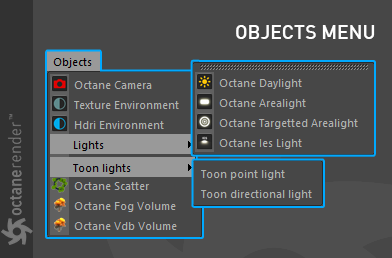
Figure 5: The Objects menu.
Octane Camera
This option is used to create the Octane camera Tag along with the Camera object.
This option is used to create the Octane Environment Tag along with a Sky object.
HDRIAn image which presents more than 8 bit per color channel unlike most common image formats. Environment
This option is used to create the Octane Environment Tag along with a Sky object.
Octane Daylight
Creates an Octane Daylight Tag and Sun expression Tag along with the Infinite Light object. it adds daylight to the scene and simulates sunlight.
Octane Arealight
Creates an Octane Arealight Tag along with the Area Light object.
Octane Targeted Arealight
Creates an Octane Arealight Tag and Target Expression Tag along with the Area Light object. It also creates another object called a LightTarget. As expected, it is used to lock the light onto a certain target.
Octane IESAn IES light is the lighting information representing the real-world lighting values for specific light fixtures. For more information, visit http://www.ies.org/lighting/. Light
Adds an Area Light with the Octane LightTag to the scene that contains added features for an IES light profile.
Octane Scatter
Adds the Octane Scatter object to the scene, similar to the Cinema 4D cloner. However, it is a native Octane tool, so it is fast and effectively.
Octane Fog Volume
This option is used to create Volume objects.
Octane Vdb Volume
Used to import Vdb data into the scene.
MaterialsA set of attributes or parameters that describe surface characteristics. Menu
This menu is used to create materials in Octane. All of the options here are described in detail in the relevant sections. A quick summary is provided here (figure 6).
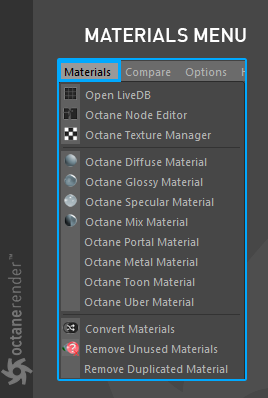
Figure 6: The Materials menu.
Open LiveDB
Live DB is the online material / texture database of Octane Plugin. It can be used to download and pre-made materials (figure 7).
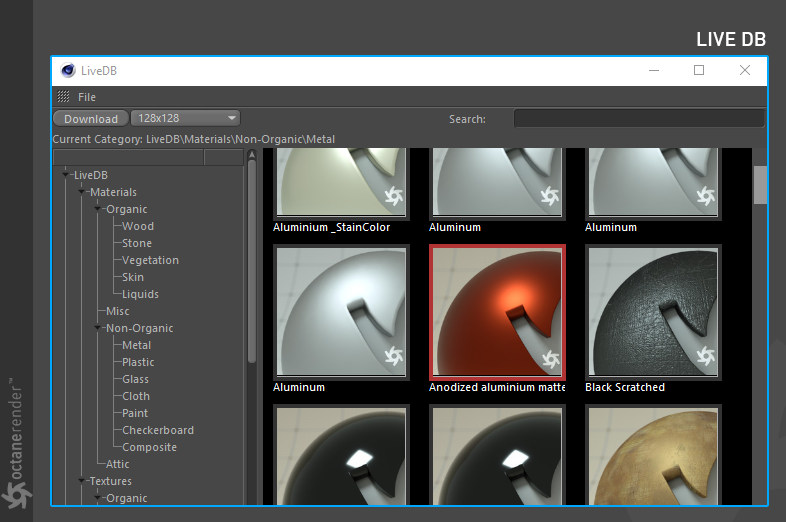
Figure 7: The LiveDB window.
Octane Node Editor
There are two ways to adjust materials in Octane, the classic material window or use the Node Editor. The Node Editor provides more advanced control using a visual flowchart-like structure (figure 8).
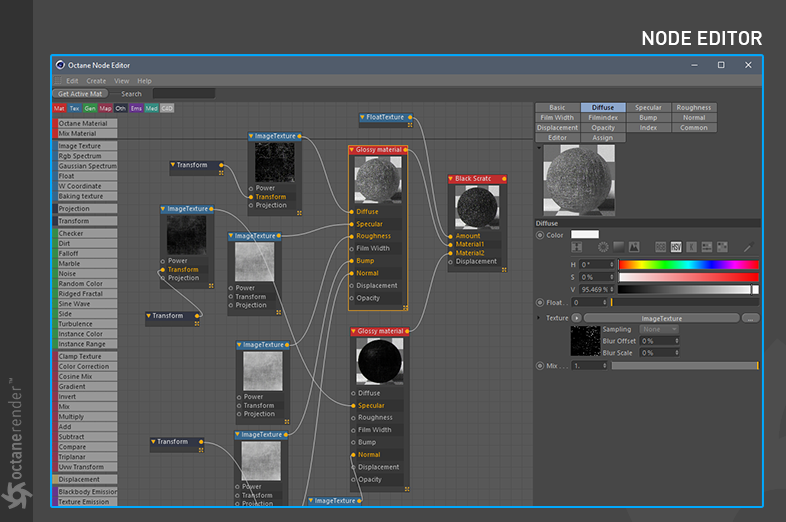
Figure 8: The Octane Node Editor window.
Octane Texture Manager
This menu can be used to troubleshoot problems with textures that have been assigned to materials (figure 9). It also provides information such as what textures are in use, how much space is occupied, and where the imported texture are located on disk.
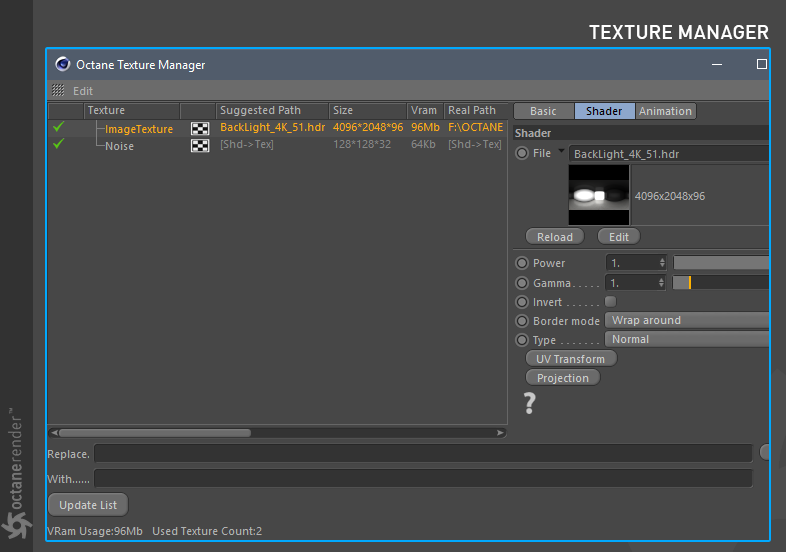
Figure 9: The Octane Texture Manager window.
Octane DiffuseAmount of diffusion, or the reflection of light photons at different angles from an uneven or granular surface. Used for dull, non-reflecting materials or mesh emitters. MaterialThe representation of the surface or volume properties of an object.
Used to create Diffuse Material. Diffuse materials are relatively simple materials. In this model, light hits the surface and distributes the color value evenly. It does not have Reflective or Refractive features (figure 10).
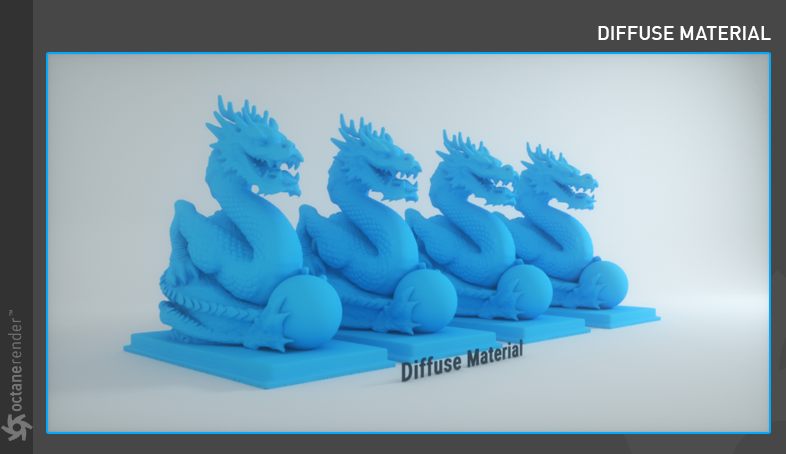
Figure 10: The Octane Diffuse materialUsed for dull, non-reflecting materials or mesh emitters..
Octane GlossyThe measure of how well light is reflected from a surface in the specular direction, the amount and way in which the light is spread around the specular direction, and the change in specular reflection as the specular angle changes. Used for shiny materials such as plastics or metals. Material
Used to create Glossy Materials. In this model, the light is reflected when it hits the surface because the reflection is equal to the incident angle of the light (figure 11). It can be used to create materials like metal and plastic.
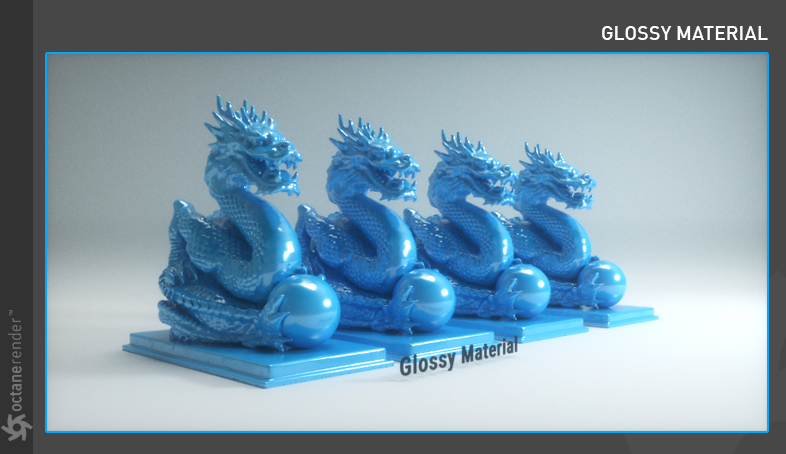
Figure 11: The Octane Glossy materialUsed for shiny materials such as plastics or metals..
Octane SpecularAmount of specular reflection, or the mirror-like reflection of light photons at the same angle. Used for transparent materials such as glass and water. Material
Used to create specular materials. In this model, when light hits the surface, it continues to travel through the medium (figure 12). It can be used to create materials such as glass and water.
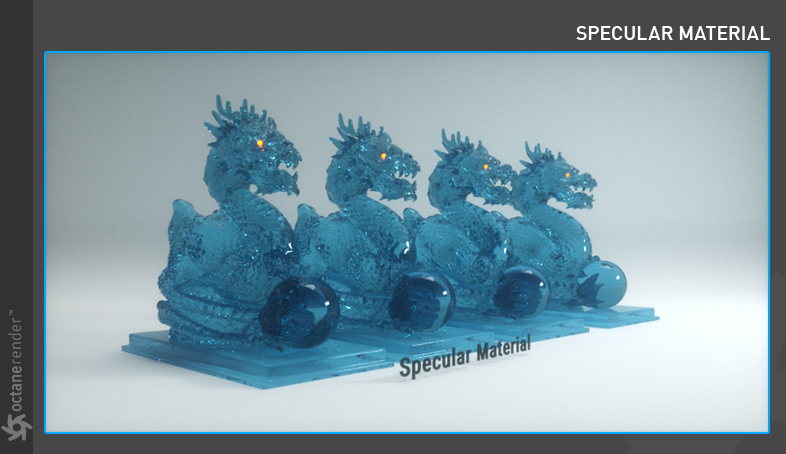
Figure 12: The Octane Specular materialUsed for transparent materials such as glass and water..
Octane Metal Material
This model is specifically designed to create realistic metal (figure 13). Unlike glossy material, it has real-world complex IOR values.
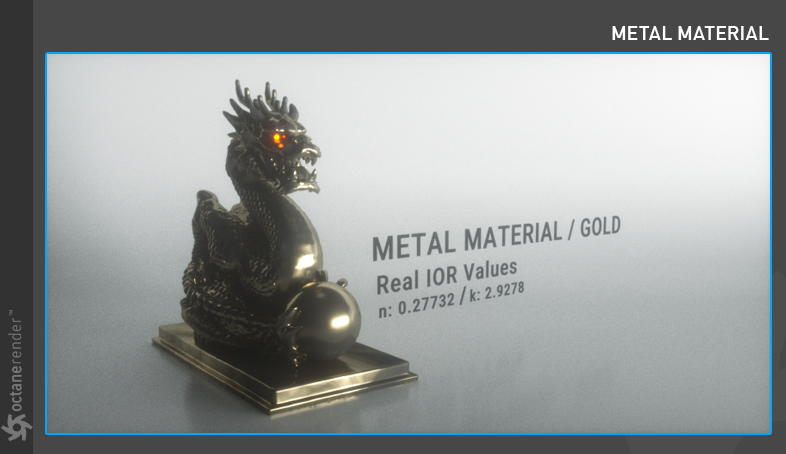
Figure 13: The Octane Metal material.
Octane Toon Material
This model is designed to create toon material inside Octane (figure 14).
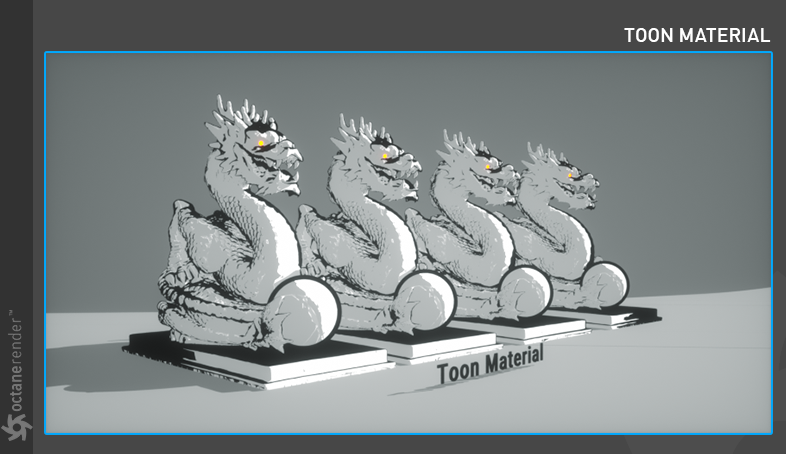
Figure 14: The Octane Toon material.
Octane Mix MaterialUsed to mix any two material types.
Used to mix two different materials.
Octane Uber Material
Unlike mix material, this material can mix more than two shaders. It is ideal for making complex materials.
Used for places where light has difficulty penetrating.
Convert Materials
Used to convert materials created with other render engines to Octane-specific material types.
Remove Unused Materials
Used to delete any materials that are not assigned to objects in the scene.
Remove Duplicated Material
Used to remove any duplicate material in the scene.
Compare Menu
This menu provides the ability to compare two different renderings (figure 15).
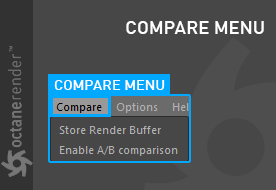
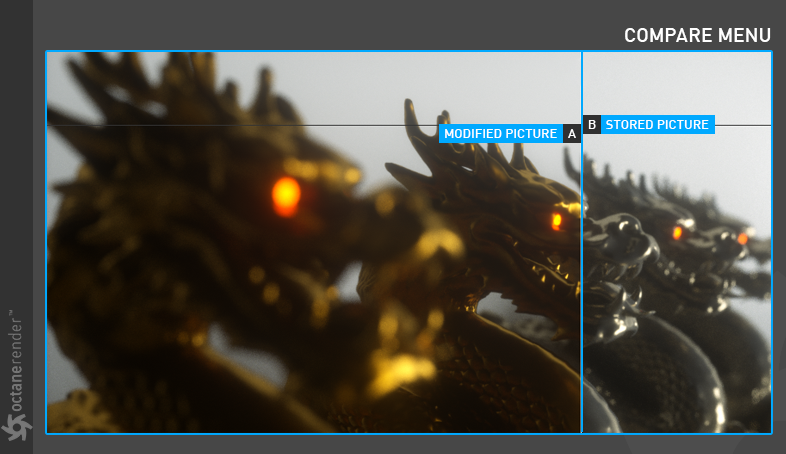
Figure 15: Comparing two different renderings from the Compare menu.
Options Menu
The Options menu provides access to general operational functions in the Live Viewer window (figure 16).
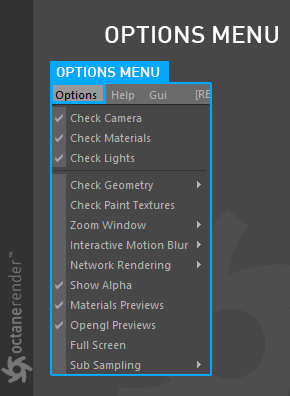
Figure 16: Accessing the Live Viewer window options.
Check Camera
Controls whether the camera in the scene will be updated in the LV. When this option is turned active, every move made to a camera in the scene will also be reflected in the LV.
Check Materials
Controls whether the materials in the scene will be updated in the LV. When this option is turned active, every material edit made in the scene will also be reflected in the LV.
Controls whether the lights in the scene will be updated in the LV. When this option is turned active, every edit to lights in the scene will also be reflected in the LV.
Check Geometry
This option determines the mechanism for object updates in the LV. It consists of two sub menus: "Enabled" and "All Movable". If Enabled is off, there will be no object updates in the LV (unless an object tag is added to the scene geometry). The diagrams below illustrates how this mechanism works (figure 17).
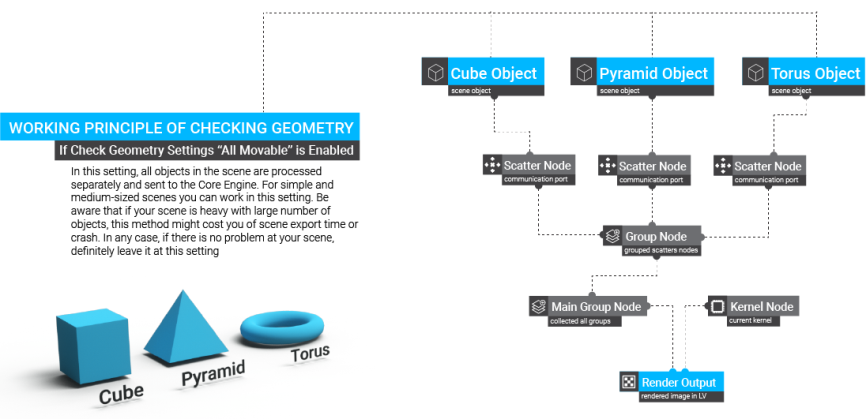
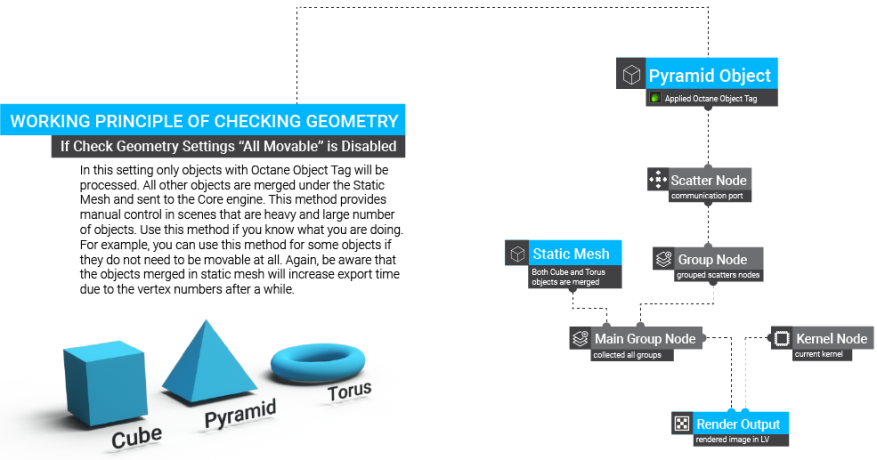
Figure 17: Flowchart of how geometry is updated in the Live Viewer window.
Check Paint TexturesTextures are used to add details to a surface. Textures can be procedural or imported raster files.
When this option is active, any movement made in Body paint, Polygon paint, or Vertex paint of Cinema 4D (or other 3rd party texture painting tools) will be reflected in the LV in real-time. In the off state, there will be no paint texture update.
Zoom
Used to zoom into the desired area in LV render (figure 18). There are three sub-menus: Enable Zoom / Centered / Aligned.
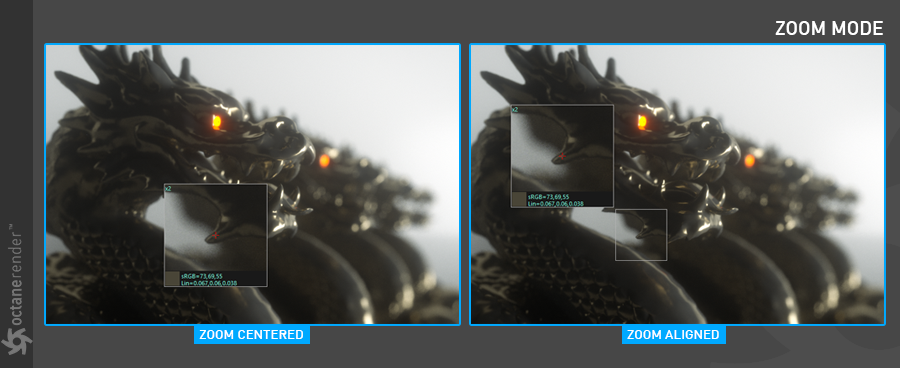
Figure 18: Using the Zoom feature in the Live Viewer window.
Used to turn the motion blur on and off in LV. It has three sub-menus: Camera Motion Blur / Object Motion Blur / Vertex Motion Blur.
Network rendering allows additional GPUs from other computers to be utilized in rendering images. Conceptually, it is similar to working with additional GPUs by allowing the distributed rendering of single images over multiple computers connected through a fast local area network.
Show Alpha
Used to turn the alpha channel on and off in the LV (figure 19)
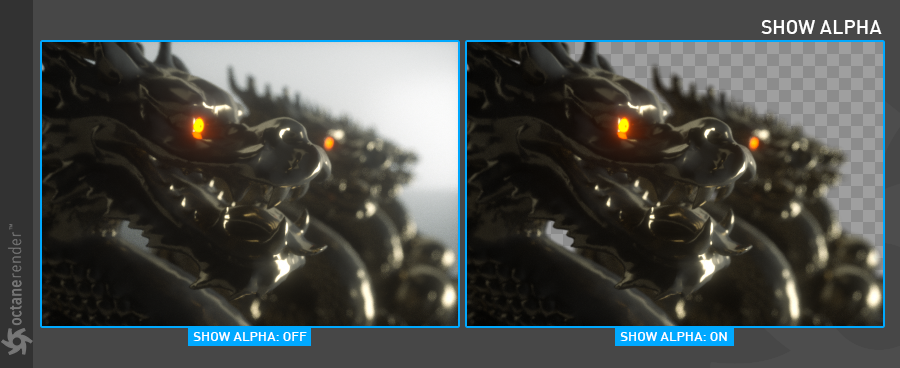
Figure 19: Activating the alpha option in the Live Viewer window.
Material Previews
Determines if the Octane materials in the Material Attributes window will be updated or not. It is recommended to remain on.
Opengl Previews
Determines whether the Octane materials update in the viewport. It is recommended to turn it on.
Full Screen
Shows the LV window without command icons. To exit Full Screen, open the Dialog Window and turn off Full Screen from Options.
Adjusts the resolution of the real time update in the LV. It has three sub-menus: None / 1x / 2x. In the None option, the resolution is high during the update or when navigating inside the LV. At 1x and 2x the resolution is reduced respectively. These two are useful for heavy scenes.
Help Menu
The Help menu provides access to numerous functions such as displaying help documentation and showing Octane-specific information (figure 20).
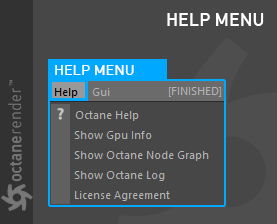
Figure 20: The Live View window Help menu.
Octane Help
Opens the Help documentation.
Displays information about the Graphics card(s) in the system.
Show Octane Node Graph
This window displays the scene structure in the LV (figure 21). It is similar to the Nodegraph Editor in OctaneRender Standalone. For more information, reference the OctaneRender Standalone documentation.
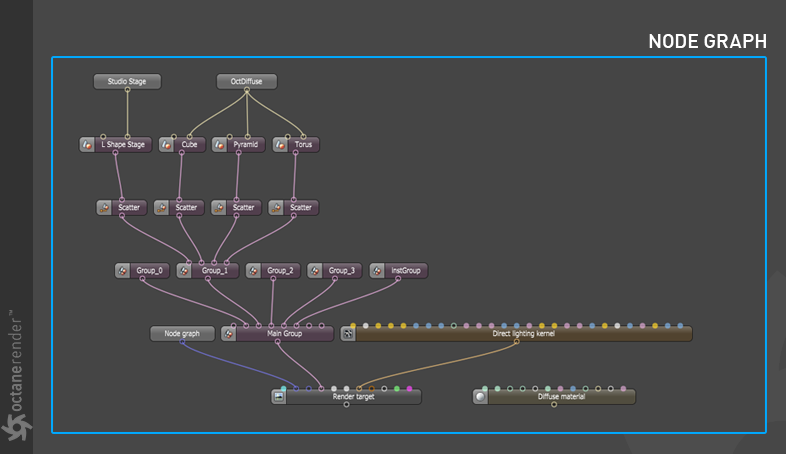
Figure 21: The Octane Node Graph window.
Show Octane Log
Displays the Octane log.
License Agreement
Displays the License Agreement.