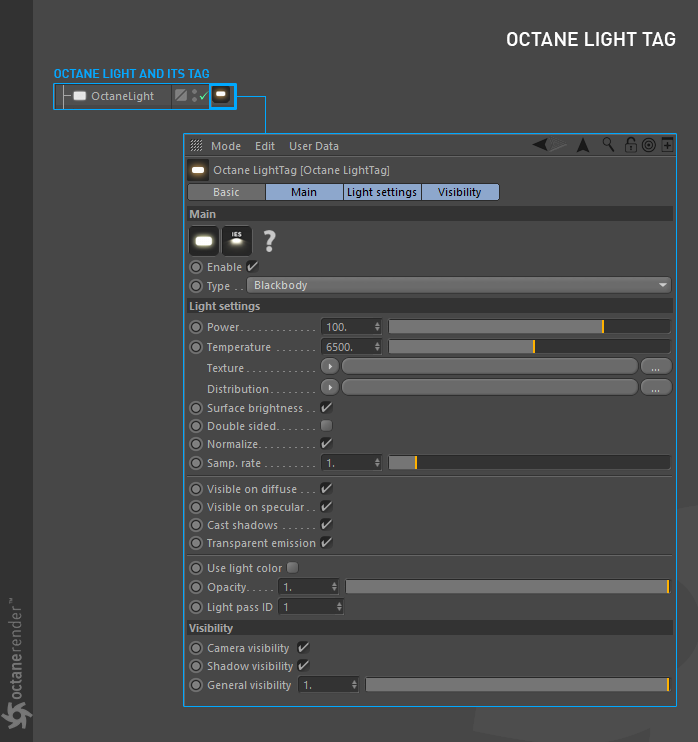
Now that we understand the emission topic, let's look at the global settings of the light tag in detail:
Normal and IESAn IES light is the lighting information representing the real-world lighting values for specific light fixtures. For more information, visit http://www.ies.org/lighting/. Light Icons
With the help of these two icons you can change the light type. When you press the IES icon, you can start using special light data with the "ies" file extension. This topic will be discussed in detail in "IES Lights".
Enable
It is for activating or deactivating the use of the light.
Type
In Octane, there are two different light features, Blackbody and Texture. Both of these explained in the corresponding sections.
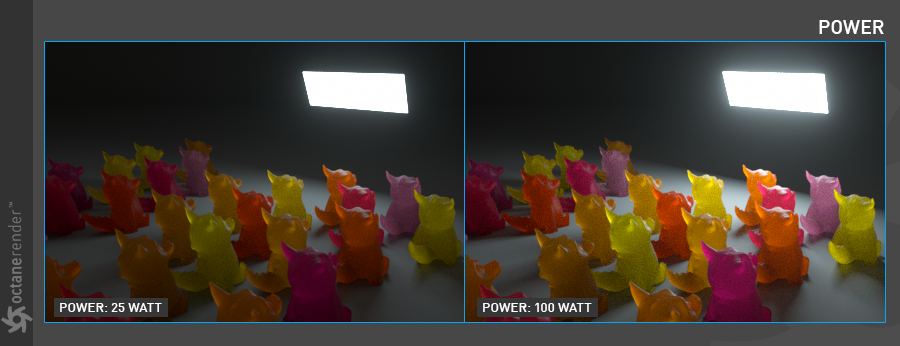
Power
In Octane, the light unit is Wattage. So if you want to see realistic render render output, you have to enter the real world light values into the power setting. It depends on the light source. For example, a standard bulb has a wattage of 25-100 and gives a brightness of about 250-1600 Lumens (do you still use it?). Halogen bulbs are 18-72 watts and the you get the same brightness as standard bulb. You see the energy gain, don't you? Moreover, if you use 4-20 wattage "LED bulb" you will get the standard bulb brightness. For these reasons the wattage values in Octane are very important for realistic rendering.
On the other hand, if your aim is not realistic render, you can play as you like with the power value for more artistic render outputs.
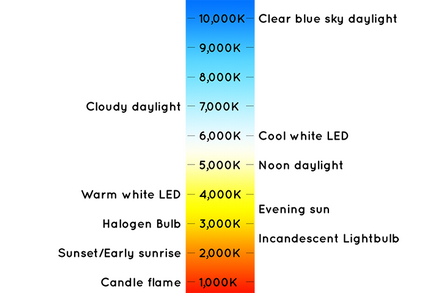
Temperature
Here you can adjust the emission color of the light. Unit is Kelvin. We recommend using real world Kelvin values for a realistic render. The following chart may be useful for different situations.
However, if you want to make the light color completely different in some cases, there are 2 ways to do this:
1- You can define Octane "Rgb Spectrum" or "Gaussian Spectrum" in the texture channel. We recommend using Gaussian Spectrum. The color usage in Octane is actually wavelength based. All RGB inputs that you use in other areas are actually converted to wavelength. Since Octane is a spectral engine, it uses the visible spectrum, where the wavelengths are valid not the rgb. For example, let's say you picked a blue color with a rgb value of 0-51-255 for the diffuse channel. This color is converted by Octane to wavelength and the correspondence is 450 nm (nanometer), hence 0.45 μm (micrometer). That's the value Octane uses. if you ask "What is it to us?", we have a response: This rgb convert operation is not perfect (But each version it is getting better). At higher light intensity, rgb colors are clipped and you may see different (or wrong) color other than the desired color. If you are looking for a realistic render we recommend you use this node because you will be using the realistic spectrum that Octane has used directly without losing color values. Of course, if your goal is motion graphic style renders, you do not have to bother with this node. In this case, you can use RGB (HSV) color space.
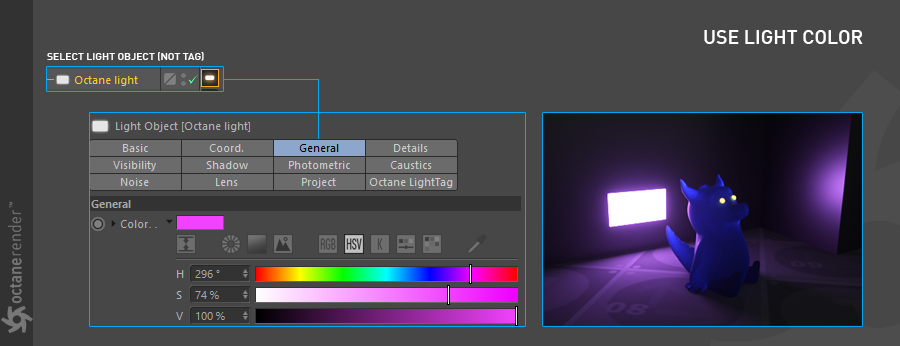
2- In the Settings window, you can check "Use Light Color" slightly below. In this case, you can set the color of the Cinema 4D's classic light, go to the General tab and adjust the color you like.
Texture
From here you can adjust the emission value of the light using any texture instead of Kelvin. You can use any Procedural / Image or Alpha image. For details see Texture Emission.
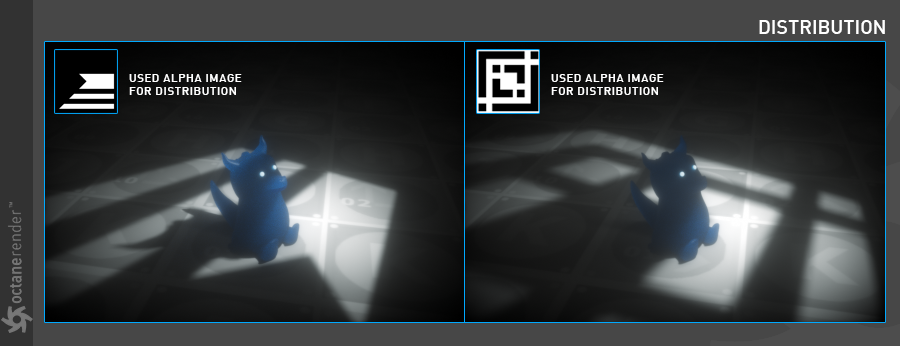
Distribution
This option is used to define the Pattern of the light. It's also called "Gobo Lights" or "IES Lights". These features will be create with the help of this option. You can also create various light patterns using an Alpha image. In the example below, various light patterns are created using Alpha images in the Distribution channel. Once you have defined the alpha image on the Distribution channel, you can make a lot of adjustments on the texture by adding Transform and Projection (using Octane Image texture). We have explained these two properties in detail in "UsingTextures" section. Also remember to make the "Texture Projection" option "perspective" from Projection (when you rotate the light, it can be rotated on your texture). You can also use "IES Lights" in Distribution. We will explain the details in the relevant section.
Surface Brightness
This option increases or decreases the brightness value of the light according to the size of the Emitter Object. If you select "On", you can see that brightness changes when you scale your Emitter object. If select "Off", the brightness will remain constant, regardless of the scale of your Emitter Object. Use whichever is suitable for you.

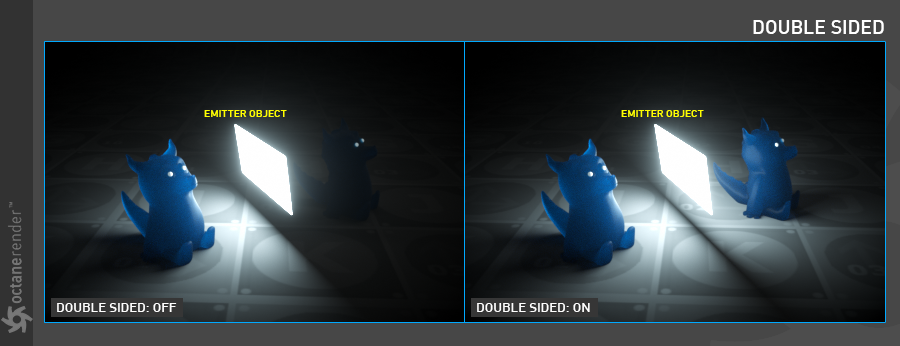
Double Sided
This option is used to emit both sides of the Emitter Object. Default is "off".
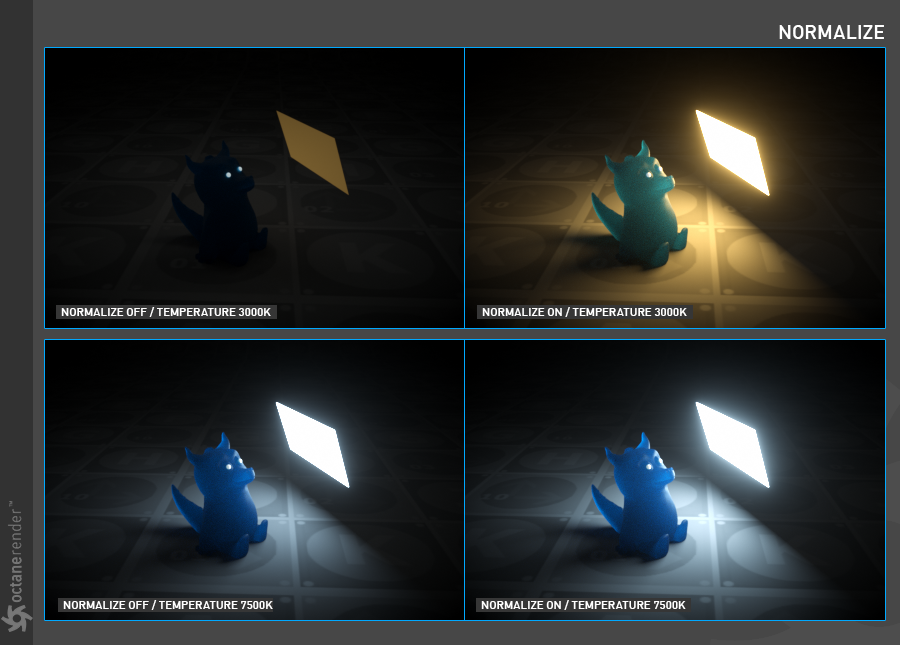
Normalize
It is an option to keep the Luminance value constant as the temperature values of the emission change. When it is off, the "luminance" level will change as the temperature changes. According to this, in the low temperature parts of the Visible Spectrum (orange, red), the light brightness will decrease, and at the higher points (white, blue) the light brightness will increase. Default is "On".
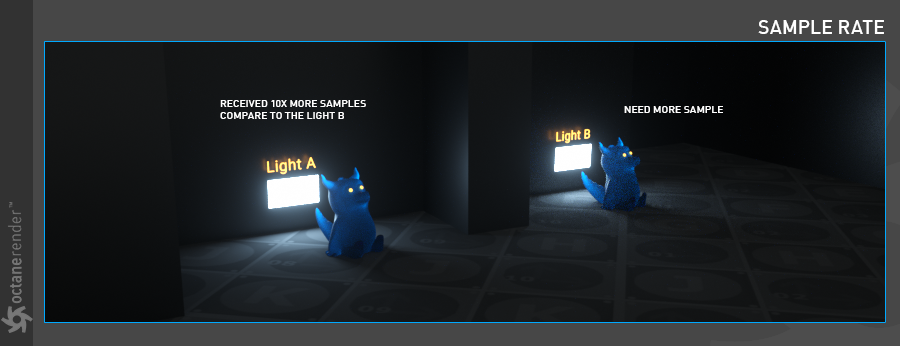
Sample Rate
If you have more than one Blackbody Emission in your scene, you can determine from here which of them will be rendered with more samples. In some cases, there may be more than one light in your scene, and some of them may create noise in a certain area because of its location. In such cases you can reduce noise by defining more samples for that light. However, you may need to set the sample rate of other lights when doing this, because this option works as "ratio". You can think of blackbody emissions on the scene as "sample weighting". In the example you see in the picture below, "Light A" has 10x more samples than "Light B". The default value of 1 works in most scenarios. It is recommended to keep the default value unless you use different lights and a noisy situations.
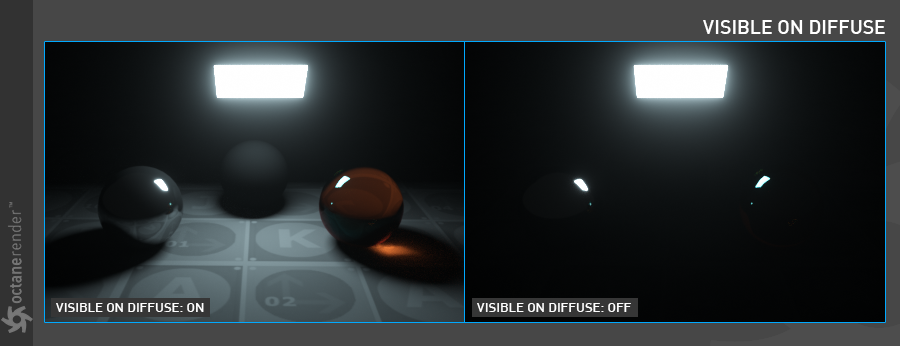
This is an option to enable the light source to be visible on diffuse surfaces. This is enabled by default. This allows users to enable or disable the blackbody emission or texture emission light sources from casting illumination or shadows on diffuse objects. Disabling this option will disable emission, i.e. it won’t be visible in diffuse reflections, but still be fully visible in specular reflections. It will also be excluded from the direct light calculation.
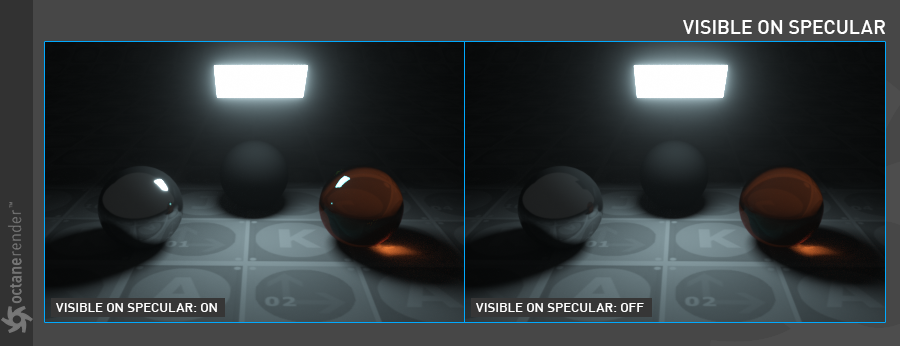
This is an option to enable the light source to be visible on specular surfaces. This is enabled by default. This allows users to hide emitters on specular reflections / refractions only.
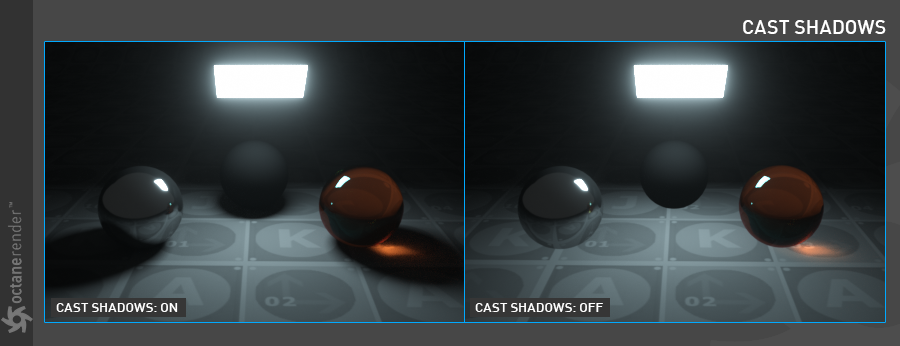
Cast Shadows
This is an option to enable the light source to cast light and shadows on diffuse surfaces and provides users the means to disable direct light shadows for mesh emitters. This option only has an effect if the emitter is actually included in the direct light calculation, i.e. the "sampling rate" is > 0. This option is enabled by default.
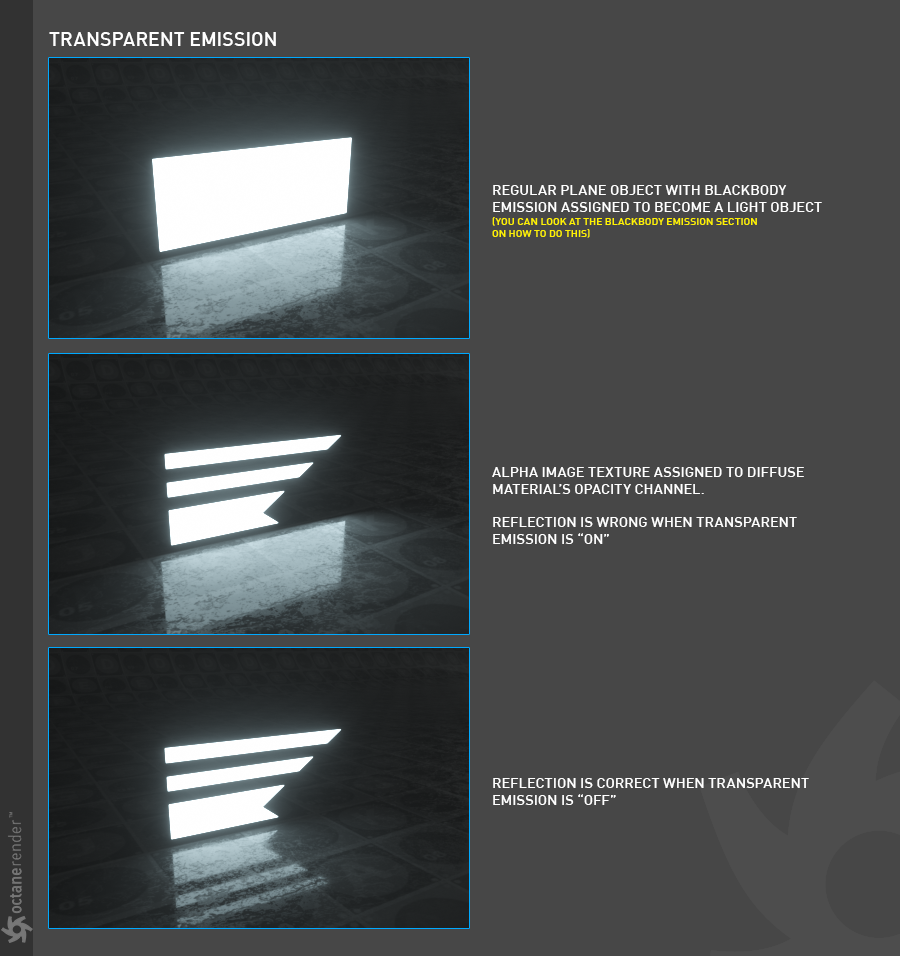
Transparent Emission
This option allow the user to choose whether the emission power should be scaled with opacity or not. Until now, transparent emitters were always taken fully into account even if they were transparent, i.e. they behaved as if "Transparent emission" is enabled. This is useful if you want to control the light in your scene without your emitters being directly visible. But there are cases when transparent emitters should not emit light. Consider the following example: Suppose you make a Plane object "Blackbody Emission" as shown in the picture. If you define any alpha image on the Opacity channel of this object, the reflection will not be correct. However, if you turn off "Transparent Emission", the reflection will look correct.
Use Light Color
With this option you can also change the color of the light from the "General" tab in the light options of Cinema 4D.
Opacity
This option is to define the opacity value in Blackbody Emission.
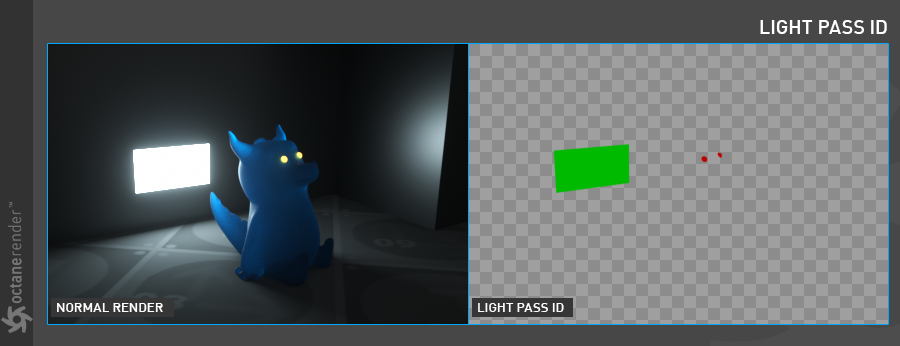
Light Pass ID
This option is for rendering the ID pass of the lights in your scene. So you can play with the color of these lights in a 3rd party compositing software. "Render PassesRender passes allow a rendered frame to be further broken down beyond the capabilities of Render Layers. Render Passes vary among render engines but typically they allow an image to be separated into its fundamental visual components such as diffuse, ambient, specular, etc.." will be explained in more detail.
Visibility Settings
These settings actually belong to the "Octane Object Tag" part. But here's a brief explanation of the options that involve the light:
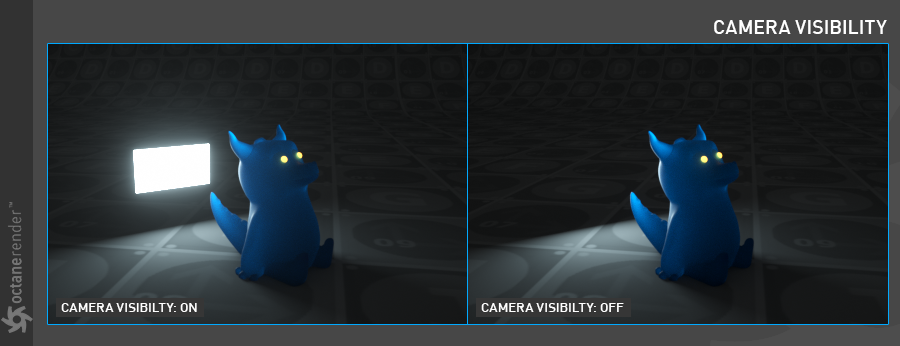
Camera Visibility
With this option you can control whether the light will be seen by the camera. When "on", the light object is rendered. When "off", the object itself is not rendered, but illumination other features remains the same.
Shadow Visibility
This option works for normal polygon objects rather than light objects. For a detailed description, please refer to the "Octane Object Tag" section.
General Visibility
It has almost the same functionality as Camera Visibility or Opacity.