The Instance Color texture is used to hold an image and prepares each pixel of the image to be mapped to geometric instance IDs.
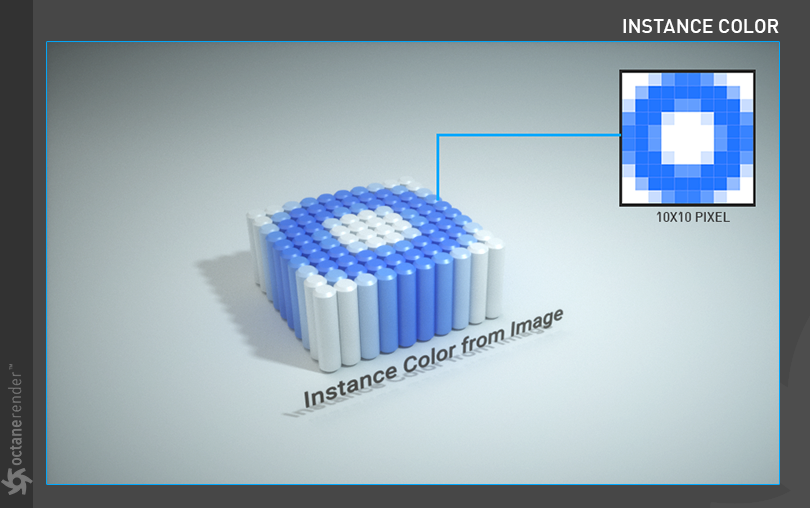
Octane Plugin is able to generate instances of an object and can also assign an ID to each of the instances generated such that number of instances results in a grid instance IDs. Colors can then be assigned via texture to each instance ID, in this case with an image in the Instance Color texture, matching the IDs with pixels of the image starting at the bottom left in row major order up to the top right.
How To Use
Instance Color has many uses, and these uses are described in the following mini tutorials. As you follow the tutorials, you can examine them on the scene. You can download all the scenes described in the tutorial from the link below.
Download the all scenes from this link
Instance Color From File
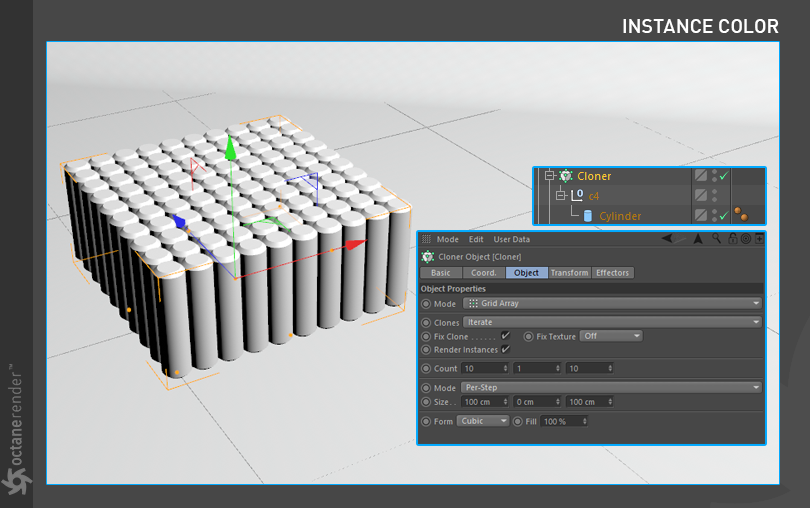
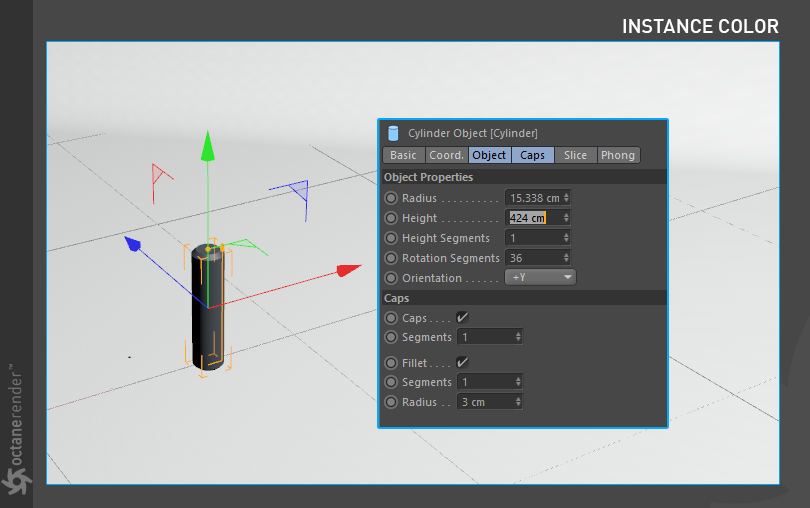
1- First create a cylinder object and change its properties as shown in the picture.

2- Then create a Cloner object and assign the cylinder object to the Cloner. Change the cloner settings as shown in the image below.
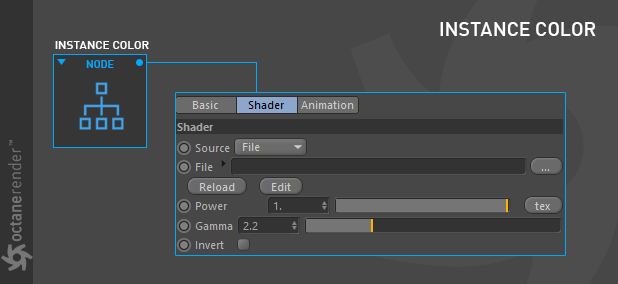
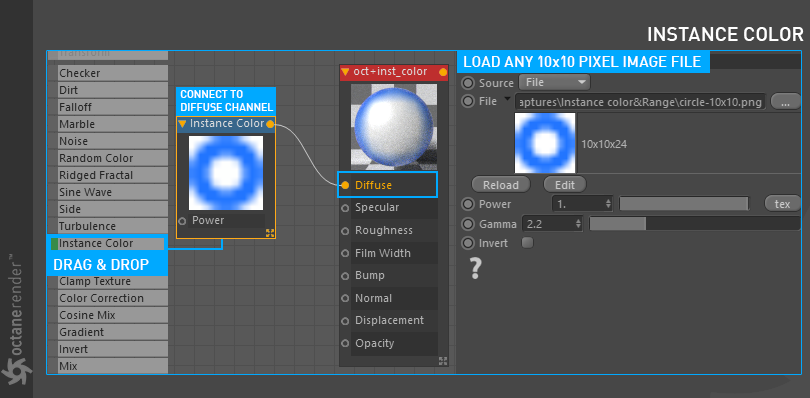
3- Next is the MaterialThe representation of the surface or volume properties of an object. and Instance Color Setup. First create the DiffuseAmount of diffusion, or the reflection of light photons at different angles from an uneven or granular surface. Used for dull, non-reflecting materials or mesh emitters. Material. Then open the Node Editor and drag and drop the material you created into the Node editor window. Drag the Instance Color directly to the node editor from the menu on the left. Now, when Instance Color Node is selected, connect the tiny yellow spot on the upper right to the Diffuse channel of Material. Now select any image file with 10x10 pixel size from the menu on the right and load it. After the Material Setup, Assign it to Cloner Object. In the picture below you can see the material and Instance Color setup.
4- If you have done everything properly, you will get a result similar to the following picture. As you can see, each pixel value of our 10x10 pixel sized image created Instance Color for our 10x10 grid cylinders in Cloner. The Instance IDs of 100 cylinders in Cloner were automatically generated. It’s just like the Shader Effector. However, this feature works effectively in smaller image files. For example, if your image size is 500x500 pixels, the 2500 Instance ID object to be created for this will most likely crash Cinema 4D. So, use it wisely.
Instance Color From Vertex Color
In this example we will describe how Instance Color is made from a Vertex Color.
1- First create a cylinder object and change its properties as shown in the picture.
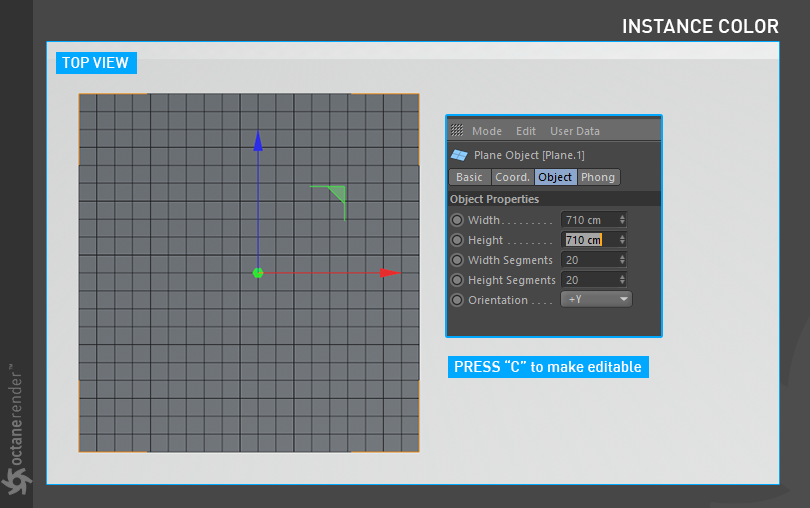
2- Then create a “Plane” object and change its settings shown in the image below. After entering the settings, make it editable (Press C).
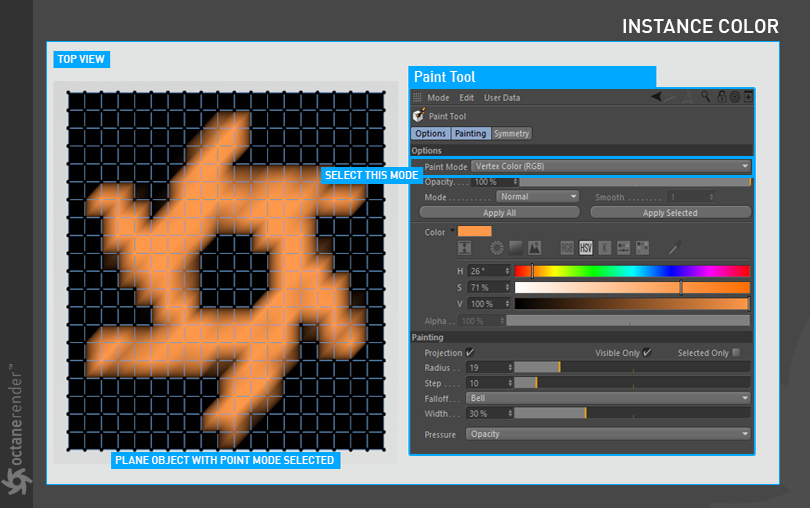
3- Now we will paint the vertices of the Plane object. Select Plane Object and then select the Point Mode.
Press Shift + C and select Paint Tool from the command menu.

4- Paint the vertex in any color and shape using the Paint menu. Do not forget to select "Vertex Color (RGB)" from the paint menu. Once the painting is finished, the "Vertex Color Tag" will be automatically created in the Object Manager, next to the plane object. You will then use this Tag as Instance Color.
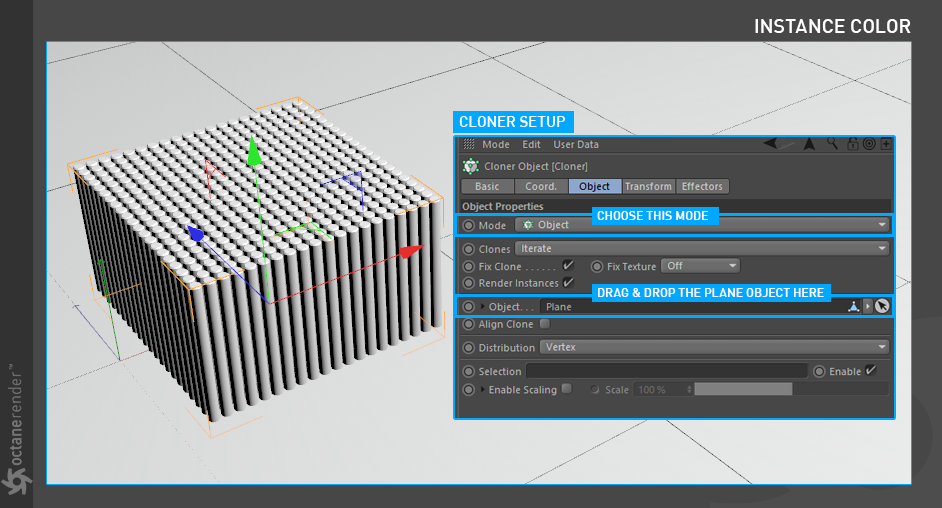
5- Create a Cloner object and assign the cylinder object to the Cloner. We also need to define Plane, which we just created, as the object to which the cylinder clones will distribute. See the picture below for settings.
6- Next is the Material and Instance Color Setup. First create the Diffuse Material. Then open the Node Editor and drag and drop the material you created into the Node editor window. Drag the Instance Color directly to the node editor from the menu on the left. Now, when Instance Color Node is selected, connect the tiny yellow spot on the upper right to the Diffuse channel of Material. Now it's time to set the Vertex TAG. When Instance Color Node is selected, select Particle as Source from the menu on the right. In the Color Source section, drag and drop the Vertex Color TAG of the Plane objet. After the Material Setup, Assign it to Cloner Object. In the picture below you can see the material and Instance Color setup.

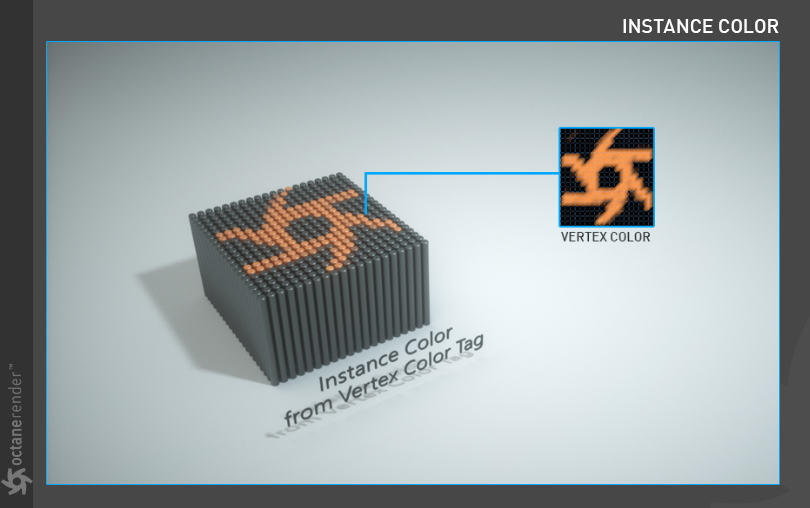
7- If you have done everything properly, you will get a result similar to the following picture. As you can see, the cylindrical objects were colored by the vertex color Tag of the plane. Although it is not a very practical method, at least it gives you more control and flexibility. You can also work with more vertex counts. Remember that too much vertex will increase your cloner objects count and the system will slow down as usual.
Instance Color From Particle Emitter
In this example we will describe how Instance Color is made from a Particle Emitter.
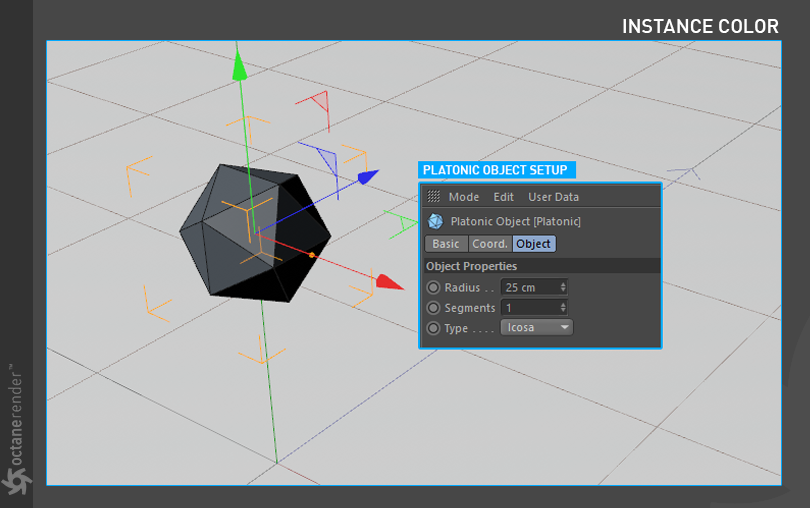
1- First create a Platonic object and change its properties as shown in the picture.
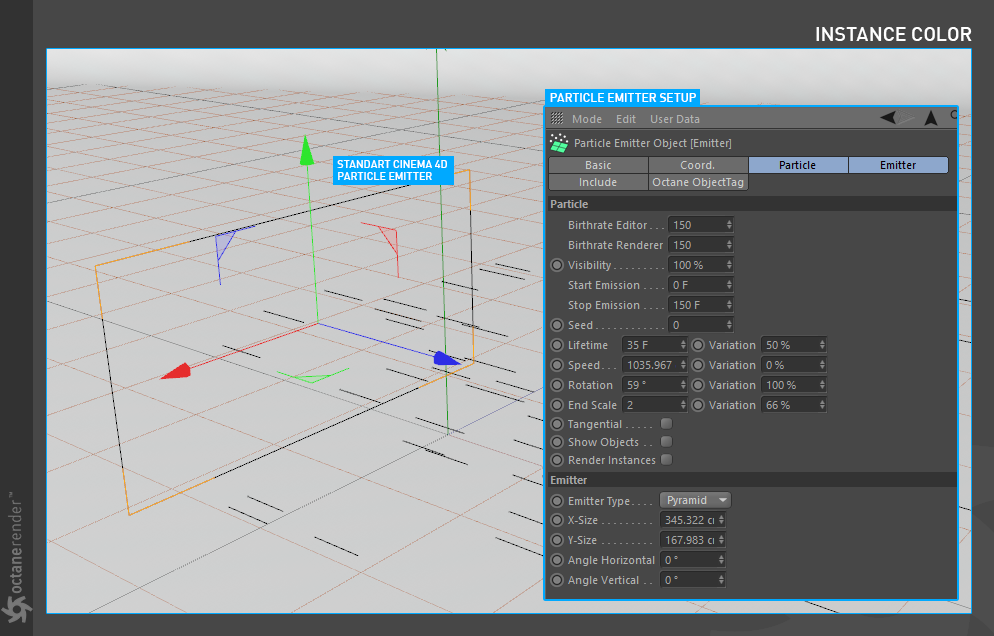
2- Now create a standard Cinema 4D particle emitter object and change its properties as shown in the picture. After you finish the setup, press the play button in the Viewport and allow the particles to flow at least 35-40 frames.
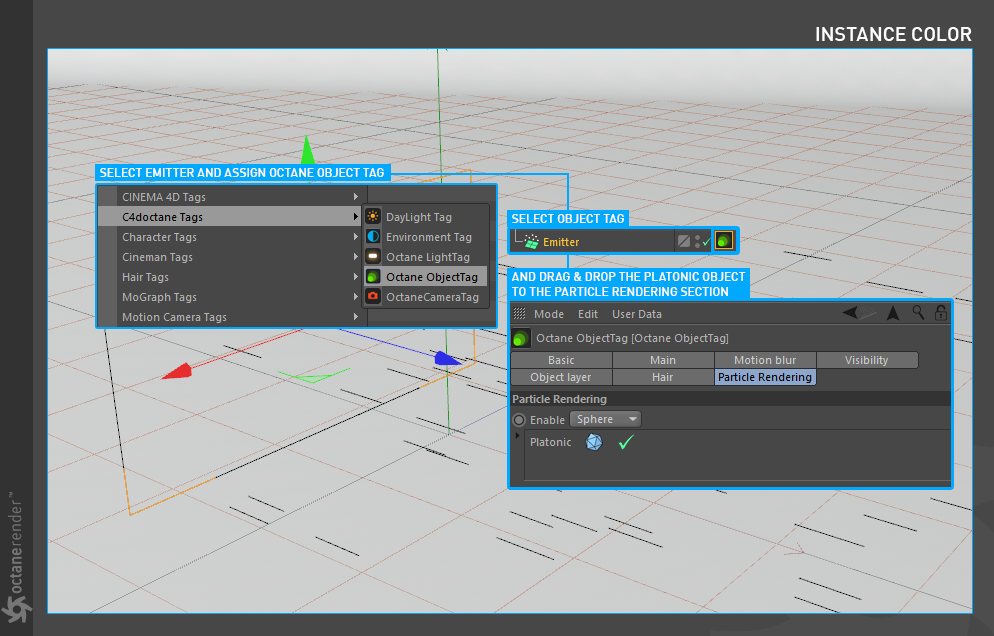
3- Now we need to identify the emitter object as a particle to Octane. We will use the “Octane Object Tag” for this. Right-click on the Emitter object and select "Octane Object Tag" from the pop-up menu. Then select the Object Tag and drag & drop the "Platonic" object to Particle Rendering Tab. Complete the setup as shown in the following image.
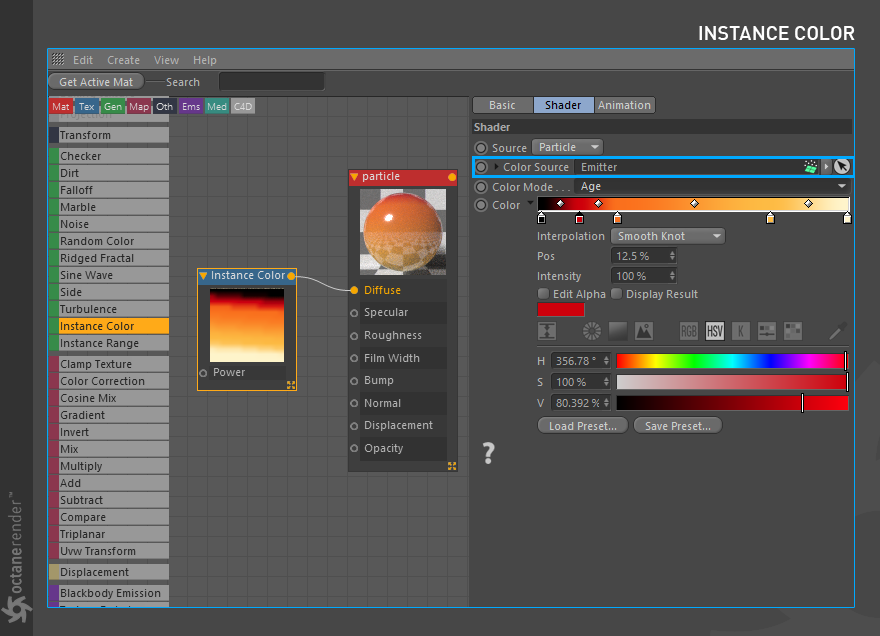
4- Next is the Material and Instance Color Setup. Create materials and Instance Colors as you did in previous tutorials. This time, Drag and drop the "Emitter" object in the "Color Source" section of the Instance Color settings. Enter the settings you see in the picture and complete the setup. After complete the setup assign the material to the “Platonic” object.
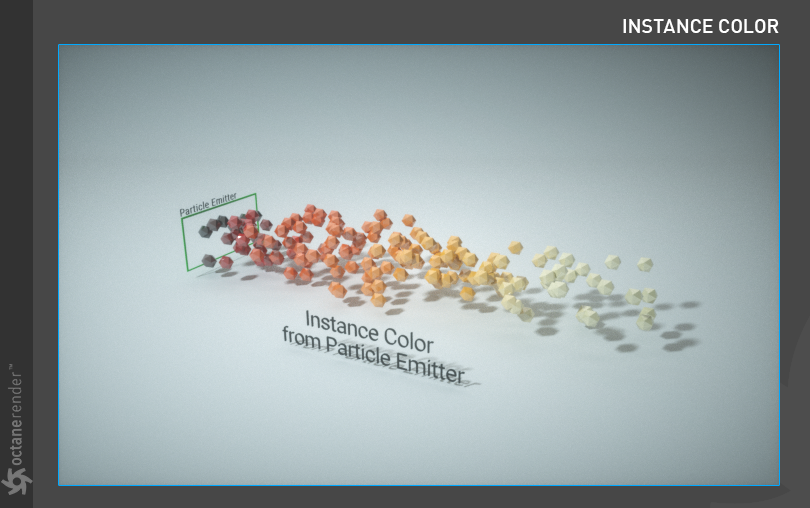
5- If you have done everything properly, you will get a result similar to the following picture. As you can see in the picture, Platonic objects that we have defined as Particle, created Instance Color according to the gradient values. You can also create Instance Color from the particles' age, speed, etc.
Instance Color On Octane Scatter Object
In this example we will apply the Instance Color to Octane Scatter Object.
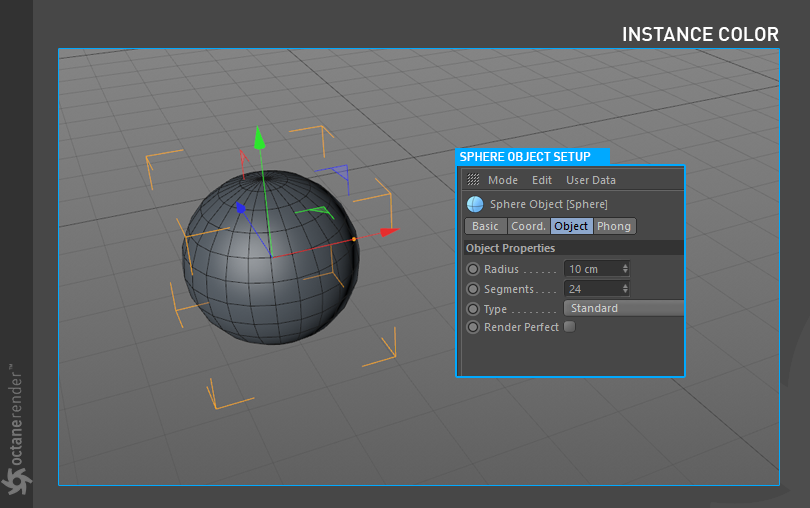
1- First create a sphere object and change its properties as shown in the picture.
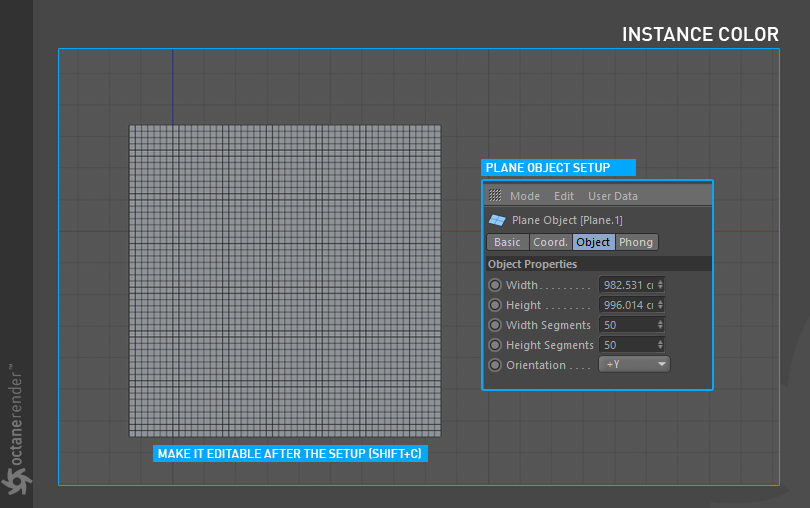
2- Then create a “Plane” object and change its settings shown in the image below. After entering the settings, make it editable (Press C).
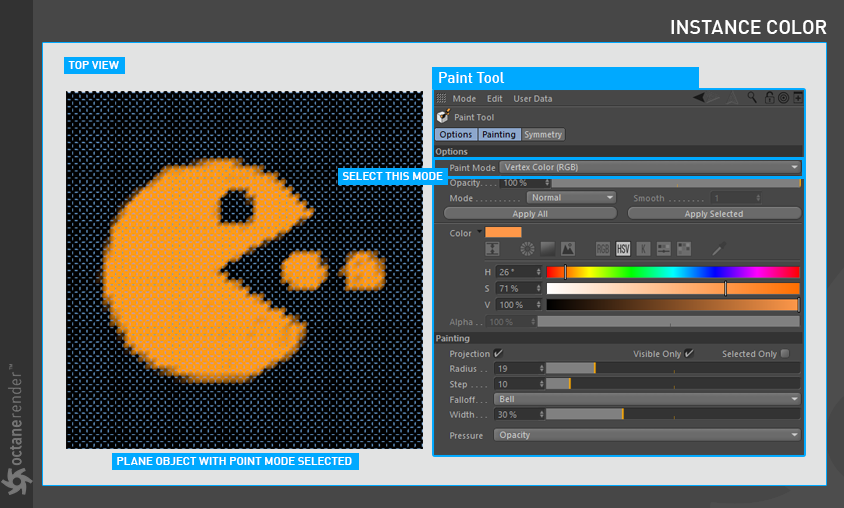
3- Now we will paint the vertices of the Plane object. Select Plane Object and then select the Point Mode.
Press Shift + C and select Paint Tool from the command menu.
4- Paint the vertex in any color and shape using the Paint menu. Do not forget to select "Vertex Color (RGB)" from the paint menu. Once the painting is finished, the "Vertex Color Tag" will be automatically created in the Object Manager, next to the plane object. You will use this Tag as Instance Color later.
5- Create a Scatter object and assign the sphere object to the Scatter. We also need to define Plane, which we just created, as the object to which the sphere clones will distribute. See the picture below for settings.

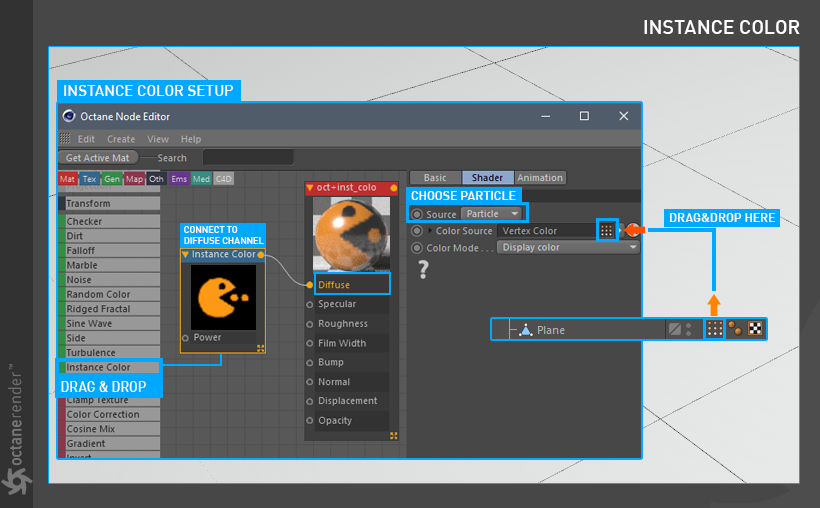
6- Next is the Material and Instance Color Setup. First create the Diffuse Material. Then open the Node Editor and drag and drop the material you created into the Node editor window. Drag the Instance Color directly to the node editor from the menu on the left. Now, when Instance Color Node is selected, connect the tiny yellow spot on the upper right to the Diffuse channel of Material. Now it's time to set the Vertex TAG. When Instance Color Node is selected, select Particle as Source from the menu on the right. In the Color Source section, drag and drop the Vertex Color TAG of the Plane objet. After the Material Setup, Assign it to Scatter Object. In the picture below you can see the material and Instance Color setup.
7- If you have done everything properly, you will get a result similar to the following picture. As you can see, the sphere objects were colored by the vertex color Tag of the plane. By using Octane Scatter Object you can get rid of the limit of Cloner and generate a large number of instances. Since Scatter Object is Octane's native tool, it works quite fast and efficiently. In this way, you can produce millions of instances and color them as you wish. Moreover, you have more control than other methods.
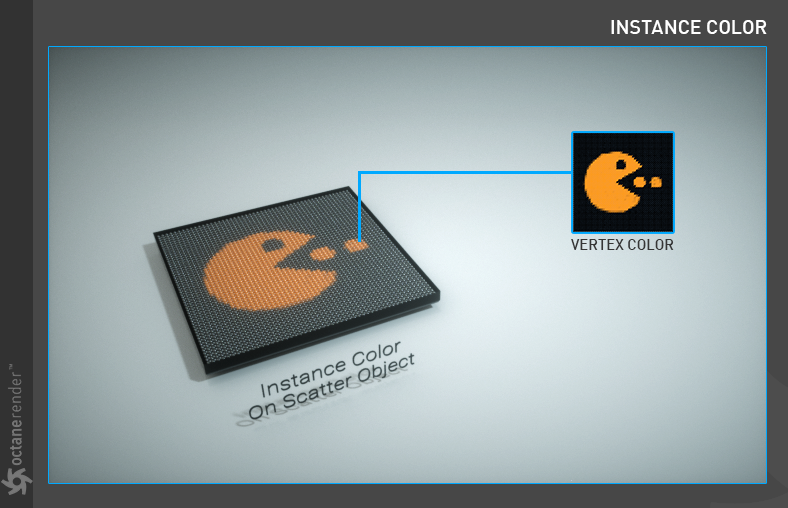
Instance Color On Scatter Object and Mograph
In this example we will create an Instance color using Octane Scatter Object and Mograph.
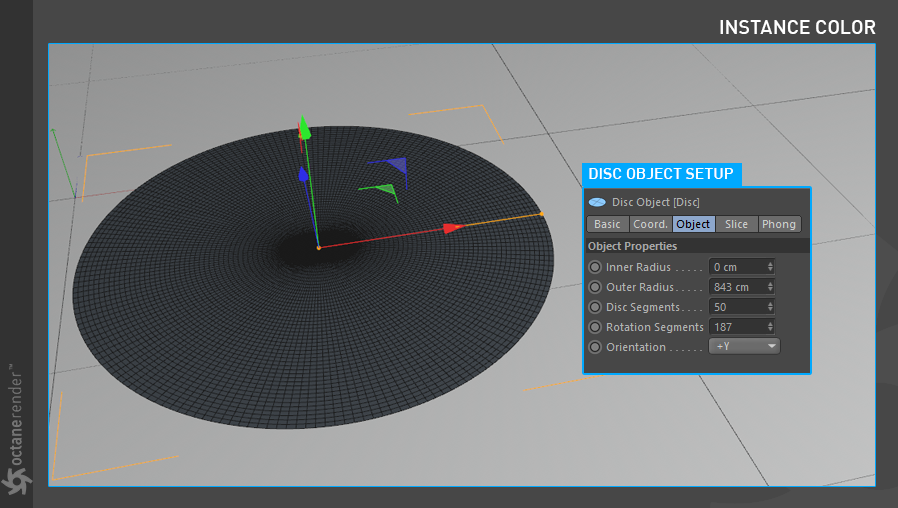
1- First create a disc object and change its properties as shown in the picture.
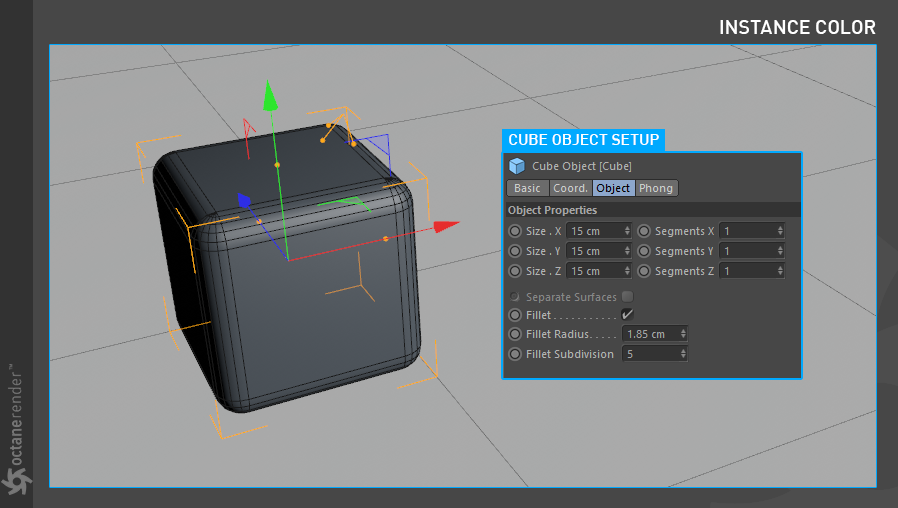
2- Now create a Cube object and change its properties as shown in the picture below.
3- Create an Octane Scatter Object and make the Cube object child. Then drag and drop the Disc object to the surface section of the Scatter. The following picture shows the setup.

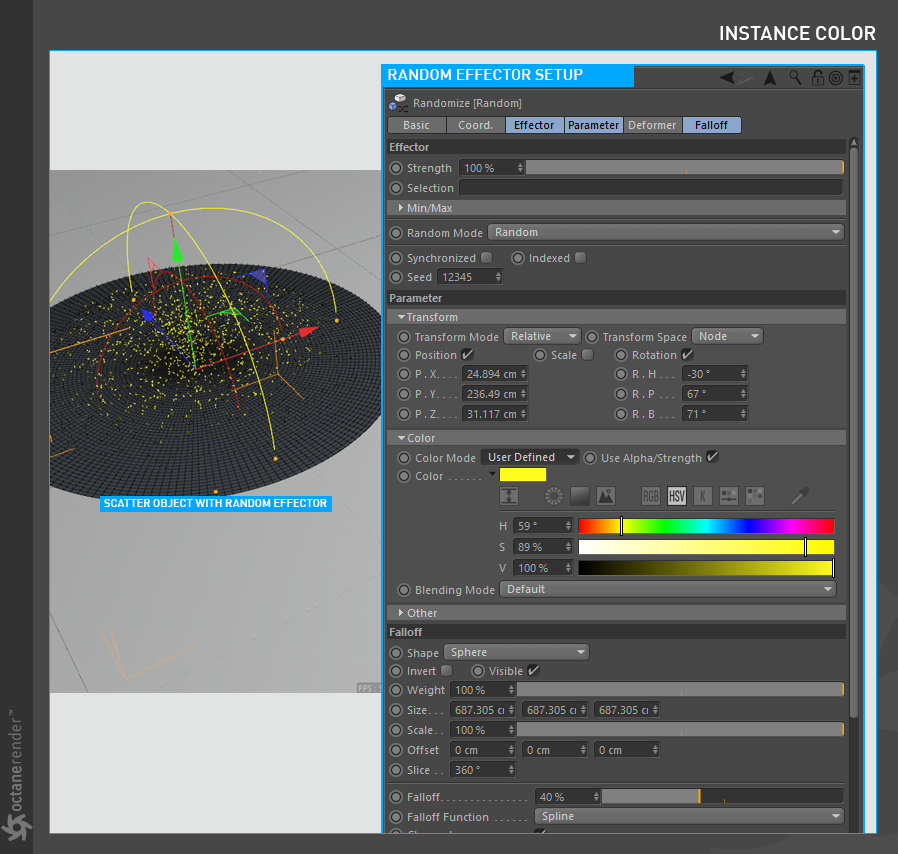
4- Now we will use Mograph in Scatter Object. To do this, first create a Random Effector from the Mograph menu and drag it to the Effector section of the Octane Scatter Object. Change the “Random Effector” properties as you see in the picture below. You don’t have to enter these properties exactly. You can change as you like the settings in the Transform and Falloff sections. For example, you can select "On" instead of “user defined” in the Color section, and you can create more colorful cubes. Or you can change the shape of the Falloff. It’s up to you.
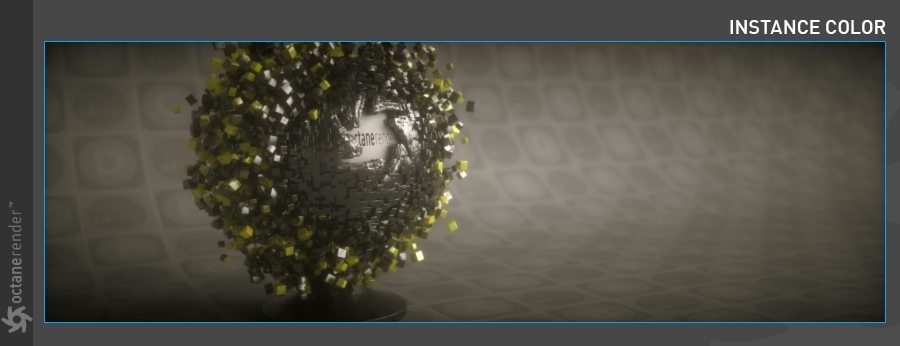
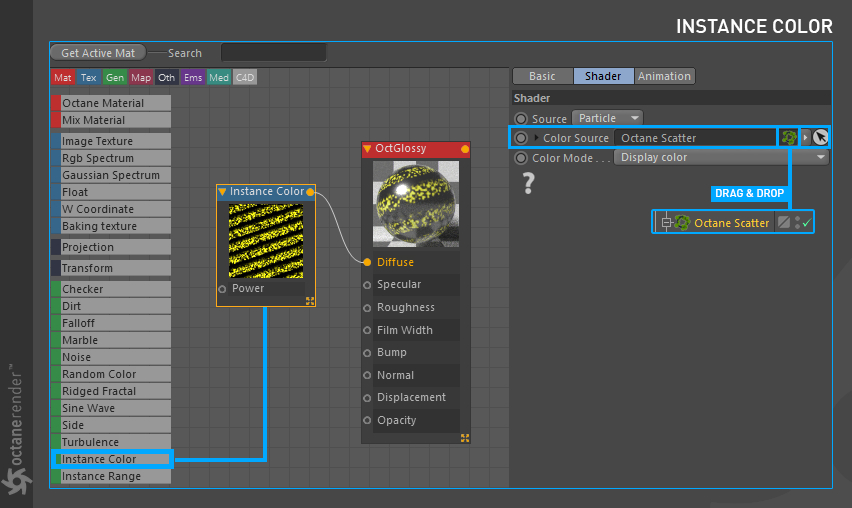
5- Next is the Material and Instance Color Setup. First create a GlossyThe measure of how well light is reflected from a surface in the specular direction, the amount and way in which the light is spread around the specular direction, and the change in specular reflection as the specular angle changes. Used for shiny materials such as plastics or metals. Material. Then open the Node Editor and drag and drop the material you created into the Node editor window. Drag the Instance Color directly to the node editor from the menu on the left. Now, when Instance Color Node is selected, connect the tiny yellow spot on the upper right to the Diffuse channel of Material. Now it's time to set the Scatter Object as a Instance Source. When Instance Color Node is selected, select Particle as Source from the menu on the right. In the Color Source section, drag and drop the Octane Scatter Object. After the Material Setup, Assign it to Scatter Object. In the picture below you can see the material and Instance Color setup.
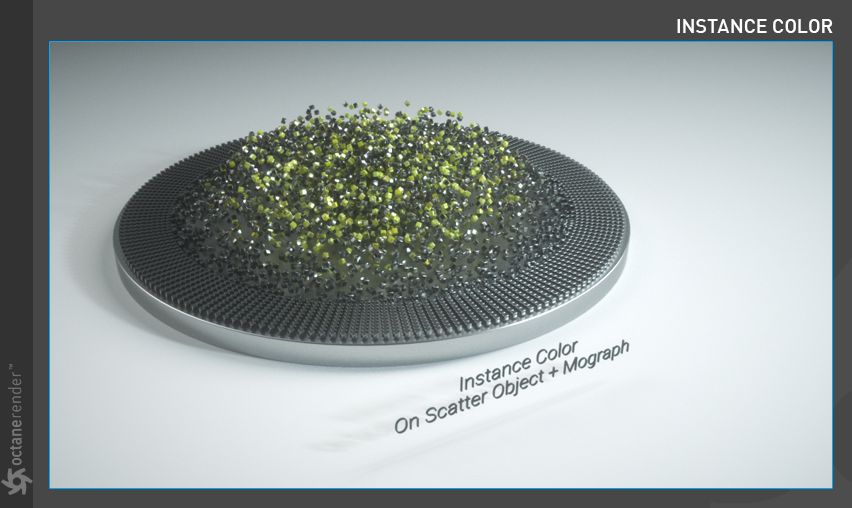
6- If you have done everything properly, you will get a result similar to the following picture (apart from the other cosmetic elements. You can also create HDRIAn image which presents more than 8 bit per color channel unlike most common image formats. environment, another light sources or secondary geometry etc.). As you can see, the cube objects were colored by the Random effector using “Instance Color”. By using Octane Scatter Object you can get rid of the limit of Cloner and generate a large number of instances. You can also use all the mograph tools.
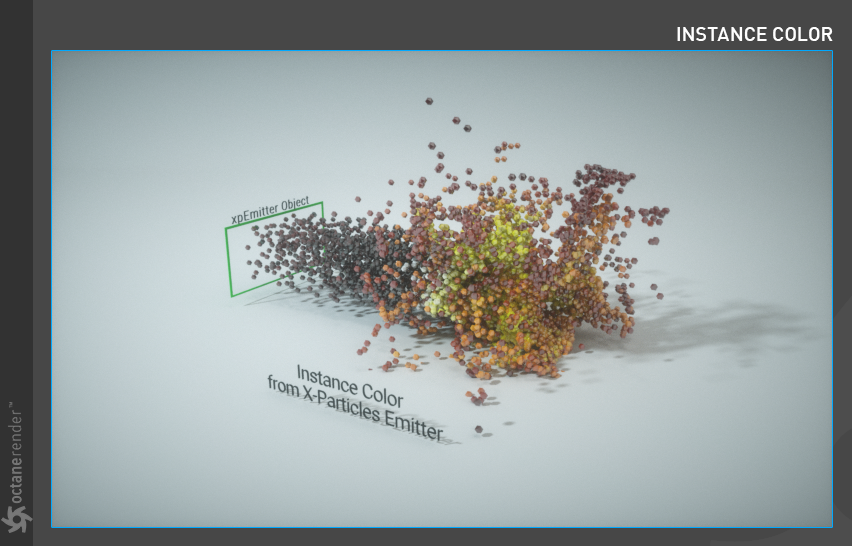
Instance Color From X-Particles Emitter
In this example we will describe how Instance Color is made from a X-Particles Emitter.
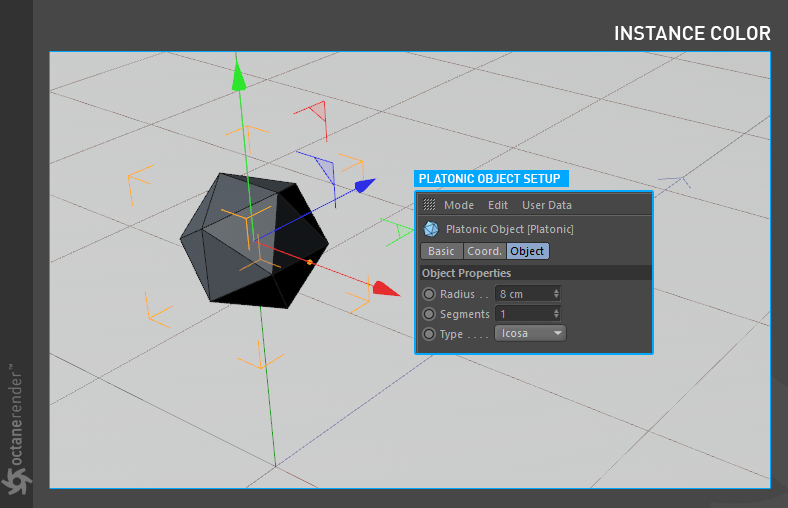
1- First create a Platonic object and change its properties as shown in the picture.
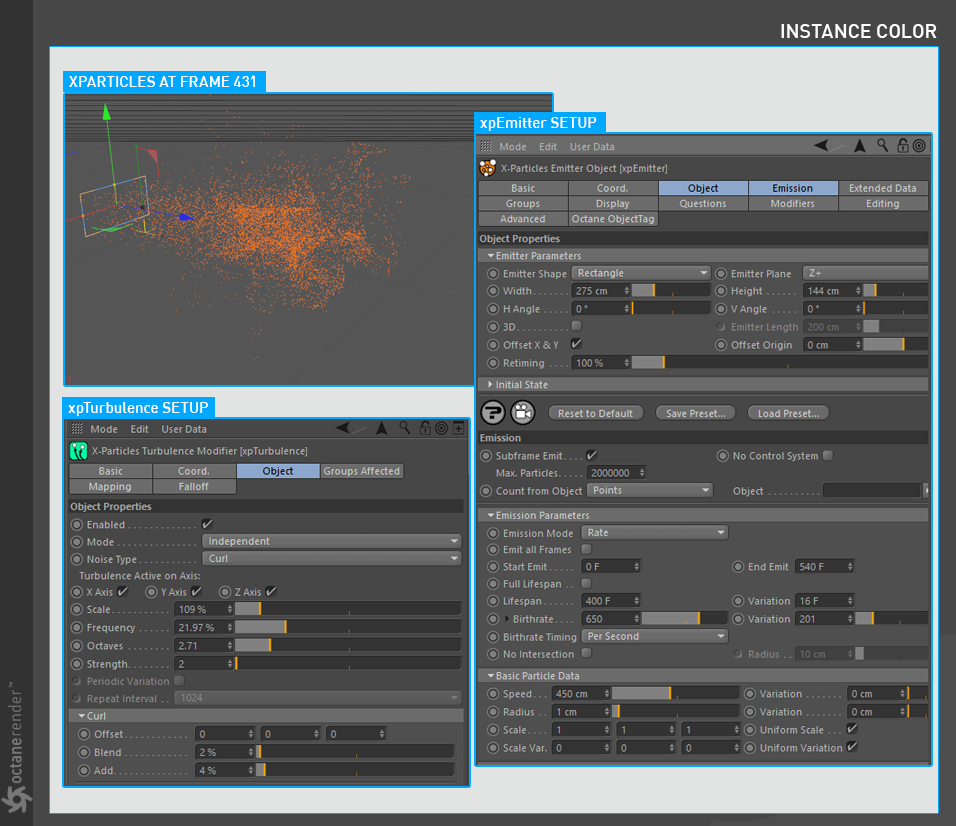
2- Now create a “xpEmitter” from the X-Particles menu and also create a “xpTurbulence” from the Xparticles/Modifiers/Motion Menu. Make the “xpEmitter” child to “xpTurbulence”. Change their properties as shown in the picture. After you finish the setup, set your animation timeline to 500 and press the play button in the Viewport. Allow the particles to flow up to the 430-450 frames.
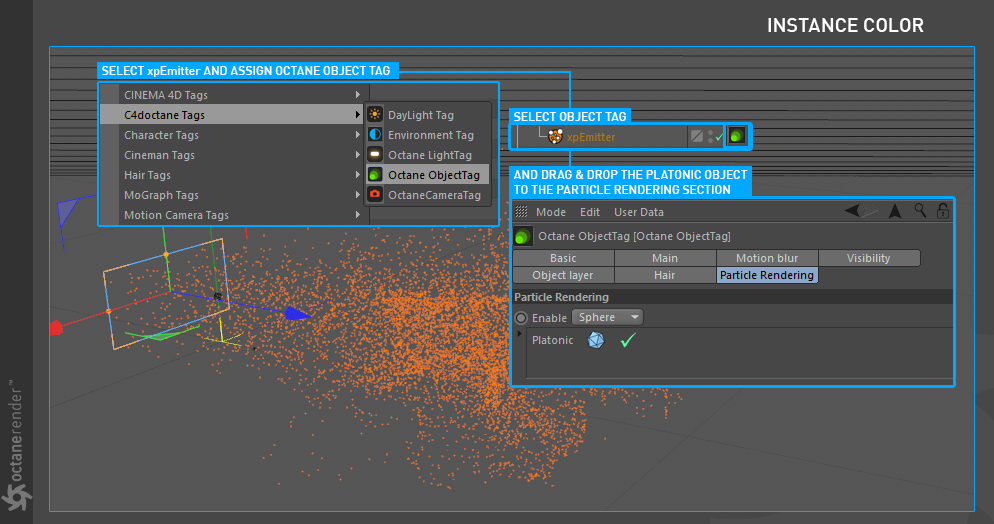
3- Now we need to identify the xpEmitter object as a particle to Octane. We will use the “Octane Object Tag” for this. Right-click on the xpEmitter object and select "Octane Object Tag" from the pop-up menu. Then select the Object Tag and drag & drop the "Platonic" object to Particle Rendering Tab. Complete the setup as shown in the following image.
4- Next is the Material and Instance Color Setup. Create materials and Instance Colors as you did in previous tutorials. This time, Drag and drop the "xpEmitter" object in the "Color Source" section of the Instance Color settings. Enter the settings you see in the picture and complete the setup. After complete the setup assign the material to the “Platonic” object.

5- If you have done everything properly, you will get a result similar to the following picture. As you can see in the picture, Platonic objects that we have defined as xpParticles, created Instance Color according to the gradient values. This time we used the Age parameter to adjust the appearance of the Instance Colors. Also we set the Age attribute in the Emission Parameters section of the xpEmitter object. Here we have identified Instance Colors with these values.