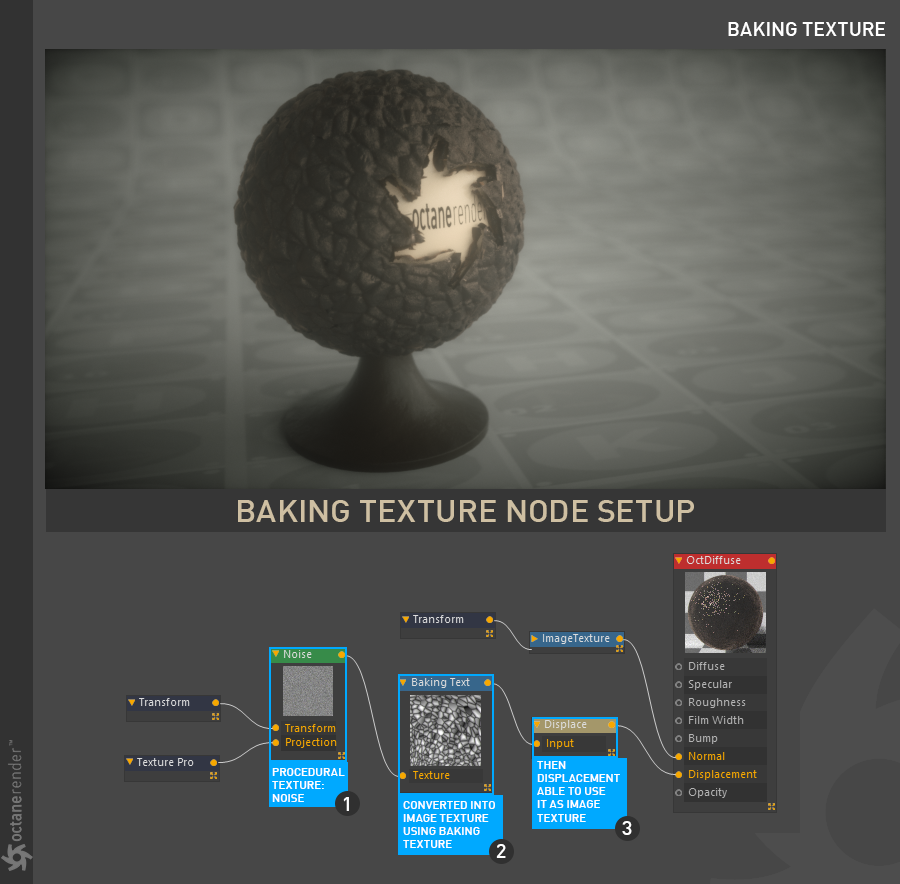
This tool converts any procedural texture to image texture. So you can use the full potential of procedural textures. It is a very useful tool. For example, if you want to use DisplacementThe process of utilizing a 2D texture map to generate 3D surface relief. As opposed to bump and normal mapping, Displacement mapping does not only provide the illusion of depth but it effectively displaces the actual geometric position of points over the textured surface. in Octane, you could only do this with image texture. With this tool, however, it is possible to convert the procedural texture to the image texture and use it in the displacement channel.
How to Use: Baking Procedural Texture For Displacement
It is very simple to use and the best part it's real time. You can change anything you want and see the result immediately. First enter the Node editor and prepare the setup as you see in the picture below. If you have not read the section on Node editor we recommend reading this section first. Because you need to know some fundemental working principles about the Node editor. The setup is quite simple as you can see in the picture. All you have to do is connect the procedural texture (Noise) to the "baking texture" node first and then connect the "baking texture" to the Displacement node. Once you have set all this connection, you can connect Displacement to the "Displacement Channel" of the main material.
If you do not want to deal with this, you can download this scene from the link below. After downloading, you can open the scene and examine it. For example, you can play with noise texture settings and get completely different results. Do not bother with other nodes used on the editor. We will explain each one in the next chapters individually. For now, just focus on "Baking textures".
Download the scene from here
Info: Texture BakingA process in which scene lighting is "baked" into a texture map based on an object's UV texture coordinates. The resulting texture can then be mapped back onto the surface to create realistic lighting in a real-time rendering environment. This technique is frequently used in game engines and virtual reality for creating realistic environments with minimal rendering overhead. is part of a texture groups. It should not be confused with camera or object baking. These last two will explain in the next chapters.
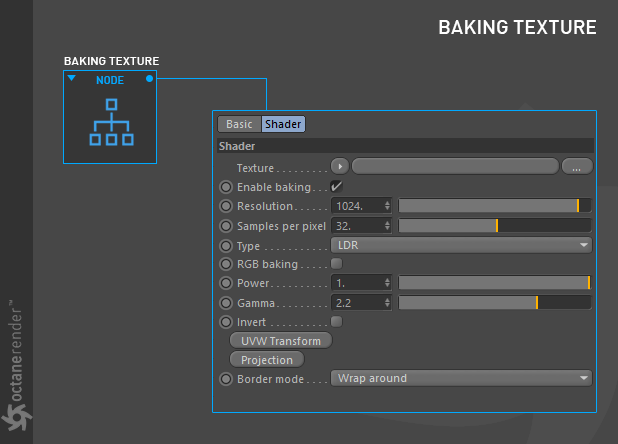
Texture
From here you can define any procedural texture. Octane's procedural textures work more efficiently than those of Cinema 4D. For example, if you use noise texture, it is recommended that you use Octane Noise.
Enable Baking
This option explains itself.
Resolution
From here you can determine the resolution of the texture to be converted. Higher resolutions require more RAM and GPUThe GPU is responsible for displaying graphical elements on a computer display. The GPU plays a key role in the Octane rendering process as the CUDA cores are utilized during the rendering process. power. If you are going to look closely at your object, it is recommended that you keep the resolution high. On the contrary, if you have objects with certain distance, you can keep the resolution low. Use completely based on your scene structure and your purpose.
Samples Per Pixel
Here you can determine how many samples you will use per pixel. 32 is the default value. You can increase it gradually when it's not enough.
Type
You can think of this option as the bit-depth of the bake texture. LDRImage formats that have 8 bits per color channel such as the common image formats JPEG, PNG, GIF among others. stands for 8 bit. HDR Linear Space can be used if the image you have uploaded has 32 bit-depth.
RGB Baking
Here you can convert RGB values according to the type of procedural texture. If your procedural texture has RGB values, enable this option. If you are using a greyscale values like in the example above, leave this option off.
Power
Here you can adjust the intensity value of the baked texture.
GammaThe function or attribute used to code or decode luminance for common displays. The computer graphics industry has set a standard gamma setting of 2.2 making it the most common default for 3D modelling and rendering applications.
Here you can adjust the gamma value of the baked texture.
Invert
Inverts the baked texture.
UVW Transform
We explained the UVW Transform under the title of "Transform/Projection".
Projection
We explained the Projection under the title of "Transform/Projection".
Border Mode
We will explain this option in detail in the "Image Texture" section.