Open topic with navigation
Thin Lens Camera (Standard)
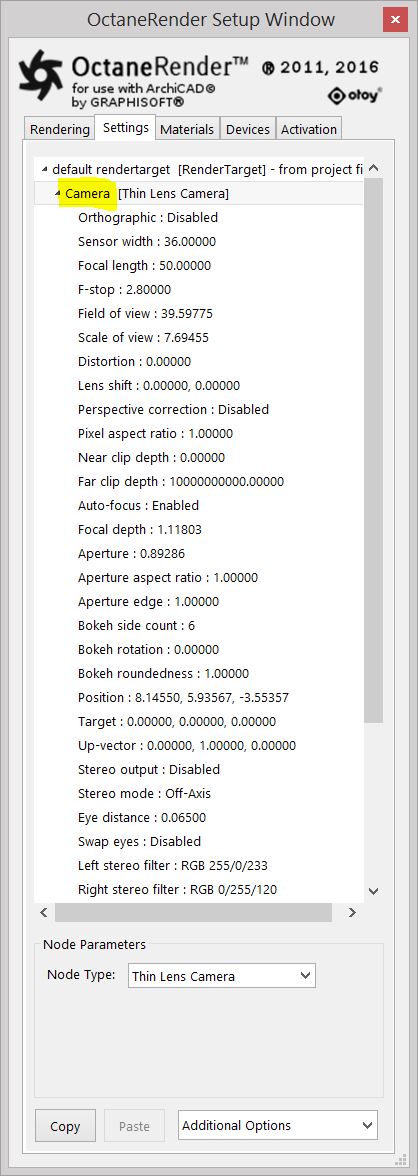
Figure below shows the node tree with Thin Lens Camera parameters.

The Thin Lens Camera parameters:
- Orthographic - If enabled, the camera will render an orthographic view. If disabled, the camera will show a perspective view.
- Position/Target/Sensor Width/Focal Length/F-stop//Scale of view - The Octane camera position, target, up vector, focal length and (Field of View) are all taken from the current ArchiCAD camera.
- F-stop - This is the aperture to focal length ratio.
- Field of View - This sets the horizontal field of view for the camera in the scene, measured in degrees. When choosing a large value, more of the scene can be seen in the camera. A smaller value will reduce the amount visible through the camera.
- Scale of View -This sets the width of the orthographic view of the camera, the units used is in meters.
- Distortion - This adjusts the spherical and cylindrical distortion. The rendered image displays the entire sphere and uses equidistant cylindrical projection also known as lat-long projection.
- Lens Shift - This is useful for architectural rendering, when users want to render images of tall buildings/structures from a similar height as the human eye, but keep the vertical lines parallel.
- Perspective Correction - If Up-Vector is vertical, enabling this option keeps vertical lines parallel.
- Pixel Aspect Ratio -This allows you to stretch or squash the disc and render to a non-square pixel format (like NTSC or PAL).
- Near Clip Depth - Distance from the camera to the near clipping plane, measured in meters.
- Far Clip Depth - Distance from the camera to where the far clipping plane starts, measured in meters.
- Auto-Focus -If enabled, the focus will be kept on the closest visible surface at the center of the image, regardless of the aperture, the aperture edge, and focal depth values. This setting is on by default.
- Focal Depth -The depth of the plane in focus, measured in meters. If you are having trouble seeing a result when you adjust this setting, double-check to make sure that Auto-Focus is enabled. Auto-Focus will override the Focal Depth setting.
- Aperture -The aperture is the radius of the lens opening of the camera used in the scene, measured in centimeters. Choosing a low value will have a wide depth of field where everything is in focus. Choosing a high value will create a shallow depth of field () where objects in the foreground and background will be out of focus.
- Aspect Ratio - This allows users to stretch/squash the Depth of Field disc.
- Aperture edge - This controls aperture edge detection at all points within the aperture. The lower values will give more pronounced edges to out of focus objects affected by a shallow depth of field (DOF) such as objects in the foreground and background. The aperture edge modifies the bokeh effect of the depth of field. A high value increases the contrast towards the edge.
- Bokeh side count – Defines the number of sides of the bokeh shape, which is usually the number of blades of the diaphragm in a camera.
- Bokeh rotation – Defines the orientation of the bokeh shape.
- Bokeh roundedness - Defines how round the bokeh shape sides should be rendered.
- Up-Vector - This is the up direction of the camera in the scene. By default this is in the Y-direction (0,1,0).
Note: the up vector is like a camera roll. 0, 1, 0 is a vector of 1m in the up direction (so pointing straight up).
- Stereo Output -This specifies the output rendered in stereo mode.
- Left: Render only the image for the left eye
- Right: Render only the image for the right eye
- Side-by-side: Renders the scene as a pair of two-dimensional images
- Anaglyphic: When active, the render will be able to be viewed with Red / Blue 3D glasses
- Over-under: The pair of two-dimensional images is placed one above the other for special viewers
- Stereo Mode - Users can enable stereo mode and choose whether to use off-axis or parallel stereo camera projections.
- Eye Distance - This is the distance between the left and the right eye in stereo mode, measured in meters.
- Swap eyes – Swaps the left and the right eye.
- Left Stereo Filter / Right Stereo Filter - The left and right filter colors used to create the anaglyphic stereo affect in the render.
The ArchiCAD Parallel Settings (i.e. used for Isometric Perspective) are not converted into OctaneRender camera and only using the ArchiCAD Perspective Settings as a non-orthographic camera can be rendered in the Octane Render Viewport.
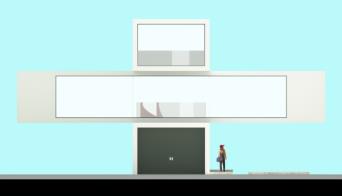
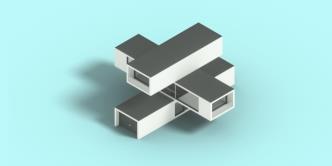
You can render Orthographically using the Thin Lens Camera and enable the Orthographic node. Now you can adjust the FOV, Scale of View to set your scene to wishes.
 ..
.. 


The image on top left show the camera rendered with Orthographic disabled. The Other two images are rendered with Orthographic enabled.
Note: the Orthographic images are rendered with Alpha channel enabled in the Kernel settings and the blue background was added in postproduction.
For interior renders, there may be situations where the camera is positioned inside a wall. In this case, increase the ‘Near clip depth’ to remove the wall from the rendered geometry.
Panoramic Camera
The Panoramic camera can be used to create 360 panorama images for or other 360 experience such as 360 Desktop viewers.
Figure below shows the node tree with Panoramic Camera parameters.

The Panoramic Camera parameters:
- Projection - Specifies the panoramic projection that should be used, with the option of either a Spherical Camera Lens or a Cylindrical Camera Lens. Single-face cube map projections are available allowing users to render only one face of the cube. This is useful for animation overlays in stereo panorama renderings.
- Position/Target/Sensor Width/Focal Length/F-stop/Field of view/Scale of - The Octane camera position, target, up vector, focal length and FOV (Field of View) are all taken from the current ArchiCAD camera.
- Horizontal Field of View - The horizontal field of view in degrees. This sets the x coordinate for horizontal field of view of the camera in the scene. This is ignored when cube mapping is used.
- Vertical Field of View - The vertical field of view in degrees. This sets the y coordinate for the vertical field of view of the camera in the scene. This is ignored when cube mapping is used.
- Keep upright - If enabled, the panoramic camera is always oriented towards the horizon and the up-vector will stay in its default direction (vertical) at (0,1,0).
- Near Clip Depth - Distance from the camera to the near clipping plane, measured in meters.
- Far Clip Depth - Distance from the camera to where the far clipping plane starts, measured in meters.
- Up-Vector - This is the up direction of the camera in the scene. By default this is in the Y-direction (0,1,0).
Note: the up vector is like a camera roll. 0, 1, 0 is a vector of 1m in the up direction (so pointing straight up).
- Auto-Focus -If enabled, the focus will be kept on the closest visible surface at the center of the image, regardless of the aperture, the aperture edge, and focal depth values. This setting is on by default.
- Focal Depth -The depth of the plane in focus, measured in meters. If you are having trouble seeing a result when you adjust this setting, double-check to make sure that Auto-Focus is enabled. Auto-Focus will override the Focal Depth setting.
- Aperture -The aperture is the radius of the lens opening of the camera used in the scene, measured in centimetres. Choosing a low value will have a wide depth of field where everything is in focus. Choosing a high value will create a shallow depth of field (DOF) where objects in the foreground and background will be out of focus.
- Aperture Aspect Ratio - This allows users to stretch/squash the Depth of Field disc.
- Aperture edge - This controls aperture edge detection at all points within the aperture. The lower values will give more pronounced edges to out of focus objects affected by the a shallow depth of field (DOF) such as objects in the foreground and background. The aperture edge modifies the bokeh effect of the depth of field. A high value increases the contrast towards the edge.
- Bokeh side count – Defines the number of sides of the bokeh shape, which is usually the number of blades of the diaphragm in a camera.
- Bokeh rotation – Defines the orientation of the bokeh shape.
- Bokeh roundedness - Defines how round the bokeh shape sides should be rendered.
- Stereo Output - Users can enable stereo mode and specify which of the following stereo output to render:
- Left: Render only the image for the left eye
- Right: Render only the image for the right eye
- Side-by-side: Renders the scene as a pair of two-dimensional images
- Anaglyphic: When active, the render will be able to be viewed with Red / Blue 3D glasses
- Over-under: The pair of two-dimensional images is placed one above the other for special viewers
- Eye Distance - This is the distance between the left and the right eye in stereo mode, measured in meters.
- Eye Distance Falloff - This controls how quickly the eye distance gets reduced towards the poles. This is to reduce eye strain at the poles when the panorama is viewed through a head-mounted display.
- Pano Blackout Latitude - This is the +/- latitude at which the panorama gets cut off when stereo rendering is enabled. This defines the minimum latitude (in spherical camera coordinates) at which the rendering is ‘blacked out’. The area with higher latitudes will be blacked out.
- Swap eyes – Swaps the left and the right eye.
- Left Stereo Filter / Right Stereo Filter - The left and right filter colors used to create the anaglyphic stereo affect in the render.
Open topic with navigation


 ..
.. 


