The Rendering Tab also contains these rendering controls and statistics.
Pause (render control button) - Pauses the render.
Play/Continue (render control button) - Continues the render (after it has been paused).
Refresh (button) - Reloads all scene geometry and materials from ArchiCAD to OctaneRender. This is used after changing elements in the ArchiCAD scene or after change in the proxies loaded.
Auto Focus Picker (AF) (button) - Click the toggle button to enable the setting of the Octane camera focal depth by clicking on an item or elements in the Viewport.
MaterialThe representation of the surface or volume properties of an object. Picker (button) - Toggles the material picker of the render viewport.
Render Region Picker (button) - Toggles the render regio lasso in the render viewport.
Lock Scene (X button) - Clicking this toggle button will means that NO changes to the scene, camera position or Octane node setup will propagate to the Viewport (means the render will continue whilst you work on the underlying scene).
NOTE. Imager and Postprocessing settings changes will not be applied whilst the Lock Scene button is ON.
Samples/Pixel (info) - Progress compared to the maximum samples to be rendered
MSamples/Sec (info) - Render speed
Video Memory: Used - Shows the GPUThe GPU is responsible for displaying graphical elements on a computer display. The GPU plays a key role in the Octane rendering process as the CUDA cores are utilized during the rendering process. Memory used by the current process.
Video Memory: Free - Shows the total GPU Memory size available, this excludes the memory size used by other applications running concurrently with OctaneRender, but includes the memory used by this process.
Video Memory: Total - Shows the total GPU Memory size available, limited to the size of that card with the least amount of VRAM present.
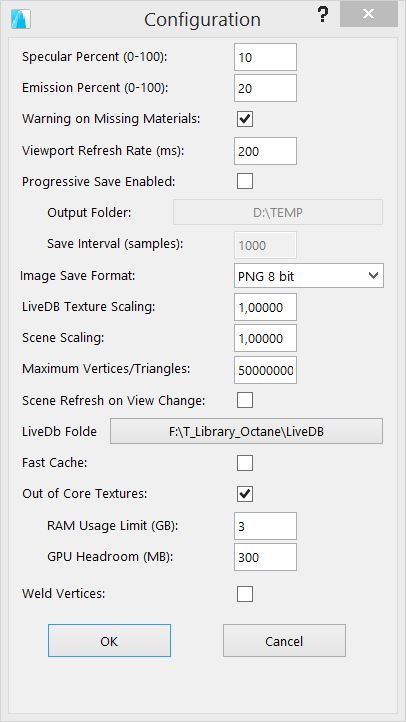
Video Memory: Out of Core - Shows how much MB Out of Core textures are loaded compared to the maximum. The RAM Usage Limit for loading maximum Out of Core textures is set in:
Settings Tab>Additional Options>Configuration>Out of Core TexturesTextures are used to add details to a surface. Textures can be procedural or imported raster files.
Figure 1: The Out-Of-Core Texture Settings
Time Elapsed/Est Total - Time elapsed and the time remaining for completion
Num LDR/HDR Textures (info) - These indicators show the number of texture map slots that the render is using on your video card. If you are using more than the available slots (for example RGB: ‘72/64’), then you will need to reduce that number of texture maps being used by the scene.
Num Meshes (info) - Geometric statistic about how many Meshes are stored in the GPU.
Num Triangles (info) - Geometric statistic about how many Triangles are stored in the GPU.
Resolution Lock (button) - If this button is ON, then the resolution of the render is controlled by the Settings Tab resolution settings.
If it is OFF, then the render resizes to the Viewport size (and you can resize the Viewport by stretching the window).
Save (button) - Saves the current render in the Viewport to file. The file type is determined by the Image Save Format in the Configuration screen.
Export (button) - You can export the total scene to an OCS or ORBXThe ORBX file format is the best way to transfer scene files from 3D Authoring software programs that use the Octane Plug-in such as Octane for Maya, Octane for Cinema 4D, or OctaneRender Standalone. This format is more efficient than FBX when working with Octane specific data as it provides a flexible, application independent format. ORBX is a container format that includes all animation data, models, textures etc. that is needed to transfer an Octane scene from one application to another. file (i.e. to open in the Standalone).
Help (button) - This button will guide you to the Documentation PortalA technique that assists the render kernel with exterior light sources that illuminate interiors. In interior renderings with windows, it is difficult for the path tracer to find light from the outside environment and optimally render the scene. Portals are planes that are added to the scene with the Portal material applied to them.: https://docs.otoy.com/Portal/Home.htm
Hide Viewport (button) - Clicking this button will not close the OR Viewport, but will hide it.
Restore Viewport (button) - Clicking this button will Restore the hidden Viewport.
Clay Mode (input) - Change clay render Modes (for Beauty Render Pass only).
Shutter Speed (ms) (input) - This Animation Setting is used to control the shutter interval.
Refer to sections ‘Rendering’ → ‘Animation’ and ‘Effects → Motion BlurAn optical phenomenon that occurs when a camera’s shutter opens and closes too slowly to capture movement without recording a blurring of the subject.’.
Render Pass (input) - Select the Render Pass to show in the OctaneRender Viewport.
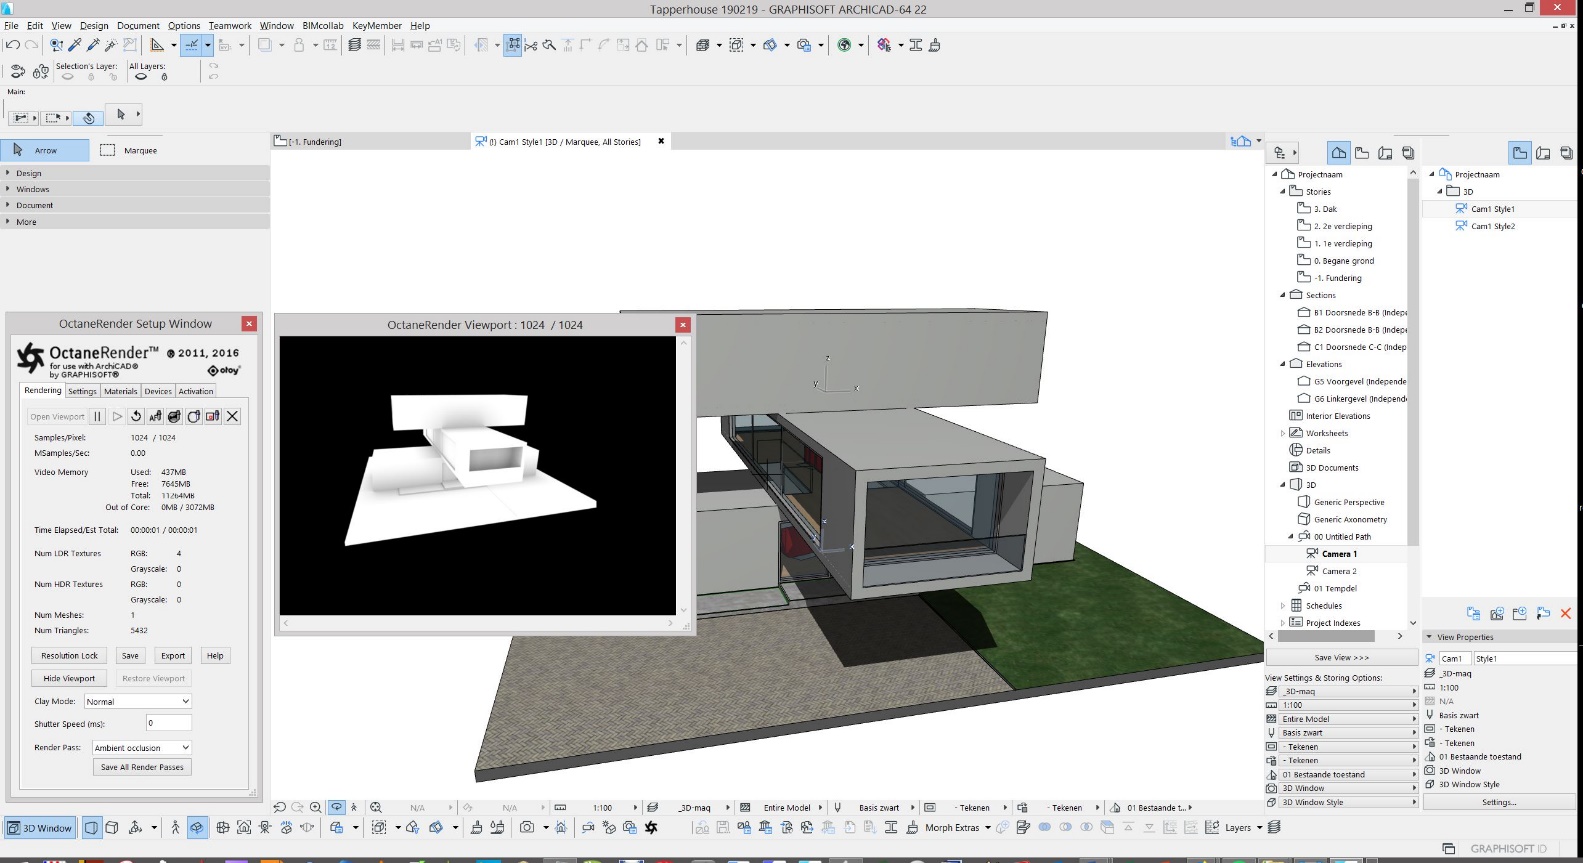
Figure 2: Example showing the Ambient Occlusion Render Pass
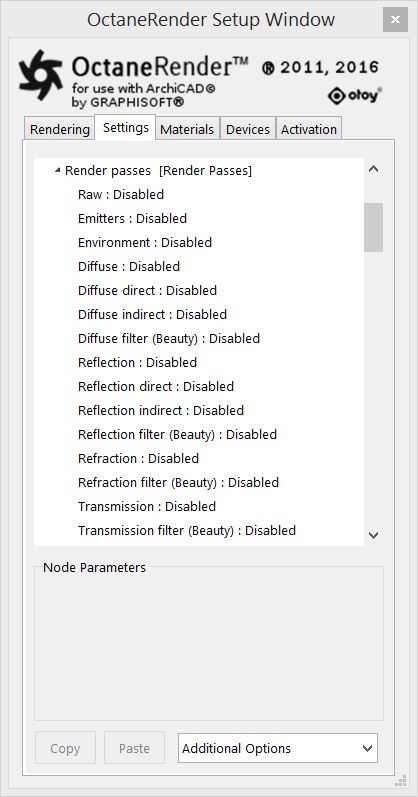
Note: The render passes to show up here can be set in:
Settings Tab → Render PassesRender passes allow a rendered frame to be further broken down beyond the capabilities of Render Layers. Render Passes vary among render engines but typically they allow an image to be separated into its fundamental visual components such as diffuse, ambient, specular, etc.. → Choose Render Pass Disabled or Enabled
Save All Render Passes (button) - Save all selected Render Passes as an *.exr file.
Note: Also known as OpenEXR. This image file format was developed by Industrial Light & Magic and provides a High Dynamic Range image capable of storing deep image data on a frame-by-frame basis.
Photoshop can read EXRAlso known as OpenEXR. This image file format was developed by Industrial Light & Magic and provides a High Dynamic Range image capable of storing deep image data on a frame-by-frame basis. files. GIMP (open source) needs a third-party plugin to be able to read exr.