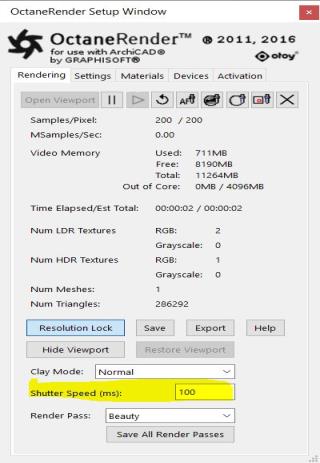
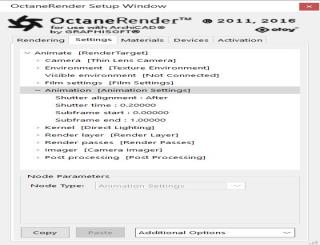
|Figure 1: ’Shutter Speed’ settings in the ’Rendering Tab’ and ’Animation’ Settings in the ’Settings Tab’.
Motion BlurAn optical phenomenon that occurs when a camera’s shutter opens and closes too slowly to capture movement without recording a blurring of the subject. is an optical phenomenon that occurs when a camera’s shutter opens and closes too slowly to capture movement without recording a blurring of the subject.
There are 3 types of motion blur:
Note: Both Object and Vertex motion blur should better be done in the Octane Standalone.
Camera motion blur works for Fly-Throughs within the plugin. You can create a Camera Motion Blur by adjusting the ’Animation’ Settings in the ’Settings Tab’ and the ’Shutter Speed’ settings in the ’Rendering Tab’. The combination of both determines your result and you might try some low resolution first to see if your settings are good for rendering the final animation.
For more about creating an animation refer to section ‘Rendering ’→ ’ PhotoRendering’ → ’Animation’.
|Figure 1: ’Shutter Speed’ settings in the ’Rendering Tab’ and ’Animation’ Settings in the ’Settings Tab’.
The Shutter time does have effect on the result rendering in the plugin. The other Animation Settings are not relevant for the ArchiCAD plugin - they are only used if you export the scene to ORBX and then load into Octane Standalone.
Shutter Speed (ms) (input) - This Animation Setting is used to control the shutter interval. Default the Shutter Speed value to 0 and does not generate a motion blur. Setting the Shutter Speed value to 1 or higher will add a motion blur to the saved animation images.
Note:
In the Standalone the Shutter Speed value is relative to the frame time which is set in the time slider via the FPS option. In ArchiCAD the frame time is set in the Camera Path options.
I.e. Setting the in-between Frames (in the Motion Resolution) to 50 will mean 2 seconds for a 25fps animation.
The Camera path is created by the Camera Tool. Placed cameras along this path are defined as key frames, and the number of images between each camera is set by the in-between frames (defined at Camera Path Options). Only one camera path will be active at a time (cameras and their markers visible on the Floor Plan). Use Camera Tool to select the active Camera path.
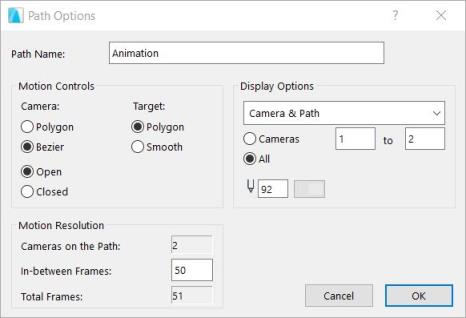
Figure: ArchiCAD Camera Path Options.
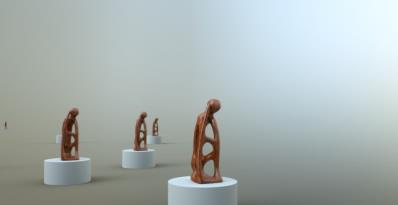
The next examples show blur effect using different settings:
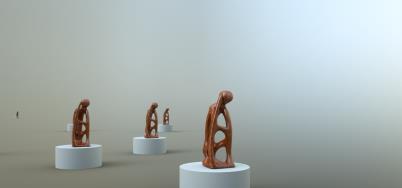
 ← Shutter Speed 0, Shutter Time 0.0
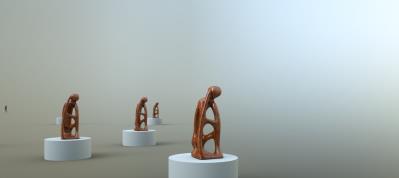
 ← Shutter Speed 200, Shutter Time 0.0
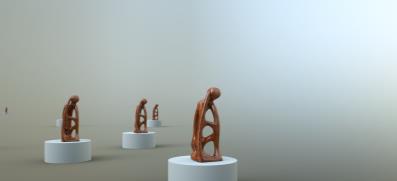
 ← Shutter Speed 0, Shutter Time 1.0
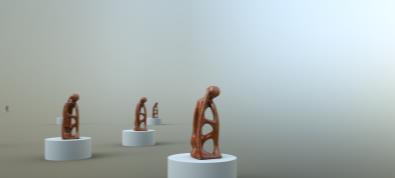
 ← Shutter Speed 5, Shutter Time 0.1
 ← Shutter Speed 5, Shutter Time 0.5
 ← Shutter Speed 500, Shutter Time 0.5
 ← Shutter Speed 5, Shutter Time 1.0
 ← Shutter Speed 1000, Shutter Time 1.0