
Beauty Passes provide a rendered view of different aspects lighting the scene such as shadows, highlights, reflections, illumination, and color. Beauty passes are rendered together with the main beauty pass. Each one of these requires its own frame buffer that needs to be stored in addition to the main frame buffer. Beauty Passes include:
Raw rendering allows more control over the final look in post-production. Toggling the raw passes does not restart the render. Figure 1 shows the beauty passes selected in the Render Passes settings.
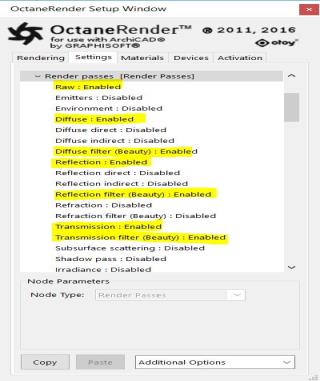
Figure 1: Some Beauty passes are activated in the Render PassesRender passes allow a rendered frame to be further broken down beyond the capabilities of Render Layers. Render Passes vary among render engines but typically they allow an image to be separated into its fundamental visual components such as diffuse, ambient, specular, etc.. settings
These passes can be composited (In Photoshop, Nuke or otherwise) together by multiplying the raw pass with its matching filter pass:
Figure 2 shows what a sample composition looks like in Nuke using the above passes.
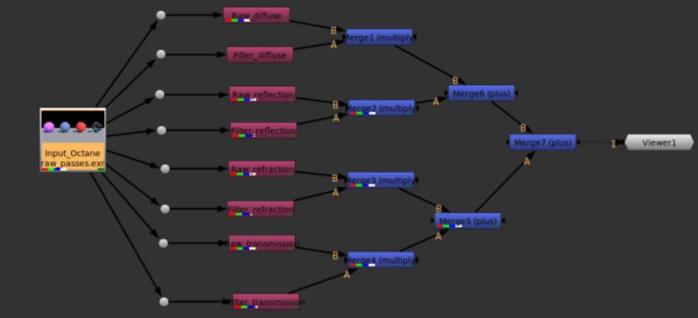
Figure 2: A sample composition in Nuke using the above passes
To get a good result, make sure that all images are saved as HDR EXR files with linear color space (i.e., gamma is 1 and linear camera response).
You can also save the Render Passes one by one (Save Button) and use them individually in software for post-production.
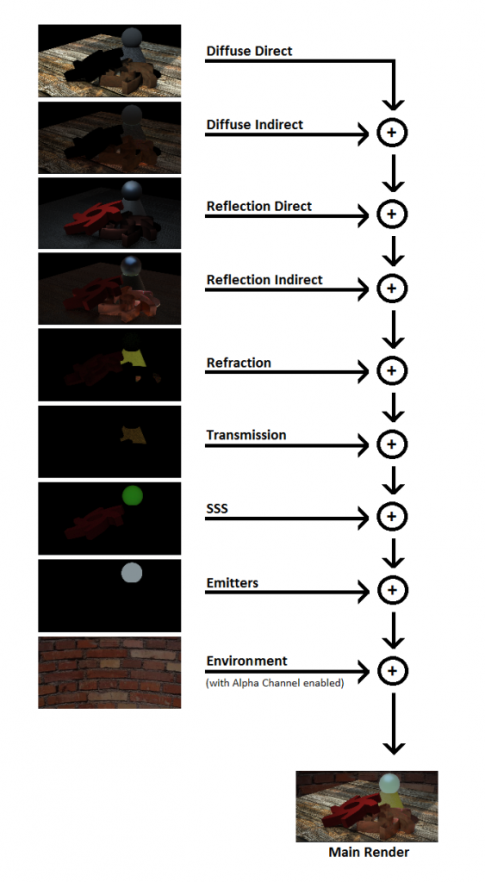
Figure 3: Reassembling the basic Beauty passes with the additive blend mode in third-party compositing applications
This pass contains all direct light shadows that are calculated on the first path bounce. The pass includes sun light provided by the Daylight Environment node. The Shadow pass excludes the sky light (a.k.a Octane Sun+Sky environment) or texture environment if the texture environment does not consist of an image. If the environment node contains a sky light or texture environment that is contributed by an image texture, the pass takes the value in the Environment node's Importance Sampling attribute into account. Make sure to enable Importance Sampling in the Environment node to include the sky light or texture environment in the Shadow pass.

Figure 4: A scene with an Octane Sun+Sky environment is rendered with a Shadow pass twice for comparison. The resulting passes with Importance sampling enable and disabled are compared
This pass is used to observe the rendering progress through the noise estimate value when Adaptive Sampling is used with the Path Tracing or Direct Light Kernels. A pixel is treated as "noisy" if the noise level is higher than the given threshold. When the noise estimate for a pixel becomes less than the given noise threshold, the value is a green color which also switches off sampling for that pixel and tells the rendering process to concentrate on other areas.
This pass shows which pixels have noise lowered down to the specified noise threshold as the rendering progresses. Note that Adaptive sampling considers all attributes of nodes in the scene such as Environment Importance Sampling and this will be evident in the progress of the noise pass (Figure 5). If Adaptive SamplingA method of sampling that determines if areas of a rendering require more sampling than other areas instead of sampling the entire rendering equally. is not enabled, the noise estimate value is black.
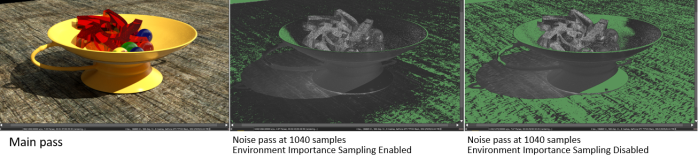
Figure 5: A scene with an Octane Sun+Sky environment is rendered with a Noise pass. The progress of the noise passes with Importance sampling enable and disabled are compared