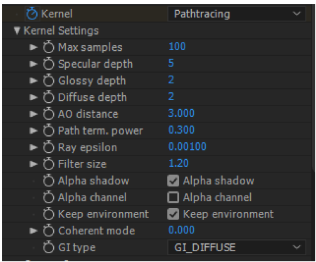
Path Tracing is best used for realistic results. The render times are higher than Direct Lighting but the results can be photorealistic. It can have some difficulties with small light sources and proper caustics (Figure 1).
Figure 1: The Path Tracing Kernel Settings.
Path Tracing Kernel parameters:
Maximum Samples
This sets the maximum number of samples per pixel before the rendering process stops. The higher the number of samples per pixel, the cleaner the render. For quick animations and scenes with predominantly direct lighting, a low amount of samples (500-1000) may suffice. In scenes with lots of indirect lighting and mesh lights, a few thousand samples may be required to obtain a clean render.
SpecularAmount of specular reflection, or the mirror-like reflection of light photons at the same angle. Used for transparent materials such as glass and water. Depth
The maximum depth upon which rays (reflections/refractions) passing through specular objects are traced. This may be used to prevent transparent objects from causing dark outline in scenes.
GlossyThe measure of how well light is reflected from a surface in the specular direction, the amount and way in which the light is spread around the specular direction, and the change in specular reflection as the specular angle changes. Used for shiny materials such as plastics or metals. Depth
The same as diffuse depth but for low roughness surfaces like reflections or refractions.
DiffuseAmount of diffusion, or the reflection of light photons at different angles from an uneven or granular surface. Used for dull, non-reflecting materials or mesh emitters. Depth
Gives the maximum number of diffuse reflections if GI Mode is set to Diffuse.
AO Distance
The distance of the ambient occlusion in units. Always check if the amount is correct related to scene scale. For example you don’t need an amount of “3″ units if your object is a small toy. However, if your model is a house or something large, you can increase the value.
Path Termination Power
This parameter provides a system to tweak samples/second vs. convergence (how fast noise vanishes). Increasing this value will cause the kernels to keep paths shorter and spend less time on dark areas (which means they stay noisy longer) but may increase samples/second. Reducing this value will cause kernels to trace longer paths on average and spend more time on dark areas. In short, high values increases the render speed but may lead to higher noise in dark areas.
This parameter provides a system to tweak samples/second vs. convergence (how fast noise vanishes). Increasing this value will cause the kernels to keep paths shorter and spend less time on dark areas (which means they stay noisy longer) but may increase samples/second. Reducing this value will cause kernels to trace longer paths on average and spend more time on dark areas. In short, high values increases the render speed but may lead to higher noise in dark areas.
Ray Epsilon
The ray epsilon is the distance to offset new rays so they don’t intersect with the originating geometry. If the scale of a scene is too large, precision artifacts in the form of concentric circles may appear. In that case, increasing the ray epsilon can make these artifacts disappear.
Filter Size
This sets the pixel size for filtering the render. This can improve aliasing artifacts in the render. Noise can also be reduced this way, but if the filter is set too high, the image can become blurry.
Alpha Shadows
This setting allows any object with transparency (specular materials, materials with opacity settings and alpha channels) to cast a proper shadow instead of behaving as a solid object.\
Alpha ChannelA greyscale image used to determine which areas of a texture map are opaque and which areas are transparent.
This option removes the background and renders it as transparent (zero alpha). This can be useful to composite the render over another image without the background being present.
Keep Environment
This option is used in conjunction with the Alpha Channel setting. It allows the background to be rendered with zero alpha but is still visible in the final render. This allows even further flexibility in compositing images.
Coherent Ratio
When Coherent mode is enabled either for Path Tracing or Direct Lighting the render becomes noise free faster but the downside is flickering when rendering animations. For stills and action-heavy animations, Coherent mode might save some time.
GI Type
There are three GI type to choose from; GI_Diffuse, GI_Ambient Occlusion, GI_None. This parameter is most useful when the Direct Lighting kernel is selected.