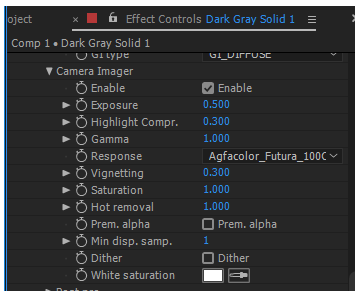
Figure 1: The Camera Imager parameters .
The Camera Imager settings provide useful parameters for post-rendering adjustments.
Figure 1: The Camera Imager parameters .
The Camera Imager parameters:
Exposure
Controls the exposure of the scene. Smaller values will create a dark scene while higher values will brighten the scene. Note also that exposure has no effect on any of the render layer passes.
Highlight Compression
This reduces burned out highlights by compressing them and reducing their contrast.
Response
A list of measured camera response curves can be selected from this drop menu.
GammaThe function or attribute used to code or decode luminance for common displays. The computer graphics industry has set a standard gamma setting of 2.2 making it the most common default for 3D modelling and rendering applications.
Adjusts the gamma of the render and controls the overall brightness of an image. Images that are not properly corrected can look either bleached out or too dark. Varying the amount of gamma correction changes not only the brightness, but also the ratios of red to green to blue.
Vignetting
Increases the amount of darkening in the corners of the render. Used sparingly, it can greatly increase the realism of the render. Note also that vignette is not applied to any of the beauty passes except the main pass.
Saturation
Adjusts the amount of color saturation of the render.
Hot Pixel Removal
The Hot Pixel Removal slider is used to remove the bright pixels (fireflies) during the rendering process. While many of the pixels can disappear if the render is allowed to progress, the Hot Pixel Removal feature allows the bright pixels to be removed at a much lower Sample per Pixel.
Pre-multiplied Alpha
Checking the Pre-multiplied Alpha button multiplies any transparency value of the output pixel by the pixels color.
Dithering
Adds random noise which removes banding in very clean images.
White Saturation
When the sun is too bright, it can create multicolored reflections. Increasing this value will change the colors to white. This is also applicable to all sources of light. Fully saturated parts of the render can be pushed towards pure white with this option. This helps avoid large patches of fully saturated colors caused by over-bright light sources such as very bright colored emitters or reflected sunlight off colored surfaces.
Minimum Display Samples
This is minimum amount of samples that is calculated before the image is displayed. This feature can significantly reduce the noise when navigating and is useful for real-time walkthroughs. When using multiple GPUs, it’s recommended to set this value as a multiple of the number of available GPUs for rendering, e.g. if rendering with 4 GPUs, set this value at 4 or 8.