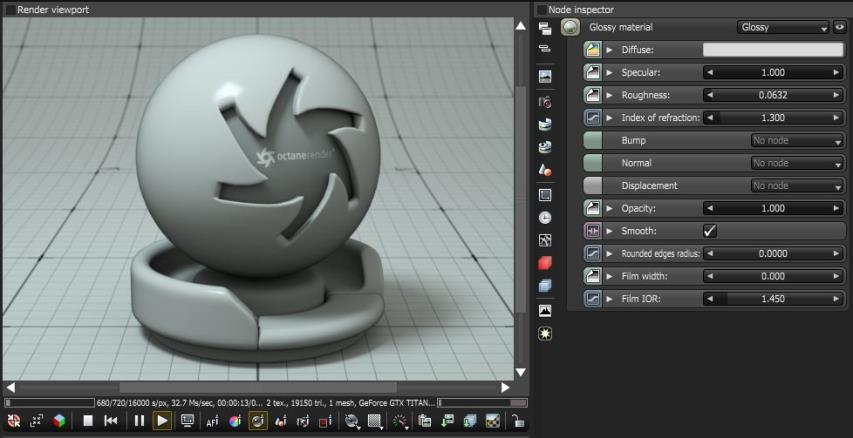
Figure 1: The Glossy materialUsed for shiny materials such as plastics or metals. and its associated parameters.
The GlossyThe measure of how well light is reflected from a surface in the specular direction, the amount and way in which the light is spread around the specular direction, and the change in specular reflection as the specular angle changes. Used for shiny materials such as plastics or metals. material is used for shiny materials such as plastics or metals.
Figure 1: The Glossy materialUsed for shiny materials such as plastics or metals. and its associated parameters.
Glossy materials have these parameters to adjust:
DiffuseAmount of diffusion, or the reflection of light photons at different angles from an uneven or granular surface. Used for dull, non-reflecting materials or mesh emitters.
The value gives the material its color.
Roughness
The roughness determines the sharpness of the reflection that will be present on the surface of the specular material. The reflection becomes more blurry as the roughness value increases. The lowest value, 0.0, will produce the sharpest and mirror-like reflection.
Specularity
The value determines the amount of specularity on the mesh. Specularity contributes to the reflective attributes of the material which in turn is also largely affected by the Index of Refraction (index attribute) and its Roughness. For example a glossy node with a black diffuse, 0 roughness and an index 0, will produce a perfect mirror.
Film Width
This controls the thickness of a optical, thin film on the material. This is useful in creating rainbow or oil slick effects.
Film Index
This controls the Index of Refraction of the thin film.
Bump/Normal
Both the Bump and Normal channels can load images to control the amount of bump mapping and normal mapping. The Bump channel should be set to floatimage to load a bump map. The Normal channel should be set to the image data type to load a full color normal map. The Bump channel simulates a relief using a greyscale texture interpreted as a height map while the Normal Channel distorts normals using an RGB image. Note that Normal maps take precedence over bump maps, therefore you can not use both a normal map and a bump map at the same time.
Opacity
Opacity sets the transparency of the material. Set the data type to alphaimage (if the image has an alpha channel), or floatimage(for black/white images) to load an image to set the transparency. Use the Invert checkbox if necessary to adjust whether black or white regions are considered transparent.
Normal Smoothing
Normal Smoothing is a Boolean value that sets whether to smooth the normals of all meshes sharing that material. When off, the materials can be faceted and polygonal.
Index of Refraction
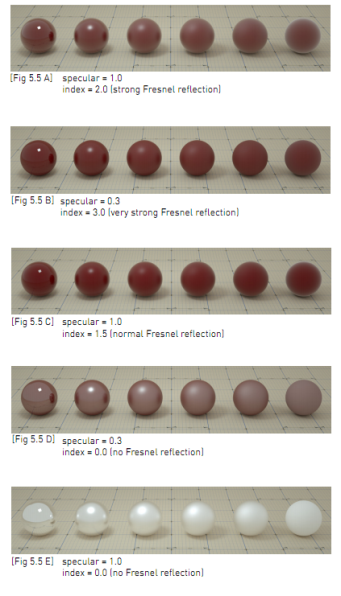
Index of refraction sets the fresnel effect applied on the glossy material. Setting a value smaller than 1.0 will disable the fresnel effect, so the glossy color will be the color in the glossy input pin, regardless of viewing angle. When selecting a value of 1.0 or bigger, the glossy reflection color will be modulated according to the fresnel law: at grazing angles the color will be the color set in the glossy input pin, at perpendicular angles it will be darker. Fresnel reflection produced becomes stronger as the index of refraction is set higher.
If a surface has a measured index of refraction, set the glossy color to 1.0.
In the following examples, the six balls have roughness 0, 0.2, 0.4, 0.6, 0.8, 1.0 (left to right) and only the specular value and index of refraction have been modified for each rendered image:
Edges Rounding
This is the radius of the rounded edges that are rendered as a shading effect. The shading effect is created at render time that easily and efficiently round the sharp edges of geometric objects without modifying and reloading the geometry. The parameter is a float value and requires vertices to be welded prior to applying the round edge value. This is very useful to virtually bevel hard edges during render time especially when using low-polygon models.
DisplacementThe process of utilizing a 2D texture map to generate 3D surface relief. As opposed to bump and normal mapping, Displacement mapping does not only provide the illusion of depth but it effectively displaces the actual geometric position of points over the textured surface.
The displacement mapping allows the height of points on a surface to be adjusted based on an image value to give objects depth and detail. The displacement is a pin in the material nodes that needs to be connected to a displacement node. A displacement texture can be specified in the displacement node, as well as the amount of displacement (in meters), the offset (in meters) and the level of detail (i.e. the maximum resolution of the resampled displacement map). Image textures are supported and of RGBA images the red channel is used as height map.
Displacement only works with the texture image node over a mesh with an UV map. No other Octane nodes can be used for displacement.