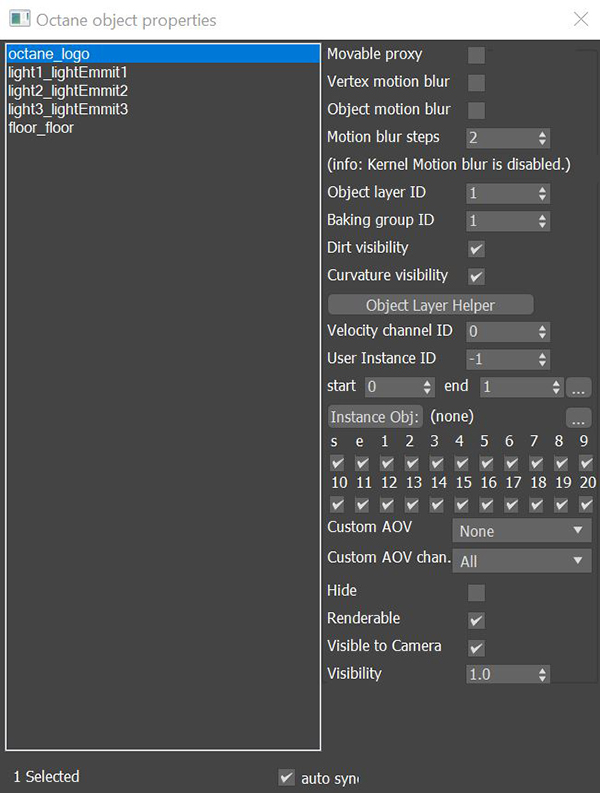
This option opens the Octane Object Properties window. You can also open this window by right-clicking on an object in the scene. The window provides a list of all objects in a scene along with a set of parameters that you can edit for each scene object (figure 1).
Figure 1: The Octane Object Properties window
Movable ProxyAn object saved as a separate file with the purpose of being reused in larger scenes. This is used to minimize any addition to the total polygon count in the scene, especially if the scene requires the same object to appear several times. If used in conjunction with instancing, Proxies help keep very large scenes from reaching polygon limits and also keeps the relative file size of the main project file manageable. - Allows real-time updates in the OctaneRender® Viewport for OctaneRender proxies that change in a scene. Unchecked, it will ignore any updates to the object, which can noticeably affect the updating process on large scenes. This is required for instanced objects will can help manage memory more efficiently.
Vertex Motion BlurAn optical phenomenon that occurs when a camera’s shutter opens and closes too slowly to capture movement without recording a blurring of the subject. - Enable this option if you need motion blur and the object contains vertex-level deformations.
Object Motion Blur - Enable this option if an object does not have any deformation animation, but the object is moving or rotating. If the object contains deforming animation, then enable both Object Motion Blur and Vertex Motion Blur for the Object.
Motion Blur Steps - Determines how many steps before and after the current frame OctaneRender applies motion blur. If you have fast curved objects moving, then increase this value.
Object Layer ID - Works with render layers. for more information, see the Render LayersRender layers allow users to separate their scene geometry into parts, where one part is meant to be visible and the rest of the other parts “capture” the side effects of the visible geometry. The layers allow different objects to be rendered into separate images where, in turn, some normal render passes may be applied. The Render layers are meant for compositing and not to hide parts of the scene. topic in this manual.
Baking Group ID - This ID type works with the texture baking process. For more information, see the Texture BakingA process in which scene lighting is "baked" into a texture map based on an object's UV texture coordinates. The resulting texture can then be mapped back onto the surface to create realistic lighting in a real-time rendering environment. This technique is frequently used in game engines and virtual reality for creating realistic environments with minimal rendering overhead. topic in this manual.
Dirt Visibility - Enabled by default. Set to false to prevent object from being evaluated by a Dirt Texture node applied to other objects in a scene.
Curvature Visibility - Enabled by default. Set to false to prevent object from being evaluated by a Curvature Texture node applied to other objects in a scene.
Object Layer Helper - Creates and edits an Object Layer Helper in the scene. When you use a Baking camera, this helper lets you edit the Baking transform matrix.
Velocity Channel ID - The ID for the channel containing vertex velocity information.
User Instance ID - Set the instance IDs for all instances of the same Object. This is done by selecting an Instance Object as the first instance, then specifying the Start and End parameters according to the number of instances present. Clicking on the ellipses provides options as to the order that the IDs are applied to each corresponding instance. This parameter's value is -1 by default. Used with Instance Color and Instance Range Nodes.
Instance Obj - This is an instance conversion tool.
S, E & 1 - 20 - These parameters specify light passes where S is for Sunlight, E is for Environment, and 1 - 20 are regular OctaneRender light ID flags. By default, all of these flags are active. If, for example, there is an OctaneRender light in the scene, its Light Pass ID is set to 2, and the 2 flag is deactivated in an Object's Octane Object Properties, that light will not illuminate the object.
Custom AOV - Adds a mask to the object as a custom AOV that can be rendered along with other AOVs using Octane's AOV system.
Custom AOV Chan. - Determines which channel will contain the mask.
Hide - Hides the object in both the viewport and the render window.
Renderable - Hides the object in the render window.
Visible to Camera - Makes the object invisible to the camera but renders its shadow.
Visibility - Allows for a varying level of visibility instead of simply switching the visibility of the object on or off.
auto sy.. - Automatically sync your selection to the Max explorer window.