The options for adding GPUThe GPU is responsible for displaying graphical elements on a computer display. The GPU plays a key role in the Octane rendering process as the CUDA cores are utilized during the rendering process. muscle to a computer depends on its available PCI-E slots.
OctaneRender® can handle 200 concurrent GPUs with enterprise all access as long as they're set up as CUDA® devices. It does not need to be SLI-enabled to detect additional GPUs in the machine, and it is not recommended for render engines - OctaneRender runs much better without it because it can't differentiate GPUs accessible from the local area network or in the PC's PCI-E slots.
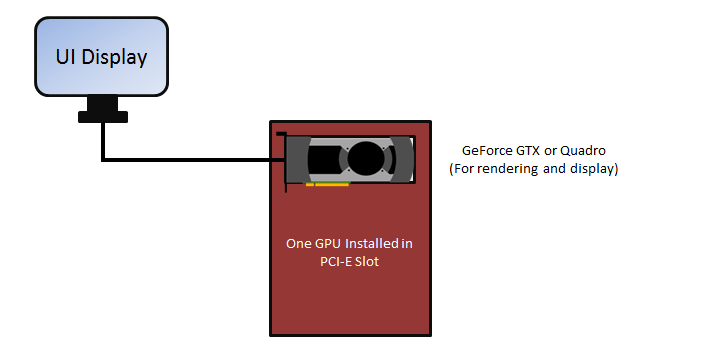
If the computer has a single PCI-E slot, there are not many options to extend rendering performance. You could add a more powerful GPU, as long as the power supply can provide enough power for it. Dual-GPU, single-slot card solutions can work, assuming that the power supply is sufficient to power the video card.
Figure 1: Single PCI-E slot configuration
If the computer has two PCI-E slots, then you have more expansion options. If the power supply is sufficient, you can dedicate one GPU to the OS display, and then dedicate two or more GPUs for rendering. For the smoothest user experience with OctaneRender, we recommend dedicating one GPU for the display and OS to avoid slow and jerky interaction and navigation. The dedicated video card could be a cheap, low-power card since it will not be used for rendering, and it should be disabled under CUDA devices in Device Manager > Preferences.
In this situation, we recommend matching the rendering GPUs in model and VRAM size. You can do multi-GPU rendering, but the OS interface may still be slow as all the GPU processing power is dedicated to the rendering process. In multi-GPU setups, the amount of RAM available to OctaneRender is not equal to the sum of the VRAM on the GPUs, but it is restricted to the GPU with the smallest amount of VRAM. We recommend disabling GPUs that don’t have enough VRAM in order to render large scenes that can fit in the remaining GPU's VRAM.
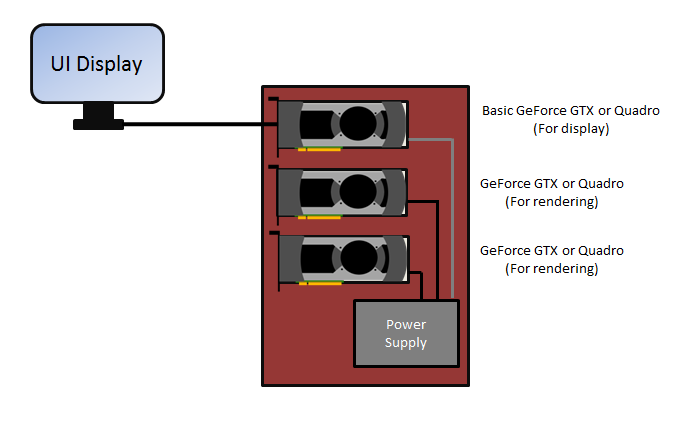
Figure 2: Multiple PCI-E slot configuration
If a local area network is available, then you have many additional upgrade options. However, this requires each render node machine in the network to have its own designated OctaneRender license.
Just like in a multi-GPU setup, it is best to have the GPUs match in model and VRAM size. You can do multi-GPU rendering, but the OS interface may still be slow as all the GPU processing power is dedicated to the rendering process. The amount of RAM available to OctaneRender is not the total amount of VRAM from your GPUs, but it is the amount of VRAM from your smallest GPU. We recommend disabling GPUs that don’t have enough VRAM in order to render large scenes that can fit in the remaining GPU's VRAM.
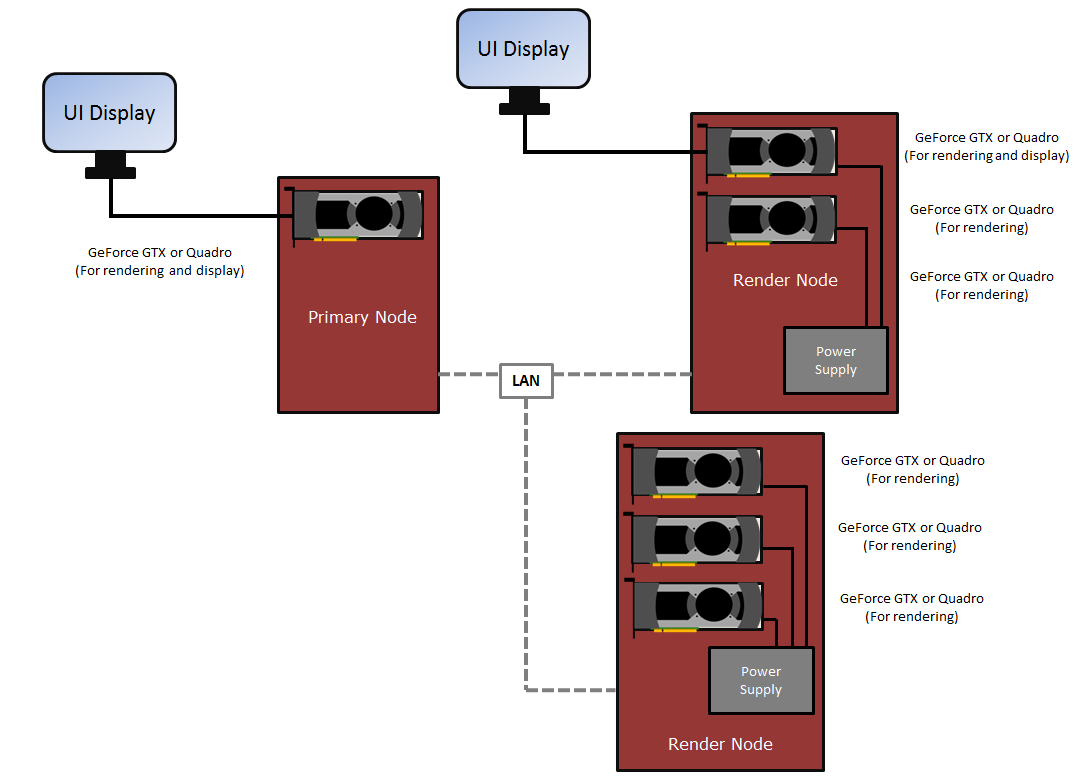
Figure 3: Networked GPU configuration
NVLink® lets you double your VRAM by combining two cards into one pool of fast shared (not mirrored) memory. NVLink works with two cards, both of which need to be Quadro® or Geforce® RTX cards. Make sure that you use the bridge over your cards (Figure 4), otherwise you may experience a large performance drop.

Figure 4: Example of a 3-slot NVLink bridge connecting two Quadro cards
To use NVLink with non-Quadro GPUs, enable SLI mode from the NVIDIA® Control Panel.
To use NVLink with Quadro GPUs, set the GPUs as Tesla Compute Cluster (TCC) devices. You can do this from the command line window with administrative privileges by running the nvidia-smi command within the NVSMI default folder ( C:\Program Files\NVIDIA Corporation\NVSMI). The nvidia-smi command generates a table that displays your GPUs and what mode they are using (Figure 5).
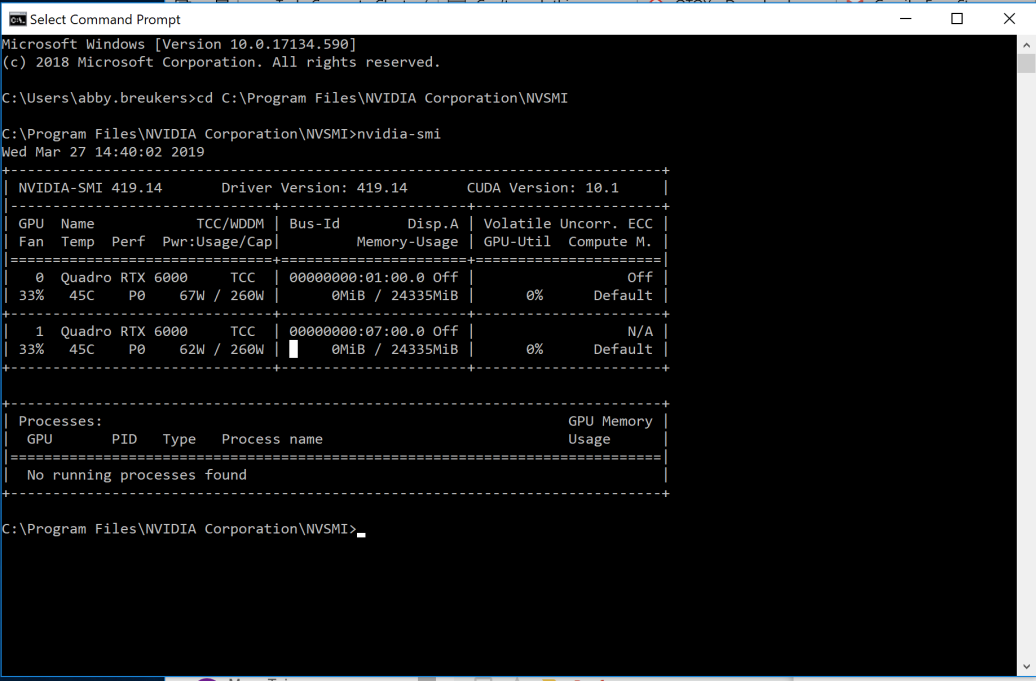
Figure 5: Table showing the devices in the machine, including the GPU ID and the mode of each device
To change the mode, use the following syntax in the command line:
nvidia-smi -g {GPU_ID} -dm {0|1}
Where, 0 = WDDM and 1 = TCC.
This command switches the first Quadro GPU to WDDM mode:
C:\Program Files\NVIDIA Corporation\NVSMI\nvidia-smi -g 0 -dm 0
This command switches the first Quadro GPU to TCC mode:
C:\Program Files\NVIDIA Corporation\NVSMI\nvidia-smi -g 0 -dm 1
When the devices are set and NVLink is installed, you can combine p2p video memory. This is evident in the OctaneRender Devices tab under File > Preferences (Figure 6). The device's Preferences window shows status info per device (Figure 7), not the total VRAM memory combined. OctaneRender uses p2p when the the primary device's VRAM is maxed out.
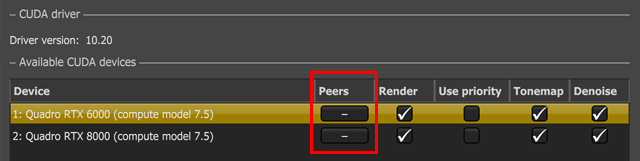
Figure 6: You can specify VRAM pooling peers for NVLink®-enabled devices
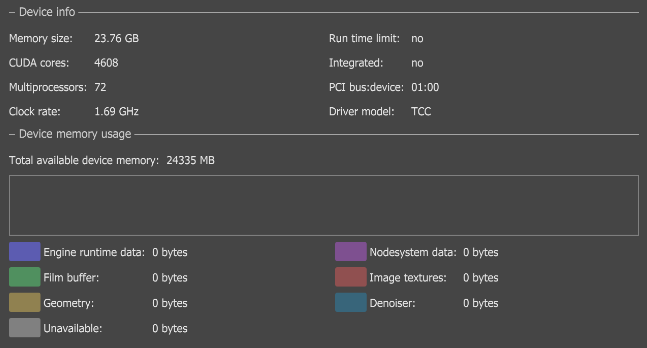
Figure 7: Device Info in the Preferences window shows info per device
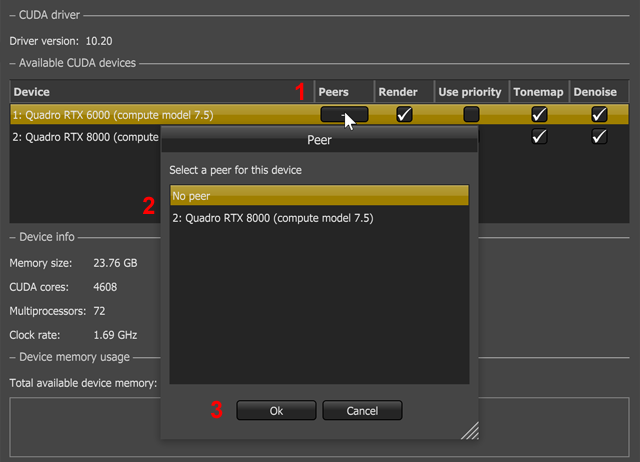
Figure 8: Setting the peers for the NVLink®-enabled devices

Figure 9: An example showing that device 1 is peered to device 2 and vice-versa
Note: You can't connect a display or monitor to the GPU adapters when the underlying devices are running in TCC mode. This causes unpredictable behavior, and may result in having to reboot the entire system.